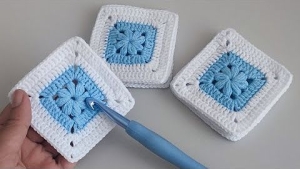
Hello, my dear friend, and welcome to Grandma’s Crafts! If you enjoy crochet squares with a little texture, this one is a lovely project to spend some time with. Its eight elongated puff stitches gather in the center, while a simple white frame gives the square a tidy finish.
Pink and white make such a gentle combination here. Keeping the center and its first surrounding round in the same color lets the raised stitches stand out without making the design feel busy. The white border gives each square a clear outline when you place several together.
You will work just four rounds for this version. The first creates the puff center, the second turns that circle into a square, and the last two build the white frame. Once you understand how the corners alternate with the side groups, the construction becomes much easier to follow.
Before starting a bigger project, give yourself one little square to practice. Take your time with the elongated loops, check the counts as you go, and see how your yarn behaves after blocking. That first sample will also help you plan the size of a cushion panel or blanket.
Finished Measurements
The finished size depends on your yarn, hook, puff height, and tension. Make and block one sample, then measure it from edge to edge before planning your project.
Yarn requirements depend on your chosen yarn and the number of squares you make.
Pattern Note
This four-round pattern is a reconstruction of the photographed construction, rather than a verified transcription of the original tutorial. It uses five draw-up movements per puff and ch-2 corner spaces. The round counts have been checked mathematically, but the pattern has not been tested with yarn. Crochet one sample before making a batch.
Materials
Pink and white yarn of the same weight and preferably the same fiber.
A crochet hook suited to your yarn. A 3.5 mm hook is shown in the construction photos; select the size that works with your own yarn.
Scissors.
A tapestry needle.
Four removable stitch markers, optional, for marking the corners.
Choose a smooth yarn for your first sample so the stitch tops are easy to see.
Work in joined rounds with the right side facing you throughout. Do not turn.
In Rounds 2–4, the beginning ch 3 counts as one dc. Join each of those rounds into the third chain of the beginning ch 3. Do not work into the joining slip stitch.
The chain used to close a puff is part of the puff stitch. The two additional chains between puffs form the spaces used in Round 2.
When checking the sides, count the dc between two corner spaces. Each stitch belongs to one side only.
How to Make the Elongated Puff Stitch
With one loop on your hook, draw that loop up to your desired puff height.
Yarn over.
Insert your hook into the ring.
Yarn over and draw up a loop to the same height as the first loop.
Repeat this yarn-over and draw-up movement four more times.
You should now have 11 loops on your hook.
Yarn over and draw through all 11 loops. Ch 1 firmly to close the puff. This closing chain is already included whenever the pattern says “puff.”
Keep all five draw-up loops the same height. For the first puff, begin with the working loop on your hook rather than a ch-3 rise.
If drawing through the loops is difficult, loosen your tension slightly. Avoid tightening the elongated loops before closing the stitch.
Round 1: Make the Pink Puff Center
Using pink yarn, make a magic ring.
Work one elongated puff into the ring, then ch 2.
Repeat [one puff into the ring, ch 2] seven more times.
You will have eight puffs, each followed by a ch-2 space. Carefully pull the magic ring closed.
Join with a sl st into the closing ch-1 at the top of the first puff. Keep the pink yarn attached.
Round 1 check: 8 puffs and 8 ch-2 spaces.
The center is still circular at this stage. Before continuing, make sure you can identify all eight spaces between the puffs.
Round 2: Turn the Center into a Square
Sl st into the first ch-2 space.
Ch 3, then work 2 dc, ch 2, and 3 dc into that same space. This forms your first corner. The beginning ch 3 counts as the first dc.
Work 3 dc into the next ch-2 space. This is your first side group.
Repeat the following sequence three times:
Work (3 dc, ch 2, 3 dc) into the next ch-2 space.
Work 3 dc into the following ch-2 space.
Join with a sl st into the third chain of the beginning ch 3. Fasten off the pink yarn.
All stitches in this round go into the spaces between the puffs. Do not work into the puff tops or add chains between the side groups.
Round 2 check: 36 dc and 4 ch-2 corner spaces. Each side has 9 dc.
Four alternating spaces become corners. The other four spaces hold the side groups.
Round 3: Add the First White Frame
Join white yarn with a sl st in any corner ch-2 space.
Ch 3, then work 1 dc, ch 2, and 2 dc into that same corner space.
Work 1 dc into each of the next 9 dc along the side.
At the next corner, work (2 dc, ch 2, 2 dc) into the corner space.
Repeat [1 dc in each of the next 9 dc; (2 dc, ch 2, 2 dc) in the next corner space] twice more.
Work 1 dc into each of the final 9 dc along the last side.
Join with a sl st into the third chain of the beginning ch 3. Keep the white yarn attached.
Round 3 check: 52 dc and 4 ch-2 corner spaces. Each side has 13 dc.
Each corner contributes two dc to each adjacent side:
9 + 2 + 2 = 13 dc per side.
Round 4: Complete the White Frame
Sl st into the next dc, then sl st into the corner ch-2 space.
Ch 3, then work 1 dc, ch 2, and 2 dc into that same space.
Work 1 dc into each of the next 13 dc along the side.
At the next corner, work (2 dc, ch 2, 2 dc) into the corner space.
Repeat [1 dc in each of the next 13 dc; (2 dc, ch 2, 2 dc) in the next corner space] twice more.
Work 1 dc into each of the final 13 dc along the last side.
Join with a sl st into the third chain of the beginning ch 3. Fasten off.
Round 4 check: 68 dc and 4 ch-2 corner spaces. Each side has 17 dc.
Once again, each side gains four dc:
13 + 2 + 2 = 17 dc per side.
Stitch Counts at a Glance
Round
Color
Stitch Count
Corner Spaces
Dc per Side
1
Pink
8 puffs and 8 ch-2 spaces
Not formed yet
—
2
Pink
36 dc
4 ch-2 spaces
9
3
White
52 dc
4 ch-2 spaces
13
4
White
68 dc
4 ch-2 spaces
17
Finishing Your Square
Secure the magic-ring tail by weaving it through the back of several center stitches in more than one direction.
Weave in the remaining ends without pulling the corners out of shape.
Block according to your yarn label. Smooth the square into shape and let it dry flat. If needed, gently pin the four corners. Avoid stretching the center or pressing the puffs flat.
If the square cups or ruffles even when your counts are correct, the relationship between your puff height and dc tension may need adjusting. Make another sample before producing a full batch. Blocking cannot reliably correct a major tension mismatch.
Joining Your Squares
For a simple visible seam, block all your squares to the same size.
Place two squares wrong sides together, with their right sides facing out. Line up the corner spaces and stitch tops.
Using pink or white yarn, work a loose sl st through the back loop of each pair of matching stitches. Join the 17 dc along the edge.
At each end, secure the matching corner spaces with a sl st through both spaces. Keep the joining yarn relaxed so the seam does not shorten the edge.
Join the squares into rows, then join the rows together.
This method makes a visible seam. The open joining mesh shown in the blanket reference is a different technique and is not included in this square pattern.
VIDEO TUTORIAL
Helpful Tips
If your center looks uneven:
Check that every puff uses five draw-up movements and that all the elongated loops reach the same height.
If you have too many corners:
Round 2 alternates a corner group with a side group. Only four spaces receive corner groups.
If a white side has the wrong stitch count:
Look for a missed first dc just after the corner, a skipped stitch before the next corner, or an accidental stitch worked into the joining sl st.
If your corners look crowded:
Make sure you worked only the stated corner group, without adding another group in a nearby stitch.
For a closer look at the construction, the companion PDF includes the complete written tutorial and five visual references in pink and white.
Thank you for visiting Grandma’s Crafts and spending a little creative time with us. I hope you enjoy working those soft puff stitches and watching your square take shape. Good luck with your project, whether you stop at one little sample or keep going with a whole basket of squares!
There are more crochet projects waiting for you here, and we share new patterns every week. Come back whenever you are ready for another small project or a new idea for your yarn basket. Wishing you a wonderful week and happy crocheting!