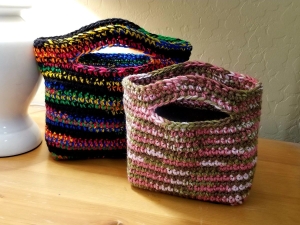
T-Shirt Yarn Crochet Bags: A Small Handbag and a Larger Tote
Written byGRANDMASCRAFT in
Hello, crochet friends! Welcome back to Grandma’s Crafts. Today we’re looking at two ways to make a chunky crochet bag: a compact handbag for the essentials and a larger tote with handles crocheted into the top. Choose a cheerful pink, a warm neutral, or another color you would enjoy carrying.
These are two separate projects, each with its own construction. The smaller bag has a narrow base and separately attached handles. The larger bag has a wider oval base and a knit-like body worked in waistcoat stitch. Follow one set of instructions all the way through, using the materials listed for that bag.
One of the nicest things about crocheting a bag is choosing a color you’ll actually want to carry. A bright pink can bring a little fun to a simple outfit, while cream, chocolate brown, or olive gives the same project a quieter feel. With stitches this chunky, even a single color has plenty of character.
T-shirt yarn gives these bags their bold texture, making each stitch easy to see. Take your time finding a comfortable tension, especially around the base. You want the fabric to feel firm without having to struggle to get your hook through the stitches.
The smaller handbag is a lovely option if you prefer something compact, and choosing its separate handles is part of the fun. The larger tote takes a different approach, with a knit-like crochet texture and handles worked into the top. Each project has its own instructions, so you can follow the one that suits you best.
Before picking up your hook, have a look at the measurements below and compare them with a bag you already enjoy using. That gives you a helpful sense of scale. Keep your measuring tape nearby as you crochet, since the thickness of your yarn and your tension will affect the finished size.
Finished Measurements
Project
Approximate finished size
Hook
Handles
Small Basic Handbag
Approximately 25 × 18 cm (9.8 × 7.1 inches)
8 mm
Attached separately
Larger Oval Tote
Approximately 42 cm wide × 28 cm tall (16.5 × 11 inches)
10 mm
Crocheted into the top
Finished measurements vary with yarn thickness and tension. These sizes are approximate; depth and separate handle measurements are not provided. Check the size of your work as you go, especially if substituting a different yarn.
Before You Begin
Both sets of instructions below use US crochet terms.
ch: chain.
sc: single crochet.
sl st: slip stitch.
st / sts: stitch / stitches.
inc: work 2 sc into the same stitch.
wsc: waistcoat single crochet. Insert the hook into the center V of the stitch below, draw up a loop, yarn over, and pull through both loops.
A beginning ch 1 does not count as a stitch. For joined rounds, join with a sl st to the first actual stitch, then ch 1 and begin the next round in that same stitch. Do not work into the joining sl st or beginning ch 1. Do not turn between rounds.
Make a few practice stitches with your yarn before starting. You want a fabric that holds together without requiring you to force the hook through each stitch. A hook size is a starting point, and it does not make different T-shirt yarns behave identically.
1. Small Basic Handbag
Materials: One skein of lightweight Terra T-shirt yarn, an 8 mm hook, a yarn needle, and a pair of bag handles. Skein meterage and gauge are not specified.
Foundation: Ch 20, then ch 1 for working height.
Round 1: Sc in all 20 foundation chains; add 2 more sc in the last chain. Continue along the opposite side: sc in the next 19 chains, then add one more sc in the first foundation chain to complete the oval. Join. 42 sts.
Rounds 2–14: Ch 1, sc in all 42 sts, join. 42 sts each round.
Round 15: Sl st in every stitch around. Fasten off and weave in the ends.
Handles: Attach separate handles opposite one another, centered on the broad faces, following the attachment method for your chosen hardware. Handle length and placement depend on the hardware chosen.
This smaller option has a narrow base and separately attached handles.
Base 1: 2 sc in second ch, sc 18, 3 sc in last ch; opposite side: sc 18, sc in starting chain. Join. 42 sts.
Base 2: Ch 1; inc twice, sc 18, inc three times, sc 18, inc. Join. 48 sts.
Base 3: Ch 1; (sc, inc) twice, sc 18, (inc, sc) three times, sc 19, inc. Join. 54 sts.
Body 1–20: Ch 1, wsc around, join. 54 sts.
Handles: Center two 9-stitch gaps with 18 stitches between. Wsc between gaps; ch 11, skip 9 at each gap. Join. 58 sts.
Next round: Ch 1; wsc in body, sc in handle chains. Join. 58 sts. Fasten off; weave ends.
Checkpoints That Help
Count the stitches before moving from the base to the body, and again before the handles. If you have a different total, stop and find the discrepancy rather than adding an unexplained increase or decrease to make the next round fit.
For the larger bag, practice waistcoat stitch first. The hook goes through the stitch’s center, rather than beneath the top loops. Keep enough room in the stitch for the next round, and check that you have not accidentally switched to ordinary single crochet around the body.
Lay the bag flat before positioning handles. Compare the two broad faces and mark both openings before crocheting either one. For separately attached handles, check their position with removable markers before sewing them securely.
Follow the care instructions on your yarn label. If adding a lining, fit it to the actual finished bag rather than cutting from an assumed depth. Different yarn thicknesses can change the base and the amount of room inside.
VIDEO TUTORIAL
Thank you for visiting Grandma’s Crafts and spending a little crochet time with us. I hope one of these bags finds a place on your project list, whether you prefer a compact handbag or a roomier tote. Enjoy choosing your yarn, and good luck with your project!
Have a look around our other crochet articles when you’re ready for something new. We add new patterns every week and would love to welcome you back. Wishing you a lovely week and happy crocheting!