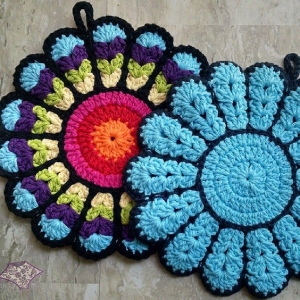
Welcome to Grandma’s Crafts! I’m so happy you are here today. This Flower Potholder Pattern has a round center, a ring of scalloped petals, and an outline that gives each petal its own shape. I love how a simple change of color can make the same flower look completely different.
The construction uses two matching pieces. You crochet the front and back separately, then connect them with an edging that travels along the outer curves and down the channels between petals. That inward part of the joining is what makes the flower outline so distinctive.
A quiet, single-color flower lets the texture stand out. Brighter stripes can make each round easy to see, while a contrasting joining yarn draws attention to the edges. Choose colors you enjoy looking at together, and keep the same yarn type for both layers.
Let’s keep the construction consistent from beginning to end: seven rounds for each piece and fifteen shells around the outside. Set aside a little time to study the joining route before starting it. The finishing deserves just as much attention as the center.
Gather Your Materials
Hobby Lobby I Love This Cotton! Solids, a 100% cotton yarn with a label length of 180 yards or 165 meters per 100 grams.
A 3.75 mm crochet hook, US F/5.
A yarn needle.
An optional plastic or bone hanging ring.
The skein information describes the yarn, not a measured quantity needed for one potholder. No total yardage for a finished flower is specified. If using leftovers, keep enough of the same yarn for a matching back and the joining.
The listed finished diameter is approximately 7.5 inches, or 19 cm. Your own tension affects the result. There is no numerical gauge to match, so check that your two pieces match each other before joining them.
Abbreviations in US Terms
ch: chain.
dc: double crochet.
sc: single crochet.
sl st: slip stitch.
st or sts: stitch or stitches.
sp: space.
RS: right side, the side that faces outward in the finished potholder.
A chain space is the opening beneath a chain, rather than the top loops of the chain itself. When a shell is assigned to a chain space, put the entire group into that opening.
How to Read the Rounds
Work in joined rounds without turning. In Rounds 1 to 3, the stated totals refer to the actual double crochets, with the beginning ch 3 outside those totals. Join these rounds to the first actual dc. From Round 4 onward, the beginning ch 3 replaces the first dc of the first shell; join to its top.
Two shell sizes are used: (2 dc, ch 1, 2 dc) and (3 dc, ch 1, 3 dc). All stitches inside a shell’s parentheses go into the same indicated stitch or space. Brackets indicate a sequence to repeat.
After joining Rounds 4 and 5, move with two sl sts to the next ch-1 space. After joining Round 6, use three sl sts to reach that space. These are positioning stitches for the next round.
Flower Potholder Pattern: Make Two
Round 1: Make a magic ring. Ch 3 and place 15 dc inside the ring. Close with a sl st. (15 dc.)
Round 2: Ch 3. Place 2 dc in every dc, then close the round with a sl st. (30 dc.)
Round 3: Ch 3. Repeat [1 dc in the next dc, 2 dc in the following dc] around; close with a sl st. (45 dc.)
Round 4: Ch 3; in that same stitch add 1 dc, ch 1, and 2 dc. Repeat [skip 2 stitches; (2 dc, ch 1, 2 dc) in the next stitch] fourteen times. Skip the last 2 stitches; join, then move to the ch-1 space. (15 shells.)
Round 5: Ch 3; add 1 dc, ch 1, and 2 dc in the starting space. In each remaining ch-1 space, make (2 dc, ch 1, 2 dc). Join and move to the next ch-1 space. (15 shells.)
Round 6: Ch 3; add 2 dc, ch 1, and 3 dc in the starting space. In every remaining ch-1 space, make (3 dc, ch 1, 3 dc). Join and move to the next ch-1 space. (15 shells.)
Round 7: Ch 3 and add 6 dc in the starting space. Fill every remaining ch-1 space with 7 dc. Join, fasten off, and weave in the ends. (15 fans of 7 dc.)
Make the second piece with the same seven rounds. Lay the pieces together and match each fan to its partner. If the edges differ noticeably in size, check the counts before beginning the joining.
Join and Outline the Petals
Position the pieces with their wrong sides together and RS facing outward. Throughout the joining, catch both layers. Start a loop in the gap between two outer fans and ch 1.
Outer curve: Sc across the next 7 stitches, then sc in the gap before the next fan.
Inward route: Ch 1, sc around Round 6 in that same channel; ch 1, sc around Round 5. Ch 1 and sc into the nearer of the two skipped stitches beneath Round 4; ch 1, sc into the other skipped stitch.
Outward route: Ch 1, sc around Round 5; ch 1, sc around Round 6; ch 1, sc around Round 7.
Repeat the outer curve and both routes around the flower. Keep using the channel between the same pair of petals as you travel inward and outward. Do not cross over a neighboring petal.
At the starting point, cover the optional hanging ring with sc, then fasten off and weave in the ends. The ring may be omitted. No fixed stitch count is supplied for covering it because the ring size is not specified.
Keep the Joining Relaxed
Work through the first petal slowly. Spread the flower on your lap or a table and check that both layers are being caught before continuing. It is much easier to correct one section than to discover a missed layer after finishing the edging.
Let the connecting chains sit comfortably between the stitches. Pulling them tightly can draw the petal channels inward and distort the shape. Avoid trying to fix a mismatch between the layers by tugging harder on the joining yarn.
After several petals, pause and smooth the piece gently. Check the back as well as the front. The outline should connect the two layers along the same route, without leaving one layer loose beneath a completed section.
VIDEO TUTORIAL
Planning the Colors
Try arranging your yarns side by side before crocheting. Choose one shade to repeat so the flower feels coordinated, then decide how much contrast you want at the edge. Dark outlining can make pale colors stand out; a closer shade gives a gentler look.
If you change colors, keep a note of which color belongs to each round. Matching the materials and tension on the front and back matters more than matching every stripe. Weave in color-change tails securely before closing the layers.
Keep the finished flower dry and away from open flame. Its heat protection has not been measured, and the cotton and doubled construction should not be treated as a guaranteed temperature rating. It can also be enjoyed as a decorative kitchen accent.
Thank you for crocheting along with me, dear. I hope you enjoy the moment when the joining turns those scallops into individual flower petals. A patient finish makes the outline much easier to appreciate.
Keep your yarn details and color notes with the pattern so you can return to them for a matching flower. A familiar construction and a fresh group of colors can be a lovely reason to pick up your hook again.