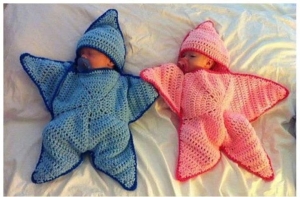
Welcome to Grandma’s Crafts! A five-point star can turn a simple handmade wrap into a sweet keepsake for a nursery or a thoughtful baby-shower gift. The Twinkle Twinkle Baby Star Bunting from Dreamy Crochet pairs a star-shaped body with a small hood, creating a playful look inspired by the night sky.
Before you gather your yarn, take a close look at the instructions. The page gives a charming idea and a materials list, but some of its round directions are incomplete or inconsistent. This guide helps you understand the project, decide how you would like to use it, and check the pattern carefully before starting.
What the Star Bunting Is Designed to Be
The source describes a five-point star with a hood, worked mostly in double crochet. It suggests the finished piece for an 18-inch baby doll or a newborn, and mentions nursery décor, photo styling, and handmade gifting. Those are the source page’s descriptions; it does not provide a tested finished measurement for a baby or a documented fit check.
The shape makes a lovely decorative idea. A star silhouette frames the hood and gives the wrap a whimsical appearance in photos. Soft yellow, white, or another gentle color can make the points stand out, while a contrasting edge could give the design a different look.
Materials Listed on the Source Page
Dreamy Crochet lists worsted-weight yarn, approximately 250–300 yards, a 5 mm (H/8) hook, a yarn needle, scissors, and three small buttons as an optional closure. The page suggests soft yellow or white yarn. Treat these as the original page’s estimates rather than confirmed requirements: the instructions do not include a gauge or a reliable finished-size measurement to help you check the yardage and fit.
For a first sample, choose a smooth yarn with clear stitch definition. A light color makes it easier to see the chain spaces and the tops of the double crochet stitches. Keep a notebook nearby to record your yarn, hook, stitch counts, and any changes you make.
Read the Instructions Before You Begin
The pattern notes describe a five-part repeat worked around a center. The early rounds use increases around chain spaces, but the written sequence changes abruptly in Round 6: the number of double crochets between increases jumps from five to twelve, followed by fourteen in Round 7. The page does not explain the missing progression or show stitch counts for checking each round.
The hood section also leaves important details open. It asks you to find the top center of a star point, work a panel about 9–10 inches wide, and sew its top edges together, but it does not give a precise attachment span or a complete stitch count for the panel. Those details can affect the shape and fit, so do not assume the written directions will produce a specific size without testing.
A careful crocheter can mark each repeat, count the stitches after every round, and compare the fabric with any clear photos or video supplied by the designer. If a count does not balance, pause and seek clarification from the pattern author rather than forcing the next round to fit.
Step-by-Step: Working the Star Bunting
The original instructions describe a five-point star worked in joined rounds, followed by a small hood. Read through the steps before starting, and keep a stitch marker and notebook nearby so you can record your stitch counts.
Materials
The source page suggests 250–300 yards of worsted-weight yarn, a 5 mm (H/8) crochet hook, scissors, a yarn needle, and three small buttons as an optional fastening. These are the designer’s estimates; the page does not provide a gauge or confirmed finished measurements.
Abbreviations
The pattern uses US crochet terms: ch = chain, dc = double crochet, sl st = slip stitch, st(s) = stitch(es), and rep = repeat.
Star Shape
Round 1: Make a magic ring, or ch 4 and join with a sl st to form a ring. Ch 4; this is intended to count as a dc and a ch-1 space. Work 1 dc, then ch 1. Repeat the dc and ch-1 sequence four more times. Join with a sl st as directed by the source.
Round 2: Ch 4, then work a dc in the same stitch. Continue around, working the increases and ch-1 spaces into the spaces indicated by the source. Join with a sl st. The original page does not provide a completed stitch count for this round, so count your stitches and compare the five sections before continuing.
Round 3: Ch 4. Work 2 dc in the next dc, 1 dc in each of the next 2 dc, 2 dc in the next dc, and ch 1. Repeat the sequence around as directed, then join.
Round 4: Ch 4. Work 2 dc in the next dc, 1 dc in each of the next 3 dc, 2 dc in the next dc, and ch 1. Repeat around and join.
Round 5: Ch 4. Work 2 dc in the next dc, 1 dc in each of the next 4 dc, 2 dc in the next dc, and ch 1. Repeat around and join.
Pause before Round 6: The source changes the number of dc between increases from 4 to 12 in Round 6, then to 14 in Round 7. It does not explain this jump or give stitch totals to verify the rounds. Confirm the intended instructions with the pattern author before continuing; do not guess at the missing counts.
Hood
The source says to face the right side of the star, locate the top center of one point, and reattach the yarn. It then describes working a dc panel about 9–10 inches wide, followed by several even rows, before sewing the top edges together. However, it does not specify the exact attachment stitches or a stitch count for the panel. Confirm those details before making the hood, since they affect its size and placement.
Finishing
Weave in the yarn ends. The source suggests adding two or three small buttons along one side and lightly blocking the piece if desired. Check that any fastenings are secure and inspect them regularly. For a baby gift, a decorative finish without detachable parts is simpler to maintain.
Important: This crocheted wrap is not a safe-sleep product. Keep blankets and other soft, loose items out of an infant’s sleep space. Use the finished piece only as décor or for brief, directly supervised photography.
A Thoughtful Keepsake or Photo Prop
A handmade star bunting can be presented as a keepsake, a supervised photo prop, or a decorative accent. If you are making one as a gift, include a small note describing the intended use and the yarn and care instructions you followed. Avoid adding loose ribbons, cords, or detachable decorations that could catch or come away.
The source mentions optional buttons. If you choose any fastener for a decorative piece, attach it securely and inspect it regularly. For a baby gift, simpler finishing without detachable parts is easier to maintain. These choices do not make the item suitable for sleep.
Important Sleep-Safety Note
A crocheted wrap or blanket should not be placed in an infant’s sleep space. The American Academy of Pediatrics advises keeping blankets and other soft, loose items out of a baby’s sleep area; the U.S. Consumer Product Safety Commission likewise recommends an empty sleep space with only a fitted sheet. Use this crochet project as décor or for brief, directly supervised photography, and follow current advice from your child’s health-care professional for anything worn or used with a baby.
VIDEO TUTORIAL
Make the Project Your Own
If you enjoy the design but want a more dependable project, consider using a clearly tested star blanket pattern with published stitch counts and finished measurements. You can still personalize the colors, add a neat border, or make a matching flat star for a garland. For a nursery display, hang any bunting securely and out of a child’s reach.
The Twinkle Twinkle Baby Star Bunting is an appealing idea with a cozy, handmade feel. The source page is a useful starting point for inspiration, but its written counts and hood directions need clarification before they can serve as a complete, reliable pattern. Take time to verify the construction, make a sample, and keep the finished piece in a decorative or supervised setting.
Thank you for visiting Grandma’s Crafts, dear. I hope these notes help you plan a thoughtful star-shaped project and choose a use that suits it well.