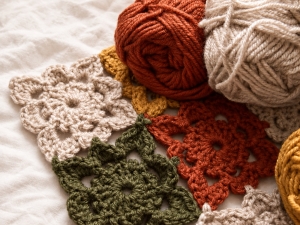
Welcome to Grandma’s Crafts! I’m so happy you are here today. Let’s make the Charm Crochet Motif, a little floral motif with eight picots around its center and a softly shaped edge. We will work through the square first, then explore how to join the pieces into a blanket.
I love how a single color lets the small details stand out. You can also use one color for the center and outer round, with a contrasting shade for the open chain arches. Set two colors beside each other before you begin and see which combination you enjoy.
The Charm Crochet Motif is based on Maggie Weldon’s Floral Fiesta pattern. Here, the instructions have been reorganized and expanded to help beginners understand each step.
Start with one complete square, dear. Once you can recognize its corners and side spaces, the joining instructions will be much easier to follow. Keep that first piece beside you as a reference while you make the next one.
One thing I enjoy about working with small motifs is being able to pause after each round and see how the shape develops. The center comes first, followed by the open arches, and then the corners that give the piece its square outline. Take a moment to count before moving on, especially while you are learning where each stitch belongs.
For an autumn palette, try terracotta, mustard, olive green, and a little cream. You can repeat the same combination throughout your project or give each motif its own color. I would lay a few finished pieces together before joining them, so you can move the colors around and find an arrangement you like.
There is no need to decide on a whole blanket right away. Make a few motifs, enjoy practicing the picots, and get comfortable with the three rounds. When you are ready to join them, those little corner spaces and side openings will become familiar places to connect the next piece.
Skill Level and Size
This is a beginner-friendly explanation of an intermediate motif. You should be comfortable making chains, slip stitches, single crochet, half double crochet, and double crochet. The picots and joins are explained below.
The reference measurement is approximately 5 1/4 inches (13.3 cm) from one point to the opposite point, with Round 1 measuring 2 1/2 inches (6.4 cm) across. Your square may differ with another yarn or tension. Finish and measure a sample before planning a blanket.
Gather Your Materials
Medium weight yarn, category 4, also called worsted weight, in one or two colors.
A 6 mm (US J-10) crochet hook, or another size needed for your sample.
Scissors and a tapestry needle.
A removable stitch marker, optional.
Use a smooth, light-colored yarn while learning so you can see the gaps between stitches. You need only a small amount for a practice square. For a larger project, weigh your finished sample and multiply its weight by the number of motifs, then allow extra for tassels and your usual working allowance.
Abbreviations (US Terms)
Abbreviation
Meaning
ch
Chain
sl st
Slip stitch
sc
Single crochet
hdc
Half double crochet
dc
Double crochet
st(s)
Stitch(es)
sp
Space
ch-4 sp
Space formed by four chains
A Few Details to Learn First
Picot: Ch 3, then sl st in the third chain from your hook, which is the first of those three chains. Do not count the loop on your hook. This makes a small decorative point.
Half double crochet: Yarn over, insert your hook, yarn over and draw up a loop. Yarn over and pull through all three loops on the hook.
Double crochet: Yarn over, insert your hook, yarn over and draw up a loop. Yarn over and pull through two loops, then yarn over and pull through the remaining two.
Working into a space: Insert your hook underneath the whole chain arch. The stitches wrap around the chains. In Round 2, work between the two double crochets of each center group, rather than into their top loops or into the picot.
Pattern Notes
Work in joined rounds without turning.
The beginning ch 3 in Round 1 counts as one dc.
In Round 2, the beginning ch 6 represents one hdc plus a ch-4 arch. The first two chains provide the stitch height.
Round 3 begins with an actual sc, which counts as the first sc of the corner.
Use both top loops when joining to a stitch, unless the instruction specifies a chain space.
Fasten off between rounds to keep the starting positions simple, including when using a single color.
Counts appear at the end of each round so you can check before continuing.
Charm Crochet Motif Pattern
Starting ring: Ch 6. Sl st in the first chain to form a ring. Work the next round into the opening of the ring.
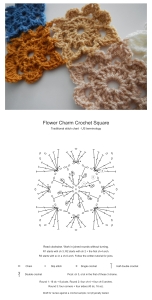
Round 1: Ch 3, then work 1 dc in the ring. Make a picot. Work [2 dc in the ring, picot] seven times. Join with a sl st to the top of the beginning ch 3. Fasten off. (16 dc, including the beginning chains, and 8 picots)
Think of the center as eight pairs of double crochets, each followed by a picot. Slide the groups gently around the ring as you work so they have room to sit beside one another.
Round 2: Attach yarn with a sl st between the two dc of any pair. Ch 6. Skip the next picot and work 1 hdc between the two dc of the following pair. Ch 5. Skip the next picot and work 1 hdc between the two dc of the next pair. Repeat [ch 4, skip the next picot, hdc between the next pair of dc, ch 5, skip the next picot, hdc between the following pair of dc] twice. Ch 4, skip the next picot, and hdc between the next pair of dc. Ch 5, then join with a sl st in the second chain of the beginning ch 6. Fasten off. (8 hdc supports, including the beginning chains; 4 ch-4 spaces and 4 ch-5 spaces)
Check the arches in order: 4, 5, 4, 5, 4, 5, 4, 5. The final ch-5 arch returns to the starting support; do not add another hdc there.
Round 3: Attach yarn with 1 sc in any ch-5 sp. In that same space, work 3 dc, ch 3, 3 dc, sc, and sl st. In the next ch-4 sp, work [sc, 2 dc, ch 1, 2 dc, sc, sl st]. Repeat the following sequence three times: in the next ch-5 sp, work [sc, 3 dc, ch 3, 3 dc, sc, sl st]; in the next ch-4 sp, work [sc, 2 dc, ch 1, 2 dc, sc, sl st]. Join with a sl st to the first sc. Fasten off. (4 corner groups and 4 side groups; 40 dc and 16 sc, with 4 ch-3 corner spaces and 4 ch-1 side spaces)
Each longer arch becomes a corner. Each shorter arch becomes a side. The final joining slip stitch is separate from the slip stitch worked at the end of the last side group.
Finish Your First Square
Weave the yarn tails through several stitches on the back, changing direction to help secure them. Trim the excess without cutting into the crochet.
If your yarn allows wet blocking, dampen the square and arrange its four points on a flat surface. Let it dry completely. Blocking can settle the shape, but recount the rounds if the piece twists or bunches noticeably.
Before making more, check for eight center picots, eight alternating arches, and four finished corners. Remember that the six starting chains of Round 2 contain only a four-chain arch, not a six-chain arch.
GRAPH
You Can Make a Beautiful Blanket!
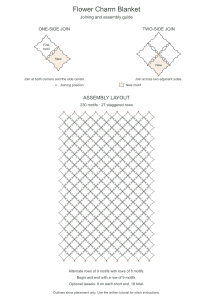
Once you understand one square, you can repeat it and join the motifs during Round 3. Make the first motif completely. For each new motif, finish Rounds 1 and 2, then replace selected chains in Round 3 with joining stitches.
Keep the right sides of the motifs facing you. Every shared side has three joining positions: a corner, the middle of a side, and the next corner. The dc groups stay in the new motif; only the joining sc goes into the finished piece.
Joining a Corner
Begin the new corner with sc and 3 dc in its ch-5 sp. Instead of the usual ch 3, work ch 1, sc in the matching ch-3 corner space of the finished motif, then ch 1. Return to the same ch-5 sp of the new motif and complete 3 dc, sc, and sl st.
Joining the Middle of a Side
In the new motif’s ch-4 sp, work sc and 2 dc. Replace the usual ch 1 with an sc in the matching ch-1 side space of the finished motif. Return to the new motif’s same ch-4 sp and complete 2 dc, sc, and sl st.
Joining Along One Side
Start Round 3 at a ch-5 sp beside the side you want to join. Join the first corner, the middle of the next side, and the following corner to the same finished motif. Complete the remaining side, corner, side, corner, and side normally. Join to the first sc and fasten off.
Before trimming the tail, spread both pieces out. They should share one side with three connections and neither piece should be twisted.
Joining Along Two Adjacent Sides
Place the new motif in its planned position beside two finished pieces. Begin Round 3 at the first joining corner. Join that corner and the next side to the first finished piece. Join the following corner at the meeting point using the same ch 1, joining sc, ch 1 method.
Continue around the new motif, joining the next side and corner to the second finished piece. Complete the remaining side, corner, and final side normally. Join to the first sc and fasten off.
There are five joining positions across these two sides: corner, side, shared corner, side, corner. At the shared corner, use the corresponding corner space at the meeting point. Do not add a separate joining stitch into every surrounding motif.
Arranging the Blanket
Arrange the motifs with one point facing up. The reference layout contains 230 motifs in staggered rows: 14 rows of nine motifs alternate with 13 rows of eight motifs. The first and last rows contain nine. The shorter rows sit in the gaps between the longer rows.
Sketch your layout and mark each completed motif. Use a one-side or two-side join according to the finished neighbors in its position. Check the arrangement regularly and weave in tails as you go.
The reference blanket measures approximately 47 by 73 1/2 inches (119 by 187 cm), excluding tassels. For another size, make a small joined sample before estimating your layout. Measure how much each staggered row adds to the height, since neighboring rows overlap in the arrangement.
Optional Tassels
For each tassel, cut 20 strands of yarn, each 12 inches (30.5 cm) long. Tie a separate strand tightly around the middle of the bundle and fold the bundle in half. Keep the tying ends for attaching it to the blanket.
Cut an 18-inch (45.7 cm) strand. Wrap it around the folded bundle about 1 1/2 inches (3.8 cm) below the fold, tie securely, and tuck in the ends. Trim the bottom evenly. Make 18 tassels for the reference layout, attaching one to each exposed ch-3 point along the two short ends, nine per end.
VIDEO TUTORIAL
A Little Care Before You Finish
I would give the first few joins a little extra attention. Lay them flat, check the connecting spaces, and keep the joining stitches relaxed enough that the edges meet comfortably. A small practice group makes it easier to understand the layout before handling a whole blanket.
Keep a note of your yarn, hook, and finished motif measurement. Those details will help you make matching pieces later, especially if you put the project aside for a while. You can change the colors without changing the stitch sequence.
Thank you for spending some crochet time with me at Grandma’s Crafts. Enjoy making your first Charm Crochet Motif, and let the blanket grow one little flower at a time.