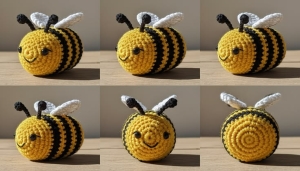
Hello, dear friends! Welcome to Grandma’s Crafts. Today we’re making a little crochet bee with a yellow and black striped body, ivory wings, and tiny antennae. Its rounded shape and simple details make it a lovely addition to your collection of handmade characters.
There is something especially sweet about a small crochet project you can hold in your hand. This bee would look lovely beside a crocheted flower, tucked into a gift box, or displayed on a shelf with your other amigurumi creations.
The body is made first, with the stripes added as you crochet. Once it is stuffed and closed, you’ll add the antennae and sew on two little wings. Taking the project one section at a time makes the construction easy to follow.
Gather your three yarn colors, find a comfortable spot, and keep your stitch marker nearby. Let’s bring this little bee to life!
Finished Measurements
The finished bee measures approximately:
Length: 2½ inches (6.4 cm), from end to end.
Height: 2 inches (5.1 cm), from the bottom of the body to the tip of the wing.
Your finished size may vary with your yarn, hook, and tension.
Materials
4 mm crochet hook (US G/6).
Approximately ¼ ounce (7 g) each of yellow, black, and ivory yarn.
6 mm safety eyes, or yarn for embroidered eyes.
Toy stuffing.
Tapestry needle.
Scissors.
Stitch marker.
For a bee intended for a baby or young child, embroider the eyes instead of using plastic safety eyes.
Abbreviations
This pattern uses US crochet terminology.
Abbreviation
Meaning
ch
Chain
sc
Single crochet
hdc
Half double crochet
dc
Double crochet
tr
Treble crochet
inc
Increase: work 2 sc in the same stitch
sc2tog
Single crochet 2 stitches together
st / sts
Stitch / stitches
R
Round
Single Crochet Decrease
To work sc2tog, insert your hook into the next stitch, yarn over, and pull up a loop. Insert your hook into the following stitch, yarn over, and pull up another loop. Yarn over and draw through all three loops on your hook.
Treble Crochet
Yarn over twice and insert your hook into the indicated space. Yarn over and pull up a loop. Yarn over and draw through two loops three times.
Pattern Notes
Stitch totals appear in parentheses at the end of each round.
Use a stitch marker to keep track of the beginning of your rounds.
Work both rounds whenever a range is given.
Change colors during the final pull-through of the last stitch before the new color begins.
Keep your stitches close enough together that the stuffing does not show through.
STEP BY STEP INSTRUCTIONS
Body
Begin with yellow yarn and make a magic ring.
Round 1: Work 6 sc into the ring. Tighten the ring to close the center. (6 sts)
Round 2: Work 2 sc in each stitch around. (12 sts)
Round 3: Repeat [1 sc in the next stitch, inc in the following stitch] 6 times. (18 sts)
Rounds 4 and 5: Work 1 sc in each stitch around. Change to black during the final stitch of Round 5. (18 sts per round)
Rounds 6 and 7: With black, work 1 sc in each stitch around. Change to yellow during the final stitch of Round 7. (18 sts per round)
Rounds 8 through 11: With yellow, work 1 sc in each stitch around. Change to black during the final stitch of Round 11. (18 sts per round)
Round 12: With black, work 1 sc in each stitch around. (18 sts)
Add the Eyes and Stuffing
Pause before beginning the decrease rounds.
Place the eyes between Rounds 2 and 3, leaving approximately 7 stitches between them. Check that they sit evenly on the yellow face before securing the backs.
Begin stuffing the body. Add small amounts at a time and distribute the filling evenly. Continue adding stuffing as you close the remaining rounds.
Round 13: Repeat [1 sc in the next stitch, sc2tog] 6 times. (12 sts)
Round 14: Work sc2tog 6 times. (6 sts)
Round 15: Work sc2tog 3 times. (3 sts)
Fasten off, leaving a long yarn tail. Check that the body is firmly and evenly stuffed.
Thread the tail onto a tapestry needle and pass it through the remaining stitches. Pull gently to close the opening, secure the yarn, and hide the end inside the body.
Antennae
The two antennae are formed from one length of black chain.
With black yarn, ch 10.
Fasten off, leaving a long tail for threading.
Tie a tight knot near one end of the chain and trim the loose yarn close to the knot, taking care not to cut the knot itself.
Thread the unknotted end onto a tapestry needle.
Pass it through the top of the yellow head and through the stuffing, leaving the chain emerging at two points directly above the eyes. Leave approximately 3 stitches between these points.
Adjust the chain so that an antenna extends from each side.
Tie a tight knot near the second end of the chain and trim the remaining loose yarn.
Check the position of both antennae and adjust them gently until you are happy with their appearance.
Wings
Make 2 wings using ivory yarn.
Each wing is worked into a magic ring.
Round 1: Work the following stitches into the ring, in this order:
1 sc, 1 hdc, 1 dc, 3 tr, 1 dc, 1 hdc, 1 sc.
You will have 9 stitches in the ring.
Pull the ring closed and cut the yarn, leaving a tail long enough to attach the wing.
Finish with an Invisible Join
Thread the yarn tail onto a tapestry needle.
Pass the needle beneath both top loops of the first stitch. Then pass it down through the back loop of the final stitch. Adjust the yarn so that the join resembles a normal stitch without pulling the wing out of shape.
Secure the center tail on the back of the wing. Keep the sewing tail available for attachment.
Repeat for the second wing.
Attach the Wings
Place the two wings on top of the bee’s body. Pin them in position and check their placement from the front and both sides.
Using the ivory yarn tails, sew the base of each wing securely to the body. Leave the outer portion of each wing free so it stands away from the stripes.
Secure the tails and hide them inside the stuffed body.
Finishing Touches
Check that the wings are secure, the antennae are positioned neatly, and no loose yarn ends remain visible. Gently shape the body with your hands to distribute the stuffing and smooth the outline.
Your little crochet bee is ready for its place on a shelf, beside a flower, or inside a handmade gift!
VIDEO TUTORIAL
Thank you for visiting Grandma’s Crafts today. I hope you enjoy making this cheerful little bee and feel inspired to try another color combination or create a small collection.
Explore our other crochet articles for more handmade projects, and come back for new patterns shared weekly. Have a wonderful week, dear friends, and happy crocheting!