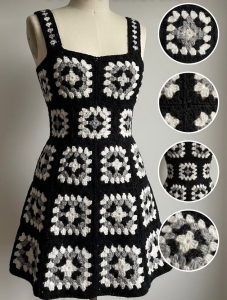
Hello, dear friends! Welcome to Grandma’s Crafts. Today we’re looking at a lovely way to turn colorful granny squares into something you can wear. This pastel crochet dress combines a fitted upper section, delicate shoulder straps, and a fuller skirt that gives the patchwork plenty of room to shine.
The colors are what caught my eye first. Soft pink, lavender, mint, peach, cream, and yellow appear throughout the squares, while light blue brings the different combinations together. That repeated blue creates a gentle frame around the motifs and gives the dress a coordinated finish without making every square identical.
There is also a lovely balance between the upper and lower sections. The bodice sits closer to the body, while the skirt spreads out beneath the waist. The narrow straps and straight neckline keep the top simple, leaving the colorful crochet as the main detail.
If you have been collecting ideas for a granny square garment, this dress offers plenty of inspiration. Below, you’ll find video resources for making traditional squares, understanding garment assembly, and working shoulder straps. These tutorials demonstrate related techniques and different dress designs rather than an exact pattern for the photographed piece.
A Closer Look at the Dress
The reference dress has three main features: a patchwork bodice, a fuller patchwork skirt, and slim straps. Light blue also appears around the neckline and lower edge, continuing the color used between the motifs.
Before beginning a similar project, look at the silhouette as carefully as the squares. A straight tube of joined motifs will fit differently from a dress with a fitted waist and a wider skirt. The transition between those sections needs its own construction plan.
Start with the Granny Squares
A traditional granny square is a useful place to begin. Make a sample in your chosen yarn, then measure it after blocking. This gives you a more useful starting point for garment planning than copying the number of squares visible in a photograph.
For a palette inspired by this dress, vary the pastel colors inside the motifs and repeat light blue around the outside. Lay several finished squares together before making the entire collection so you can see how the colors interact.
Video: How to Crochet a Basic Granny Square
This tutorial introduces the traditional granny square.
Terminology note: Bella Coco uses UK crochet terminology. UK treble crochet corresponds to US double crochet.
Understand the Garment Assembly
Making the squares is one part of the project. Arranging them into a wearable garment involves checking the fit, choosing a joining method, and planning the openings and edges.
The tutorial below covers granny square construction, joining, and fitting a crochet dress. Use it to understand those techniques while following the construction of the design demonstrated in the video.
Video: Granny Square Dress Construction
Plan the Fuller Skirt
The wider skirt is an important part of the reference dress. Before joining a skirt to a bodice, check how their upper and lower edges will connect.
A wider panel gathered at the waist, shaped motifs, and added sections can produce different silhouettes. The photograph alone does not confirm which method was used here, so an exact skirt layout should come from the chosen garment tutorial.
This planning checklist can help you organize the project:
Section
What to check
Bodice
Bust measurement, length, and room to put the dress on
Waist
Finished circumference and connection to the skirt
Skirt
Width, length, and method used to create fullness
Straps
Position, finished length, and secure attachment
Edges
A finish that lies flat without pulling
Add the Shoulder Straps
Fit the straps after checking the position of the neckline. Their length affects where the entire bodice sits, so try the garment on before securing them permanently.
Video: Crochet Straps and Attachment
This separate tutorial demonstrates making and attaching straps for a granny square dress.
Finish Your Handmade Dress
Secure the yarn ends, inspect the joins, and block according to your yarn’s care instructions. Check the neckline, waist, and hem once the garment is dry. If you would like more coverage beneath the openwork, consider a coordinating slip.
Thank you for visiting Grandma’s Crafts today. I hope this pastel dress inspires you to explore your own color combinations and enjoy turning familiar squares into a wearable project.
Browse our other crochet articles for more ideas, and come back for new patterns shared weekly. Happy crocheting, dear friends, and have a wonderful week!