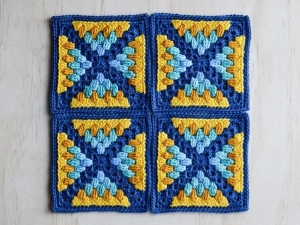
Welcome to Grandma’s Crafts! I’m so happy you are here today. This Beautiful and Easy Crochet Square with Colorful Puff Stitches caught my eye with its four little triangles of color and the contrasting stitches that separate them. Let’s look at the construction together and get everything ready for the video tutorial.
I love how a few shades from the same color family can give a square a different character. A light center with gradually deeper pinks feels gentle, while a dark background makes those raised stitches stand out. Lay your colors beside one another before you choose their order.
This motif combines familiar double crochet with puff stitches and changes of color within a round. If those changes are new to you, begin with one square and give yourself permission to pause. Getting comfortable with a single side is more useful than rushing through all four.
Below you will find preparation steps, US stitch explanations, a construction guide, and the original video demonstration. The video provides the full visual sequence. This article is a companion to that demonstration rather than a standalone, fully verified round-by-round written pattern.
Where This Square Can Fit
Several matching squares can become a blanket panel or cushion front. Start by making one finished sample, including its outer edge, and measure it after blocking. That measurement is more useful for planning than guessing from a photograph or measuring an unfinished round.
A single square can also be a small decorative mat or a sample for a future project. Keep the first one with notes about your yarn and hook. If you later combine it with another motif, compare both the finished dimensions and the available edge stitches before choosing a seam.
Materials to Gather
The demonstration uses several shades of baby yarn and a 2 mm crochet hook. The term baby yarn does not identify a standardized yarn weight, so check your own yarn label instead of assuming that every yarn sold for babies will give the same result.
Prepare a background color for the center and corner sections, several colors for the puff sections, scissors, a tapestry needle, and four removable stitch markers. Use yarns of similar thickness and compatible care requirements. If your yarn requires a larger hook, make a sample with the suitable hook and expect the dimensions to change.
No confirmed yardage, gauge, finished size, or completion time is available for the exact sample. Make and measure one square before planning a batch. For a proposed blanket width, divide that width by the blocked square width to estimate the number of squares, then allow separately for seams and the outer border.
US Crochet Terms
The explanations here use US terminology: ch means chain, sl st means slip stitch, sc means single crochet, dc means double crochet, tr means treble crochet, st means stitch, and sp means space. A ch-3 sp is the opening underneath three chains.
The source video is in Turkish. Use the stitch motions as your guide when matching them to US terms. Names used in another language do not always translate directly into the same English stitch name, especially when automatic captions are involved.
Practice the Raised Stitch First
To practice a four-draw-up puff, begin with one loop on the hook. Yarn over, insert into the chosen stitch or space, and draw up a loop to the intended height. Repeat that action three more times in the same place. You now have nine loops. Yarn over and pull through all nine, then ch 1 to secure the puff.
Keep the drawn-up loops approximately equal in height. Tight loops make the closing movement difficult, while uneven loops give the puff an irregular shape. Practice a few puffs on scrap fabric before handling two colors in the motif.
The closing chain and a separate spacing chain are different actions. When following the video, check whether a chain closes the puff, changes the yarn color, or creates a gap. Do not automatically add an extra chain after every movement.
How the Square Takes Shape
The center begins with four groups of double crochet and corner openings. Those openings establish the four directions in which the square grows. The background-colored corner sections continue outward as the colored puff sections widen between them.
The demonstrated puff sections progress from one puff per side to two, then three, then four. Across the whole square, those sections contain 4, 8, 12, and 16 puffs respectively. These are useful checkpoints for following the demonstration; they are not complete stitch counts for the rounds.
Placement matters as much as the number of puffs. The first colored puffs are anchored into the middle stitch of the center groups. Later puffs use the gaps beside and between the previous puffs. Following those gaps creates the widening triangular arrangement.
The finishing section changes from puffs to groups of taller stitches. Follow that section carefully rather than continuing the puff repeat indefinitely or replacing the edge with an unrelated granny-square border.
Follow the Tutorial in Manageable Sections
Step 1: Prepare the center. Start with the background yarn. Watch the magic ring, the initial groups, and the corner formation before crocheting along. Mark all four corner openings so they remain easy to recognize as the texture develops.
Step 2: Learn the first color change. Pause at the first puff and identify the exact stitch receiving it. Check which yarn is being carried and which yarn forms the visible stitch. Finish one side, inspect it, then continue to the next corner.
Step 3: Build the triangular sections. As each new puff round begins, look for the spaces at both ends of the previous colored section. Count the puffs on every side before moving on. A missing puff at an end changes the triangle and can leave the next round with the wrong spaces.
Step 4: Keep carried yarn relaxed. Lay the unused strand along the area being worked as shown in the demonstration. Avoid pulling it tight around a corner. Spread the completed side gently with your fingers and check that the carried strand allows the fabric to lie naturally.
Step 5: Complete the finishing round. Watch the transition to the taller edge stitches before beginning it. Check the corners and each gap between the final puffs. Do not substitute the general instructions from another square, since different edge heights can change the shape.
Step 6: Secure and shape the square. Weave the tails back through several stitches, changing direction to help secure them. Block according to the yarn label, keeping the four sides even and the corners square. Let the sample dry completely before measuring or joining.
VIDEO TUTORIAL
Settle in with your yarn and follow the original demonstration below, dear. Pause at the color changes and replay the puff placements whenever you need a closer look. Work through one complete square before starting a matching set.
Useful Places to Pause
At approximately 0:34, the center begins. Around 2:55, watch the first colored puff section. From about 6:55, the next color and the expanding puff arrangement become easier to compare. The sections near 10:32 and 13:51 show further growth, and the finishing section starts around 17:20. These times refer to the original video and may shift slightly during playback.
Before starting each section, place the work flat and locate the next corner. If the fabric begins to twist, check the insertion point and yarn tension before continuing. Blocking can settle small irregularities, but it cannot replace a missing repeat or correct the wrong anchor point.
Joining and Planning a Larger Piece
Finish two samples before choosing a joining method. Place their edges together without stretching and compare the stitch positions. Baste a short section first, keeping the raised puffs free from the seam. If the join pulls the squares out of shape, revise the seam before assembling a larger panel.
For color planning, keep the background shade consistent across a set and vary only the puff colors. Alternatively, repeat the same color order throughout. Photograph your preferred arrangement and record the color sequence so you can return to it after a break.
A Square Worth Taking Slowly
Give the first square a little extra attention, especially at the corners and color changes. A clear understanding of those small transitions will make the later squares easier to follow and help you recognize a misplaced stitch sooner.
Once your sample is finished, save its measurements and a few notes beside the yarn labels. You will have a practical reference for choosing a project size and deciding how many motifs you want to make.
Thank you for stopping by Grandma’s Crafts, dear. I hope this colorful square gives you a pleasant reason to sit down with your hook for a while. Come back whenever you are ready to try another crochet idea together.