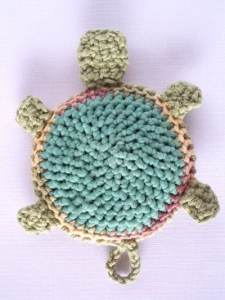
Welcome to Grandma’s Crafts! I’m so happy you are here today. This Crochet Turtle Coaster with Flat Feet brings together a smooth, circular shell, a rounded little head, and four small, flat feet. Let’s work through each piece and give the assembly the same care as the crochet.
I love the contrast between a colorful shell and a soft cream head and feet. Choose one shade for the center and another for the smaller pieces, or make several turtles with different shell colors. Keeping the same yarn thickness throughout will help the pieces stay in proportion.
The shell is worked flat in joined rounds. The head is made separately in a continuous spiral and lightly stuffed, while the feet remain completely unstuffed. You will make all the pieces before sewing them together, which gives you a chance to check their arrangement first.
Begin with one complete turtle before preparing a whole set. This is a new variation assembled from basic crochet shapes, and its finished size depends on your yarn, hook, and tension. Check the sample’s shape and stability before repeating it.
A Little Turtle for Your Table
Use the flat center beneath a cool glass or as a small decorative mat. Keep the raised head outside the area where the glass rests. The usable surface is the circular shell itself, so measure that circle against the base of the glass you plan to use.
A matching set can make a cheerful handmade gift. You can also use the turtle as a decoration on a desk or shelf. This version has a stuffed head and is intended as a decorative coaster rather than a completely flat applique.
Skill Level and Materials
Suggested skill level: confident beginner. You will need to work in rounds, increase, decrease, crochet along both sides of a starting chain, and sew small pieces in place.
Suggested starting materials for this variation: light-weight cotton yarn (CYC category 3) in two colors, a 3 mm crochet hook, a tapestry needle, scissors, a removable stitch marker, a little polyester filling, and dark embroidery thread for the eyes. These are starting choices, not materials from a physically tested sample. Keep the head stitches close enough to contain the filling.
Use Color A for the shell and Color B for the head, feet, and tail. Yardage and finished dimensions have not been established. Make one sample before buying yarn for a large set. The hook size is given in millimeters because US letter labels vary for this size.
Abbreviations (US Terms)
MR = magic ring;
ch = chain;
sl st = slip stitch;
sc = single crochet;
hdc = half double crochet;
dc = double crochet;
st(s) = stitch(es);
inc = 2 sc in the same stitch;
dc inc = 2 dc in the same stitch;
dec = single crochet two stitches together.
Before You Start
The shell uses joined rounds without turning. Its starting ch 2 does not count as a stitch. Begin the first dc in the same stitch as the joining slip stitch, and join each completed round to the first actual dc. Do not crochet into the joining slip stitch or the starting chains.
The head uses continuous rounds. Do not join or make a turning chain between rounds. Mark the first stitch of every round and move the marker upward as you work. Numbers in parentheses give the completed stitch count.
To make a magic ring, form an adjustable yarn loop, insert the hook through it, draw up the working yarn, and ch 1 to secure the loop. Work the specified stitches around both strands. Pull the starting tail to close the center, then secure that tail when weaving in the ends.
For a decrease, insert the hook into the next stitch, yarn over and draw up a loop. Insert into the following stitch, yarn over and draw up another loop. Yarn over and pull through all three loops. Two stitches become one.
Make the Circular Shell
Round 1: With Color A, make an MR. Ch 2, then work 12 dc into the ring. Tighten the ring and sl st to the first dc. (12 sts)
Round 2: Ch 2. Work a dc inc in every stitch. Sl st to the first dc. (24 sts)
Round 3: Ch 2. Repeat [dc in the next st, dc inc in the next st] 12 times. Sl st to the first dc. (36 sts)
Round 4: Ch 2. Repeat [dc in each of the next 2 sts, dc inc in the next st] 12 times. Sl st to the first dc. (48 sts)
Fasten off and weave in the shell ends. Lay the circle on a flat surface. If it cups or ruffles, examine the stitch counts and tension before attaching anything. Gentle blocking may settle minor unevenness, but it will not correct an incorrect number of stitches. Follow the yarn label’s care instructions and let the shell dry completely.
Make the Rounded Head
Use Color B. Keep the stitches firm enough to hold the filling, without pulling so tightly that the hook becomes difficult to insert.
Round 1: Make an MR and work 6 sc into it. Close the ring. Do not join. (6 sts)
Round 2: Inc in each st. (12 sts)
Round 3: Repeat [sc in the next st, inc in the next st] 6 times. (18 sts)
Round 4: Repeat [sc in each of the next 2 sts, inc in the next st] 6 times. (24 sts)
Rounds 5 through 8: Sc in every st. Work four rounds with no increases or decreases. (24 sts per round)
Round 9: Repeat [sc in each of the next 2 sts, dec over the next 2 sts] 6 times. (18 sts)
Round 10: Repeat [sc in the next st, dec over the next 2 sts] 6 times. (12 sts)
Add a small amount of filling. Keep the head softly rounded rather than packing it firmly. Embroider two small eyes on one side, around Rounds 5 and 6, leaving about 3 stitches between them. Secure the embroidery ends inside the head before closing the opening.
Round 11: Dec 6 times. (6 sts)
Cut the yarn, leaving a sewing tail. Draw the tail through the front loops of the remaining 6 stitches with a needle and tighten gently to close. Keep the tail for attaching the head. The eye spacing is a suggested placement for this variation; check the expression before securing the stitches.
Make Four Flat Feet
Each foot is a small oval worked around both sides of a starting chain. Use Color B. Do not stuff or fold the feet.
Foot round: Ch 4. Sc in the second ch from the hook, hdc in the next ch, and 3 sc in the last ch. Rotate the chain so you can work into the unused loops along its opposite side. Hdc in the next ch, then 2 sc in the last ch, which is the same foundation chain that received your first sc. Sl st to the first sc. (8 sts)
The stitch sequence around the oval is sc, hdc, 3 sc, hdc, 2 sc. The three-sc groups at the ends, including the first sc together with the final two sc, turn the work around the chain. Make four identical feet and leave a sewing tail on each.
Make the Small Tail
With Color B, ch 4. Sl st in the second ch from the hook, sc in the next ch, and hdc in the last ch. Fasten off with a sewing tail. This makes a short tapered piece with 3 worked stitches. Attach its wider hdc end to the shell so the narrow slip-stitch end points outward.
Arrange and Sew the Pieces
Use the 48 stitches of the shell’s last round as a placement guide. Choose one stitch as position 1 at the top of the turtle. Count clockwise when viewing the shell from above, and mark positions 8, 18, 25, 32, and 42. These are proposed assembly positions for this variation, so baste the pieces first and check how they sit.
Center the head at position 1. Let most of the head extend beyond the shell, with the embroidered eyes facing upward. Sew a short section of its lower back to the shell edge around positions 47, 48, 1, 2, and 3. Take several small stitches through both pieces and secure the yarn underneath. Do not pull the shell into a fold.
Center the front feet at positions 8 and 42, and the back feet at positions 18 and 32. Slip one rounded end of each oval just underneath the shell edge, leaving the other end visible. Sew through the overlapped end and two adjacent shell stitches. Angle the feet outward and keep each pair symmetrical. Secure the ends underneath.
Center the tail at position 25, directly opposite the head. Sew its wider end beneath the shell edge. Weave in all remaining tails, then place the turtle on the table and check that the shell sits flat. If an attachment lifts the shell, undo that seam and reduce the pull on the sewing yarn.
Check Your First Turtle
The completed shell has 48 edge stitches, the head reaches a maximum of 24 stitches around, and each foot has 8 stitches. These counts help you find construction mistakes, but the final proportions still depend on how your dc and sc compare in height and width.
Try a cool, empty glass on the center before using the coaster. Its base should rest fully on the shell without touching the stuffed head or rocking over a sewn attachment. If the shell is too small, choose a larger project size deliberately rather than adding unplanned rounds to just one part.
VIDEO TUTORIAL
One Turtle at a Time
I would finish the first turtle completely before making all the pieces for a set, dear. Seeing the head and feet in place helps you decide whether the proportions suit your yarn and the glass you have in mind.
Write down your yarn, hook, shell diameter, and any assembly adjustments you make. Those little notes will help the next turtle match while still leaving room to enjoy a different color combination.
Thank you for spending a little crochet time at Grandma’s Crafts. I hope you enjoy arranging those tiny feet and giving your turtle its own expression. You are always welcome back when another ball of yarn is ready for a new project.