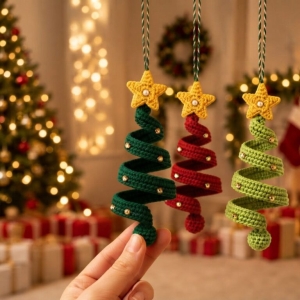
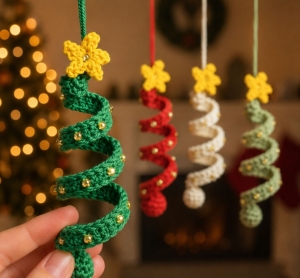
Welcome to Grandma’s Crafts! I’m so happy you are here today. Our Crochet Spiral Christmas Ornament begins with a simple strip of stitches and becomes a little tree-shaped decoration. I love a project that gives an ordinary crochet technique a new purpose, especially when we can enjoy choosing its colors together.
The crochet itself is worked flat. You will make a narrow ribbon in single crochet, then shape it around a removable cone with fabric stiffener. The spaces between the turns give the decoration its open silhouette. There is no stuffed body to make, and the cone comes out after the fabric has dried.
Keep your yarn and hook close, dear, but leave a little space on the table for the finishing. Making the ribbon and shaping the tree are separate jobs. Before applying any stiffener, we will try the dry ribbon on the form so you can see whether the proportions suit your plans.
This version keeps the finishing simple with a hanging loop and an optional ribbon bow. You can focus on even stitches without keeping track of several small crochet pieces. Take your time at the foundation chain, and count at the end of each row. Those little checks make the next step much easier.
A Little Tree with Several Uses
Hang one on a Christmas tree branch where the open turns can be seen clearly. A plain background behind the ornament helps show its shape. If you are making a coordinated set, finish one first and keep a note of your chain count, yarn, hook, and cone before starting the others.
You can also tie an ornament to a gift package and let the recipient keep it afterward. Use the hanging loop to attach it rather than squeezing the tree beneath a tight ribbon. For a garland, tie each loop separately to a supporting cord and leave enough space that the ornaments do not knock together.
Skill Level
Beginner crochet with a separate shaping stage. You will need to make chains, work single crochet in rows, count stitches, and weave in ends. The final shape depends on your form, tension, and stiffening product.
Materials
Smooth cotton yarn in your chosen color; choose enough for a sample and the ornament.
A crochet hook suitable for the yarn, using its label as a starting point.
Scissors, a tapestry needle, and removable stitch markers.
Fabric stiffener suitable for the yarn, used according to its label.
A small container and protection for your work surface.
A removable cone form, plastic wrap, and rust-resistant pins with a pinnable form, or clips suitable for your form.
Strong sewing thread for the hanging loop; narrow ribbon for an optional bow.
Yarn quantity and finished dimensions are not fixed for this version. Begin with a small sample to check that the stitches are comfortable to work and form an even fabric. Test the stiffener on that sample before treating the ornament, especially if you are using a strong or dark color.
Abbreviations (US Terms)
ch: chain
sc: single crochet
st(s): stitch(es)
Single Crochet Reminder
Insert your hook into the indicated stitch. Yarn over and pull up a loop. Yarn over again and pull through both loops on the hook. On the rows after the foundation row, insert the hook under both top loops unless instructed otherwise.
Pattern Notes
Work flat and turn between rows.
The turning ch-1 does not count as a stitch.
Numbers in parentheses give the completed row stitch count.
Work the first sc of each new row in the first sc of the previous row.
Work the last sc in the last sc, not in the turning chain.
The initial 81 chains are a starting sample for this version, not a guarantee of a particular finished height. Adjust the chain length before stiffening if needed.
Crochet Spiral Christmas Ornament Pattern
Foundation: Ch 81. Keep the chain relaxed enough that you can insert the hook without forcing it. Do not include the loop on your hook when counting chains.
Row 1: Sc in the second ch from the hook and in each remaining ch to the end. (80 sc) Place a marker in the first and last sc if you find the edges difficult to identify.
Row 2: Ch 1, turn. Sc in the first sc and in each sc across, ending in the marked last sc. (80 sc) Move the markers to the first and last stitches of this row.
Row 3: Ch 1, turn. Sc in each sc across. (80 sc) Fasten off. Weave both yarn ends securely through stitches on the back of the ribbon, then trim the remaining ends.
Try the Shape Before Stiffening
Cover your cone with plastic wrap and secure the wrap to the form without leaving loose folds across the working surface. Try the dry ribbon around the cone, beginning near the tip and winding toward the wider base. Keep the broad face of the ribbon against the cone rather than balancing it on its edge.
Leave visible spaces between the turns and check the tree from several sides. You do not need a fixed number of turns. Choose a cone and spacing that fit the ribbon naturally, without stretching it. If the ribbon is too short or too long for the look you want, change the foundation chain and remake it before applying stiffener.
For a different chain length, the calculation stays simple: total foundation chains minus one equals the number of sc in every row. For example, ch 71 gives 70 sc in Row 1 and 70 sc in Rows 2 and 3. Keep the three-row width the same while you explore the length.
Set the Spiral
Protect your table and prepare the stiffener as directed on its container. Apply it evenly to the ribbon using the method recommended for that product. Remove excess gently without wringing or twisting the fabric. Avoid adding an unverified amount of water, since different products have different dilution instructions.
Return the treated ribbon to the covered cone in the arrangement you practiced. Secure the ends and any sections that slip with rust-resistant pins or clips appropriate for the form. Keep the ribbon flat against the surface and the gaps open. Check that the bottom turn follows a smooth line rather than drooping off the form.
Leave the ornament supported until the ribbon is completely dry and firm. Follow the product instructions and check thicker areas before removing it. Release the pins or clips, then ease the ornament off the cone. If it adheres to the covering, peel the covering away carefully rather than pulling on the crochet. A collapsible cone makes removal easier.
Add the Hanging Loop
Thread strong sewing thread through several stitches at the upper end of the ribbon. Bring the ends together above the tree to make a loop large enough for your intended branch or hook. Tie them securely and conceal the knot against the crochet. Support the ornament while attaching the loop so you do not bend the upper turn.
If you would like a bow, tie a short piece of narrow ribbon into a bow and sew its center beside the hanging-loop attachment. Keep it small enough that its weight does not pull the tip sideways. Hang the ornament briefly and check the balance before putting away your supplies.
Color and Care
For an optional beaded finish, choose a few small gold beads and a fine sewing needle that fits through their holes. After the spiral is fully dry, sew each bead securely to the ribbon with strong sewing thread, passing through the bead and several crochet stitches. Support the ribbon while sewing and secure the thread ends against the fabric. Space the beads along the turns without pulling neighboring sections together. Hang the ornament again to check that the added weight does not distort its shape.
Green gives an immediate Christmas-tree impression, while cream can suit a quieter display. Make a sample in the actual yarn you plan to use before choosing the final stiffening treatment. A different fiber or fuzzy finish can change the appearance, so do not assume every leftover yarn will produce the same result.
Keep the finished decoration dry and avoid flattening the turns during storage. Place it in a box with enough space around the spiral and protect it from pressure. Follow the stiffener manufacturer’s care instructions if it needs reshaping. Keep a note of the product used so you can check that guidance later.
VIDEO TUTORIAL
Before You Put Your Hook Away
I hope you enjoy watching this little strip take on its Christmas shape, dear. The crochet gives you time to settle into a familiar rhythm, and the finishing invites you to look carefully at the spaces between the turns. Let each stage have the attention it needs.
If you plan to make more, save your successful sample details before changing anything. Record the chain count and the cone you used, and photograph the arrangement while it is still on the form. Those notes will help you return to the proportions you liked.
Thank you for visiting Grandma’s Crafts today. I am glad we could share a little Christmas crochet together. Come back whenever you are ready for another project, and keep your favorite yarn nearby for the next thing you would like to make.