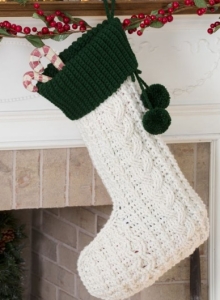
Welcome to Grandma’s Crafts! A Christmas stocking becomes a little more special when you make it stitch by stitch. This design by Mary Jane Protus pairs a richly textured Aran-colored body with a green ribbed cuff and two cheerful pompoms.
The cables give it the look of a traditional winter knit, but the entire stocking is crocheted. It is an intermediate pattern, with explanations here to help newer crocheters understand the techniques before tackling the full project.
The raised cables give this stocking plenty of character, with twists and texture that stand out beautifully against the light yarn. The green cuff adds a familiar Christmas touch, but you could choose burgundy, navy, or another shade to suit your holiday decorations. It’s a lovely opportunity to make something that feels at home on your mantel.
This is a project to take your time with, especially if crochet cables are new to you. Practicing a few crosses before starting can help you get comfortable with working around the stitch posts. Once the movements become familiar, you can enjoy seeing the pattern develop from one row to the next.
Whether you make it for yourself or someone you love, a handmade stocking can become part of the anticipation each Christmas. Fill it with little treats, hang it beside the tree, and bring it out again next December. You might even find yourself choosing colors for another one before the season is over.
Project Details
Skill level: Intermediate; practice the cable stitches first if they are new to you.
Finished height: Approximately 20 inches (51 cm).
Terminology: US crochet terms.
Construction: A front panel, a mirrored back panel, and a separately worked cuff, assembled at the end.
Materials and Gauge
Red Heart Super Saver: 2 skeins Aran (A), 1 skein Hunter Green (B). The listed solid-color skeins contain 7 oz/198 g and 364 yards/333 meters each.
5.5 mm crochet hook, US I/9, or the size needed for gauge.
Tapestry needle and scissors.
Pompom maker for 2 1/4-inch (57 mm) pompoms.
Optional stitch markers for separating the cable groups.
Make practice swatches for both textures. The cuff and body need to fit together, so checking both gauges is useful.
US Abbreviations
ch: chain; sc: single crochet; dc: double crochet; sl st: slip stitch; st/sts: stitch/stitches; RS/WS: right side/wrong side; BLO: back loop only.
The right side is the display side, where the cables stand out. Turn after every panel and cuff row, including rows whose source wording omits the word “turn.”
FPdc: Yarn over. Insert the hook from front to back and then back to front around the post of the indicated stitch. Pull up a loop, then complete a normal dc: yarn over and pull through two loops twice.
BPdc: Yarn over. Insert the hook from back to front and then front to back around the post. Pull up a loop and finish the dc in the same way.
For a post stitch, work around the upright body of the stitch rather than into its top loops.
Decreases
dc2tog: Work the first half of a dc into each of the next two stitches, leaving the final loop of each unfinished. With three loops on the hook, yarn over and pull through all three.
dc3tog: Work three partial dc across the next three stitches. With four loops on the hook, yarn over and pull through all four.
Where a row begins “ch 3, dc2tog” and identifies it as one dc3tog, the beginning chain represents the first stitch of the decrease. Work the dc2tog over the next two stitches. This is the source pattern’s special edge treatment.
Cable Crosses
Each cable returns to skipped stitches; they are not left unworked.
1/1 LC: Skip one stitch, FPdc around the next stitch, then work in front of that new stitch to FPdc around the skipped stitch.
2/2 LC: Skip two stitches, FPdc around the next two stitches, then work in front of those new stitches to FPdc around the two skipped stitches in their original order.
2/2 RC: Work the same four-stitch cross, returning to the skipped stitches behind the stitches just made.
3/3 LC: Skip three stitches, FPdc around the next three, then work in front to FPdc around the three skipped stitches in their original order.
3/3 RC: Work the same six-stitch cross, returning to the skipped stitches behind the stitches just made.
Left crosses are worked in front; right crosses are worked behind. A 3/3 cross uses six stitches in total, not three.
Reverse Single Crochet
Also called crab stitch, this is single crochet worked in the opposite direction to your usual single crochet. Insert the hook into the next stitch to the right if you crochet right-handed, pull up a loop, and complete the sc. Left-handed crocheters reverse that direction.
Before You Begin
The front and back are different mirror-image panels. Follow each panel’s own foot instructions; making two identical fronts will not reproduce the design.
The beginning ch 3 counts as one dc. In the early shaping rows, ch 4 counts as one dc plus an additional chain. Follow the special increase placement into that chain exactly.
At the end of a row, the top of the previous turning chain is a stitch unless the instructions say otherwise. The foundation row is the wrong side; Foot Row 1 is the right side.
For readability, the full stitch sequences below retain compact US notation. Use the special-stitch explanations above whenever you encounter a cable abbreviation. Brackets mean to repeat the enclosed sequence the stated number of times.
PATTERN INSTRUCTIONS
Step 1: Crochet the Stocking Front
Foot
With A, ch 42.
Foundation Row (wrong side): Dc in 4th ch from hook (beginning ch counts as first dc here and throughout), dc in each remaining ch across — 40 dc.
Row 1 (right side): Ch 4 (counts as first dc and one additional ch here and throughout), dc in 4th ch from hook (increase made), 1/1 LC, dc in next 2 sts, 3/3 RC, FPdc around each of next 3 dc, dc in next 2 sts, [1/1 LC, dc in next 2 sts] twice, 2/2 RC, 2/2 LC, [dc in next 2 sts, 1/1 LC] twice, 2 dc in last dc (top of turning ch), turn — 43 sts.
Row 2: Ch 4, dc in 4th ch from hook, [dc in next 2 sts, BPdc around each of next 2 sts] 3 times, dc in next 4 sts, [BPdc around each of next 2 sts, dc in next 2 sts] 3 times, BPdc around each of next 9 sts, dc in next 2 sts, BPdc around each of next 2 sts, dc in next st, 2 dc in last dc, turn — 46 sts.
Row 3: Ch 4, FPdc around first st, working in front of FPdc just made, dc in first ch of beginning ch 4 (first 1/1 LC made), dc in next 2 sts, 1/1 LC, dc in next 2 sts, FPdc around each of next 3 sts, 3/3 LC, [dc in next 2 sts, 1/1 LC] twice, dc in next 2 sts, 2/2 LC, 2/2 RC, [dc in next 2 sts, 1/1 LC] 3 times, dc again in last dc (same dc as last leg of last 1/1 LC), turn — 49 sts.
Row 4: Ch 4, dc in 4th ch from hook, dc in next dc, [BPdc around each of next 2 sts, dc in next 2 sts] 2 times, BPdc around each of next 2 sts, dc in next 4 sts, BPdc around each of next 4 sts, dc in next 4 sts, [BPdc around each of next 2 sts, dc in next 2 sts] twice, BPdc around each of next 9 sts, [dc in next 2 sts, BPdc around each of next 2 sts] twice, 2 dc in last dc, turn — 52 sts.
Row 5: Ch 3 (counts as first dc here and throughout), dc in next dc, [1/1 LC, dc in next 2 sts] twice, 3/3 RC, FPdc around each of next 3 sts, [dc in next 2 sts, 1/1 LC] twice, dc in next 2 sts, 2/2 RC, 2/2 LC, [dc in next 2 sts, 1/1 LC] 3 times, dc in last 3 sts, turn.
Row 6: Ch 3, [dc in next 2 sts, BPdc around each of next 2 sts] 4 times, dc in next 4 sts, [BPdc around each of next 2 sts, dc in next 2 sts] 3 times, BPdc around each of next 9 sts, [dc in next 2 sts, BPdc around each of next 2 sts] twice, dc in last 2 sts, turn.
Row 7: Ch 3, dc in next dc, [1/1 LC, dc in next 2 sts] twice, FPdc around each of next 3 dc, 3/3 LC, [dc in next 2 sts, 1/1 LC] twice, dc in next 2 sts, 2/2 LC, 2/2 RC, [dc in next 2 sts, 1/1 LC] 3 times, dc in last 3 sts, turn.
Row 8: Ch 3, [dc in next 2 dc, BPdc around each of next 2 sts] 3 times, dc in next 4 sts, BPdc around each of next 4 sts, dc in next 4 sts, [BPdc around each of next 2 sts, dc in next 2 sts] twice, BPdc around each of next 9 sts, [dc in next 2 sts, BPdc around each of next 2 sts] twice, dc in last 2 sts, turn.
Rows 9-11: Repeat Rows 5-7.
Row 12: Ch 3, dc3tog, dc in next st, [dc in next 2 sts, BPdc around each of next 2 sts] twice, dc in next 4 sts, BPdc around each of next 4 sts, dc in next 4 sts, [BPdc around each of next 2 sts, dc in next 2 sts] twice, BPdc around each of next 9 sts, [dc in next 2 sts, BPdc around each of next 2 sts] twice, dc in last 2 sts, turn — 50 sts.
Row 13: Ch 3, dc in next dc, [1/1 LC, dc in next 2 sts] twice, 3/3 RC, FPdc around each of next 3 sts, [dc in next 2 sts, 1/1 LC] twice, dc in next 2 sts, 2/2 RC, 2/2 LC, [dc in next 2 sts, 1/1 LC] twice, dc in next 2 sts, dc3tog, turn — 48 sts.
Row 14: Ch 3, dc2tog (beginning ch and following dc2tog count as one dc3tog), BPdc around each of next 2 sts, [dc in next 2 sts, BPdc around each of next 2 sts] 2 times, dc in next 4 sts, [BPdc around each of next 2 sts, dc in next 2 sts] 3 times, BPdc around each of next 9 sts, [dc in next 2 sts, BPdc around each of next 2 sts] twice, dc in last 2 sts, turn — 46 sts.
Row 15: Ch 3, dc in next dc, [1/1 LC, dc in next 2 sts] twice, FPdc around each of next 3 sts, 3/3 LC, [dc in next 2 sts, 1/1 LC] twice, dc in next 2 sts, 2/2 LC, 2/2 RC, dc in next 2 sts, 1/1 LC, dc in next 2 sts, dc3tog, turn — 44 sts. Fasten off.
Leg
Row 1 (wrong side): With wrong side facing, skip first 13 sts of last row, draw up a loop of A in next st, ch 3, dc2tog (beginning ch 3 and dc2tog count as one dc3tog), dc in next st, [BPdc around each of next 2 sts, dc in next 2 sts] twice, BPdc around each of next 9 sts, [dc in next 2 sts, BPdc around each of next 2 sts] twice, dc in last 2 sts, turn — 29 sts.
Row 2: Ch 3, dc in next dc, [1/1 LC, dc in next 2 sts] twice, 3/3 RC, FPdc around each of next 3 sts, [dc in next 2 sts, 1/1 LC] twice, dc in last 2 sts, turn.
Row 3: Ch 3, dc in next st, [BPdc around each of next 2 sts, dc in next 2 sts] twice, BPdc around each of next 9 sts, [dc in next 2 sts, BPdc around each of next 2 sts] twice, dc in last 2 sts, turn.
Row 4: Ch 3, dc in next dc, [1/1 LC, dc in next 2 sts] twice, FPdc around each of next 3 sts, 3/3 LC, [dc in next 2 sts, 1/1 LC] twice, dc in last 2 sts, turn.
Row 5: Repeat Row 3.
Rows 6-33: Repeat Rows 2-5 seven times.
Row 34: Repeat Row 2. Fasten off.
Front checkpoint: The foot increases from 40 to 52 stitches, stays at 52 through Foot Row 11, then narrows to 44. The leg starts with 29 stitches and retains that width through all 34 leg rows.
Step 2: Crochet the Stocking Back
Foot
With A, ch 42.
Foundation Row (wrong side): Dc in 4th ch from hook (beginning ch counts as first dc here and throughout), dc in each remaining ch across — 40 dc.
Row 1 (right side): Ch 4, dc in 4th ch from hook (increase made), dc in next st, [1/1 LC, dc in next 2 sts] twice, 2/2 RC, 2/2 LC, [dc in next 2 sts, 1/1 LC] twice, dc in next 2 sts, 3/3 RC, FPdc around each of next 3 dc, dc in next 2 sts, 1/1 LC, dc again in last dc (same dc as last leg of last 1/1 LC) — 43 sts.
Row 2: Ch 4, dc in 4th ch from hook, dc in next st, BPdc around each of next 2 sts, dc in next 2 sts, BPdc around each of next 9 sts, [dc in next 2 sts, BPdc around each of next 2 sts] 3 times, dc in next 4 sts, [BPdc around each of next 2 sts, dc in next 2 sts] 3 times, 2 dc in last st — 46 sts.
Row 3: Ch 4, dc in 4th ch from hook, [1/1 LC, dc in next 2 sts] 3 times, 2/2 LC, 2/2 RC, [dc in next 2 sts, 1/1 LC] twice, dc in next 2 sts, FPdc around each of next 3 sts, 3/3 LC, dc in next 2 sts, 1/1 LC, dc in next 2 sts, 2 dc in last st, turn — 49 sts.
Row 4: Ch 4, dc in 4th ch from hook, [BPdc around each of next 2 sts, dc in next 2 sts] twice, BPdc around each of next 9 sts, [dc in next 2 sts, BPdc around each of next 2 sts] twice, dc in next 4 sts, BPdc around each of next 4 sts, dc in next 4 sts, [BPdc around each of next 2 sts, dc in next 2 sts] 3 times, dc in next st, 2 dc in last dc, turn — 52 sts.
Row 5: Ch 3 (counts as first dc here and throughout), dc in next 2 sts, [1/1 LC, dc in next 2 sts] 3 times, 2/2 RC, 2/2 LC, [dc in next 2 sts, 1/1 LC] twice, dc in next 2 sts, 3/3 RC, FPdc around each of next 3 dc, [dc in next 2 sts, 1/1 LC] twice, dc in last 2 sts, turn.
Row 6: Ch 3, dc in next st, [BPdc around each of next 2 sts, dc in next 2 sts] twice, BPdc around each of next 9 sts, [dc in next 2 sts, BPdc around each of next 2 sts] 3 times, dc in next 4 sts, [BPdc around each of next 2 sts, dc in next 2 sts] 4 times, dc in last dc, turn.
Row 7: Ch 3, dc in next 2 sts, [1/1 LC, dc in next 2 sts] 3 times, 2/2 LC, 2/2 RC, [dc in next 2 sts, 1/1 LC] twice, dc in next 2 sts, FPdc around each of next 3 dc, 3/3 LC, [dc in next 2 sts, 1/1 LC] twice, dc in last 2 sts, turn.
Row 8: Ch 3, dc in next st, [BPdc around each of next 2 sts, dc in next 2 sts] twice, BPdc around each of next 9 sts, [dc in next 2 sts, BPdc around each of next 2 sts] twice, dc in next 4 sts, BPdc around each of next 4 sts, dc in next 4 sts, [BPdc around each of next 2 sts, dc in next 2 sts] 3 times, dc in last dc, turn.
Rows 9-11: Repeat Rows 5-7.
Row 12: Ch 3, dc in next st, [BPdc around each of next 2 sts, dc in next 2 sts] twice, BPdc around each of next 9 sts, [dc in next 2 sts, BPdc around each of next 2 sts] twice, dc in next 4 sts, BPdc around each of next 4 sts, dc in next 4 sts, [BPdc around each of next 2 sts, dc in next 2 sts] twice, BPdc around each of next 2 sts, dc3tog, turn — 50 sts.
Row 13: Ch 3, dc2tog (beginning ch and following dc2tog count as one dc3tog), [dc in next 2 sts, 1/1 LC] twice, dc in next 2 sts, 2/2 RC, 2/2 LC, [dc in next 2 sts, 1/1 LC] twice, dc in next 2 sts, 3/3 RC, FPdc around each of next 3 sts, [dc in next 2 sts, 1/1 LC] twice, dc in last 2 sts, turn — 48 sts.
Row 14: Ch 3, dc in next st, [BPdc around each of next 2 sts, dc in next 2 sts] twice, BPdc around each of next 9 sts, [dc in next 2 sts, BPdc around each of next 2 sts] 3 times, dc in next 4 sts, [BPdc around each of next 2 sts, dc in next 2 sts] twice, BPdc around each of next 2 sts, dc3tog, turn — 46 sts.
Row 15: Ch 3, dc2tog (beginning ch and following dc2tog count as one dc3tog), dc in next 2 sts, 1/1 LC, dc in next 2 sts, 2/2 LC, 2/2 RC, [dc in next 2 sts, 1/1 LC] twice, dc in next 2 sts, FPdc around each of next 3 sts, 3/3 LC, [dc in next 2 sts, 1/1 LC] twice, dc in last 2 sts, turn — 44 sts.
Leg
Row 1 (wrong side): Ch 3, dc in next st, [BPdc around each of next 2 sts, dc in next 2 sts] twice, BPdc around each of next 9 sts, [dc in next 2 sts, BPdc around each of next 2 sts] twice, dc in next st, dc3tog, turn; leave remaining sts unworked — 29 sts.
Row 2: Ch 3, dc in next dc, [1/1 LC, dc in next 2 sts] twice, 3/3 RC, FPdc around each of next 3 sts, [dc in next 2 sts, 1/1 LC] twice, dc in last 2 sts, turn.
Row 3: Ch 3, dc in next st, [BPdc around each of next 2 sts, dc in next 2 sts] twice, BPdc around each of next 9 sts, [dc in next 2 sts, BPdc around each of next 2 sts] twice, dc in last 2 sts, turn.
Row 4: Ch 3, dc in next dc, [1/1 LC, dc in next 2 sts] twice, FPdc around each of next 3 sts, 3/3 LC, [dc in next 2 sts, 1/1 LC] twice, dc in last 2 sts, turn.
Row 5: Repeat Row 3.
Rows 6-33: Repeat Rows 2-5 seven times.
Row 34: Repeat Row 2. Fasten off.
Back checkpoint: The back follows the same stitch totals as the front, but places the foot shaping on the opposite side. Turn after Back Foot Rows 1 and 2, as well as all other rows. After Back Foot Row 15, keep the yarn attached for Back Leg Row 1.
Step 3: Make the Ribbed Cuff
With B, ch 28.
Row 1: Sc in the second chain from the hook and every remaining chain. Turn: 27 sc.
Row 2: Ch 1, sc in each stitch through the back loop only. Turn: 27 sc.
Row 3: Ch 1, sc through the back loop of the first 23 stitches. Turn, leaving four stitches unworked: 23 sc.
Row 4: Ch 1, sc through the back loop of each of those 23 stitches. Turn.
Row 5: Ch 1, sc through the back loops of the first 23 stitches, then sc through the back loops of the four unworked stitches from Row 2. Turn: 27 sc.
Rows 6-8: Ch 1, sc through the back loop of all 27 stitches, turn after each row.
Rows 9-74: Repeat Rows 3-8 eleven more times. Each repeat contains six rows.
Rows 75-78: Repeat Rows 3-6 once.
Fasten off with a long sewing tail. Sew the two short ends of the strip together to form a ring. The short rows create a slightly shorter edge; that edge will be attached to the stocking opening.
Step 4: Make the Hanging Loop and Pompom Tie
Hanging loop: With B, ch 31. Sl st in the second chain from the hook and every remaining chain: 30 slip stitches. Fasten off.
Pompom tie: With B, ch 70 and fasten off.
Make two pompoms with the pompom maker, following its directions. Secure their centers firmly and trim them to approximately 2 1/4 inches (57 mm).
Step 5: Edge Both Panels
With the right side facing, join A with sc at the center of the bottom edge of the front foot.
Work alternating ch 1 and sc evenly around the whole outer edge, including the top opening edge. At each top corner, work (sc, ch 1, sc). Join with sl st in the first sc and fasten off.
Repeat around the back panel. Use consistent spacing on both panels so their edging spaces can be matched for assembly. The source does not supply a fixed edging count.
Step 6: Assemble the Stocking
Weave in the panel ends and place front and back together with wrong sides facing inward. Match the edges.
Hold two strands of A together. Join with a slip stitch in a top-corner ch-1 space.
Ch 1 and work reverse sc through both panels’ corresponding edging spaces. Work down the side, around the foot, and up the opposite side to the other top corner. Add stitches as needed around curves. Leave the top opening unseamed. Fasten off.
Place the cuff inside the opening. Match its shorter edge to the top of the stocking and sew it in place without closing the opening.
Fold the cuff outward over the right side.
Fold the hanging-loop strip in half and sew both ends securely at the back seam near the top.
Attach one pompom to each end of the chain tie. Sew the middle of the tie beneath the cuff at the back seam.
Weave in remaining ends and check the seams and hanging loop.
VIDEO TUTORIAL
Tips for Enjoying the Cable Work
Keep a row counter beside you and check the stitch count after every shaping row. If a cable looks wrong, check whether you returned to the skipped stitches in front or behind the new stitches.
Work a small practice cross before beginning the panels. The full stocking is an intermediate project even with detailed explanations; taking time to learn the crosses will make the experience more comfortable.
Ready for the Holiday Mantel
With its raised cables, folded cuff, and soft pompoms, this stocking has plenty of handmade character. Choose familiar Christmas colors or a combination that suits your home, and enjoy making a decoration you can bring out each year.
Happy crocheting from Grandma’s Crafts!
Pattern credit: Crochet Cable Stocking by Mary Jane Protus for Red Heart/Coats & Clark, pattern RHC0518-021065M. The stitch sequences follow the supplied PDF, with added explanations and explicit turning reminders. This written guide has not been sample-crocheted.