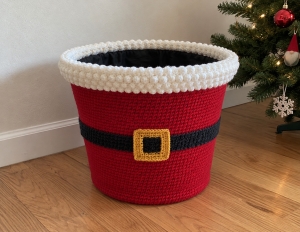
Welcome to Grandma’s Crafts! If you enjoy giving everyday things a little holiday personality, this Santa-inspired basket is a lovely project to settle into. A red cover, a black belt, a gold buckle, and a fluffy-looking white popcorn trim turn a plastic basket into a cheerful place for gifts or festive decorations.
Designed by Heather Lodinsky, this project includes an outer crochet cover and a separate liner. The plastic basket provides the structure; the crochet pieces give it its Christmas charm.
Picture it beside the Christmas tree, filled with little wrapped gifts, or near your favorite chair, holding yarn for your holiday projects. The Santa-inspired details make it feel festive wherever you place it, and the basket underneath helps it keep its shape.
Much of the cover uses single crochet, giving you a steady rhythm to enjoy as the sides grow. The white popcorn trim adds a playful texture, while the belt and buckle bring the whole design together. Checking the fit against your basket along the way will help each piece sit comfortably in place.
You can bring this basket out each December and find a new use for it as your holiday plans change. Fill it with gift bags one year and handmade decorations the next. It’s a lovely way to make something practical part of your Christmas traditions.
Project Details
Original skill level: Easy.
Basket size: Approximately 16 1/2 inches (42 cm) in diameter and 12 1/2 inches (32 cm) tall.
Terminology: US crochet terms.
Construction: Outer cover and inner liner worked from the bottom upward, with a separate belt and buckle.
This is a basket cover, rather than a freestanding crocheted basket. Use it for decoration and gifts; it is not an infant carrier or sleeping space.
Materials
Red Heart Super Saver: 2 skeins Cherry Red (A), 1 skein Soft White (B), 2 skeins Black (C), and 1 skein Gold (D).
The listed solid-color skeins contain 7 oz/198 g and 364 yards/333 meters each.
5.5 mm crochet hook, US I/9, or the size needed for gauge.
A plastic 1-bushel basket in the stated size.
Removable stitch marker, scissors, and tapestry needle.
Gauge: 14 sc = 4 inches (10 cm). Check both gauge and fit against your actual basket as you work.
Single crochet: Insert the hook, yarn over and pull up a loop, then yarn over and pull through both loops.
Popcorn: Work 3 dc into one stitch. Remove the hook from the working loop, insert it from front to back through the first dc, pick up the dropped loop, and pull it through the first dc. The popcorn counts as one stitch for the following round.
Color change: On the final stitch before changing colors, use the new color for the final pull-through.
Work the cover and liner in a continuous spiral. Do not join or turn at the end of each round. Put a marker in the first stitch and move it up as you complete each round.
Step 1: Crochet the Red Base
With A, make a magic ring. Ch 1; this chain does not count as a stitch. Work 6 sc into the ring and tighten it gently.
For each round in the table, repeat the listed sequence six times. Work into both loops unless instructed otherwise.
Round
Sequence
Total stitches
1
6 sc into the ring
6
2
Inc in each stitch
12
3
Inc, sc in next st
18
4
Sc, inc, sc
24
5
Sc in next 3 sts, inc
30
6
Sc in next 2 sts, inc, sc in next 2 sts
36
7
Sc in next 5 sts, inc
42
8
Sc in next 2 sts, inc, sc in next 4 sts
48
9
Sc, inc, sc in next 6 sts
54
10
Sc in next 6 sts, inc, sc in next 2 sts
60
11
Sc in next 3 sts, inc, sc in next 6 sts
66
12
Sc in next 10 sts, inc
72
13
Sc in next 6 sts, inc, sc in next 5 sts
78
14
Sc in next 2 sts, inc, sc in next 10 sts
84
15
Sc in next 10 sts, inc, sc in next 3 sts
90
16
Sc in next 7 sts, inc, sc in next 7 sts
96
17
Sc, inc, sc in next 14 sts
102
18
Sc in next 16 sts, inc
108
Compare the circle with the bottom of the basket. The source allows one or two additional plain sc rounds if needed. Plain rounds retain 108 stitches; if your basket requires a substantially different base, the later shaping needs an individual adjustment.
Step 2: Build the Outer Cover
Round 19: Sc in each stitch around through the back loops only: 108 sc. This marks the transition from the base to the sides.
Continue in both loops, working one sc into each stitch, until the side measures 1 inch (2.5 cm) from the base of Round 19.
First increase round: Repeat (2 sc in next st, sc in next 17 sts) six times: 114 sc.
Work plain sc rounds for another 1 inch (2.5 cm), measured from the base of that increase round.
Next increase round: Repeat (2 sc in next st, sc in next 18 sts) six times: 120 sc.
Continue the same one-inch interval followed by a six-increase round seven more times:
Stitches before the increase
Repeat six times
Stitches after
120
Inc, sc in next 19 sts
126
126
Inc, sc in next 20 sts
132
132
Inc, sc in next 21 sts
138
138
Inc, sc in next 22 sts
144
144
Inc, sc in next 23 sts
150
150
Inc, sc in next 24 sts
156
156
Inc, sc in next 25 sts
162
Work plain rounds until the red cover is approximately 2 inches (5 cm) shorter than the basket. Finish the last sc with B and fasten off A.
Step 3: Add the White Popcorn Trim
The supplied PDF has a mismatch between its round range and repeat count. The instructions below provide a defined 14-round adaptation, retaining the white popcorn texture and 162-stitch circumference. The plain rounds are complete rounds so the marker remains easy to follow.
Round 1: With B, sc in every stitch: 162 sc.
Round 2: Repeat (popcorn in next st, sc in next st) 81 times: 81 popcorns and 81 sc.
Round 3: Sc in every stitch, including the top of each popcorn: 162 sc.
Rounds 4-13: Repeat Rounds 2 and 3 five times. Each popcorn round has 81 popcorns and 81 sc; each plain round has 162 sc.
Round 14: Sc in each stitch around. Sl st into the next stitch and fasten off.
This adaptation aligns the popcorn columns. The PDF’s 161-stitch pass shifts their placement; use its original instructions if you want to explore that offset arrangement.
Step 4: Crochet the Black Liner
With C, repeat the base through Round 18.
For the liner’s Round 19, work through the front loops only, rather than the back loops.
Continue with the same side measurements and increases as the red cover, finishing with 162 stitches. Stop at the same side height as the red section, approximately 2 inches below the basket rim. Do not add popcorn trim or change to white. Fasten off.
Step 5: Make the Gold Buckle
With D, ch 13.
Row 1: Sc in the second chain from the hook and each remaining chain. Turn: 12 sc.
Rows 2-3: Ch 1, sc in each stitch, turn: 12 sc.
Row 4: Ch 1, sc in the first 3 sts, ch 6, skip 6 sts, sc in the last 3 sts. Turn.
Row 5: Ch 1, sc in the first 3 sts, work 6 sc into the ch-6 space, sc in the last 3 sts. Turn: 12 sc.
Rows 6-7: Repeat Rows 2 and 3.
Row 8: Repeat Row 4.
Row 9: Repeat Row 5.
Rows 10-11: Ch 1, sc in each stitch across, turn.
With the right side facing, work slip stitches evenly around the outer edge of the buckle. Fasten off. The two openings allow the belt to pass through the buckle.
Step 6: Make the Black Belt
With C, ch 6. Sc in the second chain from the hook and each remaining chain: 5 sc. Turn.
Ch 1, sc in all 5 stitches, and turn. Repeat this row until the belt fits around the middle of the basket with a slight stretch. Fasten off.
Step 7: Assemble the Basket
Weave in the yarn tails.
Put the plastic basket inside the red cover. Bring the white trim over the rim.
Place the black liner inside the basket and sew its upper edge to the final white trim round.
Thread an end of the belt through the buckle openings. Sew the belt ends together and hide the join behind the buckle.
Position the belt around the basket and tack it to the cover if needed.
VIDEO TUTORIAL
Enjoy Your Festive Make
Fill your finished basket with wrapped gifts, yarn for your next holiday project, or lightweight seasonal decorations. It is a lovely way to give a practical household item a handmade Christmas outfit.
Happy crocheting from Grandma’s Crafts!
Pattern credit: Santa’s Gift Basket by Heather Lodinsky for Red Heart/Coats & Clark, pattern RHC0504-016416M. The popcorn trim above is an explicitly described editorial adaptation; the other sections follow the supplied pattern.