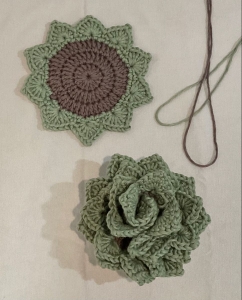
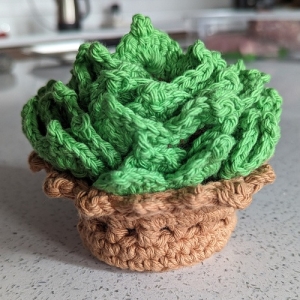
Welcome, dear friends of Grandma’s Crafts! If you love a little greenery on the kitchen table, here’s a plant you’ll never have to water. This crochet succulent coaster set looks like a potted plant when the pieces are tucked away. When it’s time for coffee, pull out a coaster and slip it under your cup. It’s a lovely project for your own home and a thoughtful gift for a friend who always has the kettle on.
I can picture this little pot on a coffee table, waiting for someone to ask whether the plant is real. The fun comes when you lift out a coaster and slide it under their cup. It’s the kind of handmade detail that gets people talking over coffee.
This is also a lovely project to make a little at a time. Start with one coaster when you have a few quiet minutes, then work on the pot another evening. If you’re using leftover yarn, set your greens side by side before you start. A soft sage and a deeper olive can look right at home in the same pot.
If you’re making the set for someone else, think about where they like to sit with their morning coffee. A cheerful yellow pot might brighten a kitchen windowsill, while a warm terracotta shade would look right at home beside a favorite reading chair. Once you’ve picked your colors, let’s take a closer look at how the pieces fit together.
How the Crochet Succulent Coaster Set Works
The set has two parts: the crocheted coasters and the pot that holds them. Stack the coasters inside the pot and spread the green leaf tips to give the succulent a fuller look. When you need a coaster, lift one out and lay it flat under your cup.
Yarn and Hooks for the Project
For the beginner tutorial below, use a 4 mm crochet hook and medium weight (No. 4) yarn. Choose green for the leaves and pick whichever colors you like for the coaster center and pot. The instructions use US crochet terminology.
If you’re working from your yarn stash, make one coaster first and check that it lies flat with a mug on it. Try it in the finished pot before making the rest of the set so you can check the fit.
Easy Crochet Succulent Coaster and Pot
If you’re new to crochet, start with one coaster and a small pot. You’ll practice making a flat circle, learn how taller stitches shape the leaves, and crochet a pot to hold the finished set.
What You’ll Need
A 4 mm crochet hook
Medium weight (No. 4) yarn in green for the leaves and your choice of colors for the coaster center and pot
A stitch marker
Scissors and a yarn needle
The center of the coaster measures about 3 inches across before the leaves are added. Your finished size may vary depending on your yarn and how tightly you crochet.
US Crochet Abbreviations
ch: chain
sc: single crochet
hdc: half double crochet
dc: double crochet
tr: treble crochet
sl st: slip stitch
inc: work two single crochets into the same stitch
Step 1: Crochet the Center of the Coaster
Start with a magic ring. Place a stitch marker in the first stitch and move it up as you begin each new round. Count your stitches before starting the next round.
Round
Instructions
Stitch count
1
Work 7 sc into the magic ring. Pull the yarn tail to close the center.
7
2
Work 2 sc into every stitch.
14
3
Repeat 1 sc, then 1 inc seven times.
21
4
Repeat 1 sc in each of the next 2 stitches, then 1 inc seven times.
28
5
Work 1 sc in the back loop of each stitch.
28
To find the back loop, look at the little V at the top of each stitch. Insert your hook under the strand farther away from you and leave the closer strand untouched.
Step 2: Add the Green Leaves
Switch to green yarn. Each leaf rises to a pointed tip, comes back down, and is anchored to the edge of the circle.
Start the leaf: Ch 2. In the next stitch of the circle, work 1 hdc, 1 dc, and 1 tr. All three stitches go into the same opening.
Make the tip: Ch 2, then sl st into the top of the treble crochet you just made.
Come back down: In the next stitch of the circle, work 1 tr, 1 dc, and 1 hdc, all in the same opening.
Anchor the leaf: Ch 2 and sl st into the next stitch of the circle.
Repeat these steps around the edge. Stop after your last full leaf, then fasten off and weave in the yarn ends. If you lose your place, look for the slip stitch that anchors the previous leaf to the circle.
Step 3: Crochet the Pot
With your pot color, repeat Rounds 1 through 5 from the coaster center. The back loop round creates a ridge where the bottom meets the sides.
Rounds 6 through 14: Work 1 sc in every stitch, inserting your hook under both loops. Keep 28 stitches per round. The sides will grow upward as you work without increases.
Fasten off and weave in the ends. Fold the top edge outward if you’d like a rolled rim.
Step 4: Put Your Succulent Together
Try your first coaster in the pot before making the rest. The center should fit comfortably inside, with the green leaves visible above the rim. Once you’re happy with the fit, make a few more coasters and stack them in the pot. Gently spread the leaf tips so they fan out like a little succulent.
Make It Your Own
Try two shades of green for the coasters if you want a little variation in the finished plant. For the pot, terracotta gives it the look of a clay planter, while cream pairs nicely with sage or olive green.
If you’re making the set as a gift, pick a pot color that suits the recipient’s kitchen and tuck in a handwritten note explaining the surprise. A favorite tea or a small bag of coffee would make a sweet addition.
Watch the Free Crochet Video Tutorial
If you prefer a pattern you can print, the Ravelry listing links to the designer’s paid PDF. It includes written instructions and charts for the coaster and pot, as well as teapot coaster and hanging basket variations.
When your set is finished, put it somewhere you’ll reach for it often. The nicest part of this little succulent is getting to use it every time you sit down for a cup of something warm.
And if you’re giving yours away, tuck a favorite tea bag into the pot with a little note that says, “Lift a leaf for your cup.” I hope you enjoyed making this project, dear friends. If you try it, I’d love to hear which colors you picked for your little succulent.
Thank you, dear friend, for spending a little time with us here at Grandma’s Crafts. I’m so glad you stopped by, and I hope this little succulent has you reaching for your favorite shades of green. Good luck with your coaster set! Take your time with that first leaf, and give yourself a moment to admire it before moving on to the next. There’s something especially satisfying about setting your morning mug on a coaster you made yourself. Until next time, happy crocheting, and I’ll see you soon for another handmade project!