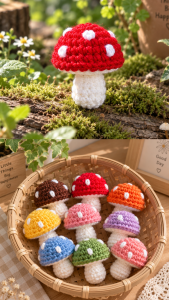
Welcome to Grandma’s Crafts! I’m so happy you are here today. Today we are making something small and sweet: a Little Mushroom Amigurumi. With a rounded cap, a chubby stem and a few white spots, it is one of the cutest things you can make with a bit of leftover yarn.
Mushrooms are everywhere right now, on shelves, in cottage style decor and dangling from bags and keychains. They are also a wonderful first amigurumi, because the shapes are simple: a little tube for the stem and a dome for the cap, both worked in single crochet.
The stem has a clever detail. At the top, it flares out into a flat circle that becomes the underside of the cap. Then you place the cap on top and crochet the two edges together, so there is no fiddly sewing of pieces.
Grab two colors, a little stuffing and a stitch marker, and let’s make a whole little mushroom family together.
The fun part is deciding what kind of mushroom you want to make. A red cap gives it that storybook look, while brown, pink or mustard can make each one feel a little different. You can even make a few in colors that match the room where they’ll live.
I also love a project that makes use of the little balls of yarn left over from something bigger. They never seem like enough for a blanket or a bag, but they are just right for a tiny mushroom. Before long, you might have a few of them sitting together on a shelf.
If this is your first amigurumi, take your time with the first few rounds and keep your stitch marker close. Once the shape starts to grow, you’ll see how it all comes together. Let’s get your yarn and hook ready.
Skill Level
Easy. You should know the magic ring, single crochet and working in a spiral.
Materials
Worsted weight (#4) cotton or acrylic yarn in 2 colors: a cream or beige for the stem and a red, brown or any color you like for the cap
A small amount of white yarn for the spots
4 mm (G-6) crochet hook, or a hook a little smaller than your yarn label suggests so the stitches are tight
Polyester fiberfill stuffing
Stitch marker
Scissors and tapestry needle
Abbreviations (US Terms)
MR: magic ring
ch: chain
sl st: slip stitch
sc: single crochet
inc: increase: 2 sc in the same stitch
st(s): stitch(es)
BLO: back loop only
FLO: front loop only
* *: repeat the instructions between the asterisks as directed
Pattern Notes
Both pieces are worked in a continuous spiral. Do not join the rounds. Place a stitch marker in the first stitch of each round and move it up as you go.
Amigurumi stitches should be tight, so the stuffing doesn’t show through. If you can see gaps, go down a hook size.
The number in parentheses is the stitch count at the end of each round.
Little Mushroom Amigurumi Pattern
Stem (cream)
Round 1: Make a magic ring and work 6 sc into it. Pull the ring closed. (6)
Round 2: Inc in each st around. (12)
Round 3: Sc BLO in each st around. This makes a neat edge so the stem can stand flat. (12)
Rounds 4 to 10: Sc in each st around. (12)
Stuff: Stuff the stem firmly now, while the opening is easy to reach.
Round 11: Working in the FLO for this round only, *inc in the next st, sc in the next st*. Repeat from * around. (18)
Round 12: *Inc in the next st, sc in each of the next 2 sts*. Repeat from * around. (24)
Round 13: *Inc in the next st, sc in each of the next 3 sts*. Repeat from * around. (30)
Finish the stem: Sl st in the next st and fasten off, leaving a short tail. Rounds 11 to 13 form a flat circle that will be the underside of the cap.
Cap (your cap color)
Round 1: Make a magic ring and work 6 sc into it. (6)
Round 2: Inc in each st around. (12)
Round 3: *Inc in the next st, sc in the next st*. Repeat from * around. (18)
Round 4: *Inc in the next st, sc in each of the next 2 sts*. Repeat from * around. (24)
Round 5: *Inc in the next st, sc in each of the next 3 sts*. Repeat from * around. (30)
Rounds 6 to 9: Sc in each st around. (30) Do not fasten off.
Spots and Assembly
Spots: Before you join the pieces, thread white yarn on your tapestry needle and embroider a few spots on the cap. Small straight stitches worked over each other, or French knots, both look lovely. Knot the ends on the inside of the cap.
Join: Hold the cap over the flat circle at the top of the stem, with the wrong sides together so the cap covers the circle. With the cap yarn, sc through both loops of the next cap stitch and both loops of the matching stem stitch at the same time. Continue around, working through both pieces. (30)
Stuff and close: Before you work the last few stitches, add a little stuffing to the cap so it is nicely rounded. Finish the round, sl st in the next st and fasten off. Weave the end inside the mushroom.
Make It a Keychain or Ornament
To hang your mushroom, thread a piece of strong yarn through the top of the cap before you close it, knot it on the inside, and tie the ends into a loop. You can attach the loop to a keyring or a hook. If the mushroom is for a baby or a small child, skip the keyring and use only embroidery for the details.
Tips for Neat Amigurumi
Keep your stitch marker in place. It is very easy to lose your spot in a spiral.
Stuff a little at a time and shape with your fingers as you go.
For a taller, rounder cap, work one more plain round of sc after Round 9.
Try a speckled or tweed yarn for the cap for a woodland look.
VIDEO TUTORIAL
A Little Mushroom Family
Make a big mushroom with a bigger hook and thicker yarn, and a tiny one with thinner yarn and a small hook. Group them together on a shelf, around a potted plant or on a windowsill. They also make sweet gifts tucked into a card or a basket.
There you go, your very own Little Mushroom Amigurumi! Isn’t it amazing how a few simple rounds turn into something so charming?
I hope you make a whole handful of them. Thank you for spending this time with me, and come back soon to Grandma’s Crafts for more little projects to brighten your day.