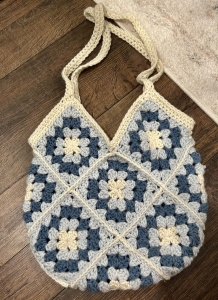
Welcome to Grandma’s Crafts! I’m so happy you are here today. Granny squares are having such a wonderful moment again, and one of my favorite ways to use them is in a bag. So today we are making a Granny Square Tote Bag from eight classic squares, with sturdy handles built right into the top band.
The plan is simple. You make eight traditional granny squares, join four of them for the front and four for the back, and then crochet the two panels together along the sides and bottom. A few rounds of single crochet finish the top, and the handles are made with chains that get covered in stitches, so they are strong enough for everyday use.
This is a perfect project for using up leftover yarn. Every square can be different, or you can plan a color scheme and repeat it. Either way, the finished bag always looks cheerful and full of handmade charm.
If you have made a granny square before, you already know most of what you need. If you haven’t, don’t worry, I have written the square out round by round. Let’s pick our colors and get started!
Skill Level
Easy. You should know the magic ring, double crochet and single crochet.
Materials
Worsted weight (#4) yarn in several colors for the squares, plus one main color for joining, the top band and the handles. Cotton or a cotton blend gives a sturdier bag.
5 mm (H-8) crochet hook, or the size recommended on your yarn label
Scissors
Tapestry needle
Fabric for a lining (optional)
Abbreviations (US Terms)
MR: magic ring
ch: chain
sl st: slip stitch
sc: single crochet
dc: double crochet
st(s): stitch(es)
sp(s): space(s)
sk: skip
* *: repeat the instructions between the asterisks as directed
Pattern Notes
The ch 3 at the beginning of each square round counts as a dc.
Squares are worked in joined rounds with the right side facing you. Do not turn.
You can change color on every round of the squares. Fasten off at the end of a round and join the new color in any corner space.
Make all eight squares with the same yarn and hook so they are the same size.
Part 1: The Granny Squares (make 8)
Round 1: Make a magic ring. Ch 3 (counts as the first dc), 2 dc in the ring, ch 2. *3 dc in the ring, ch 2*. Repeat from * 2 more times. Pull the ring closed and join with a sl st to the top of the beginning ch 3. (12 dc and 4 ch-2 corner spaces)
Round 2: Join the new color with a sl st in any ch-2 corner space. Ch 3, (2 dc, ch 2, 3 dc) in the same space, ch 1. *(3 dc, ch 2, 3 dc) in the next corner space, ch 1*. Repeat from * 2 more times. Join with a sl st to the top of the beginning ch 3. (24 dc)
Round 3: Join the new color in any corner space. Ch 3, (2 dc, ch 2, 3 dc) in the same space, ch 1, 3 dc in the next ch-1 space, ch 1. *(3 dc, ch 2, 3 dc) in the next corner space, ch 1, 3 dc in the next ch-1 space, ch 1*. Repeat from * 2 more times. Join. (36 dc)
Round 4: Join the new color in any corner space. Ch 3, (2 dc, ch 2, 3 dc) in the same space, ch 1, [3 dc in the next ch-1 space, ch 1] twice. *(3 dc, ch 2, 3 dc) in the next corner space, ch 1, [3 dc in the next ch-1 space, ch 1] twice*. Repeat from * 2 more times. Join and fasten off. (48 dc)
Weave in the ends of each square before you join them. Your future self will thank you!
Part 2: Joining the Panels
Front and back: Lay out your squares in two groups of four, each group arranged 2 squares by 2 squares. Move them around until you love the color arrangement.
Join the squares: Working with the main color and a tapestry needle, place two squares side by side with the right sides facing up and whip stitch through the back loops of the matching stitches along the edge, from corner space to corner space. Join all four squares of each panel this way, first in pairs and then the pairs together.
Join the panels: Hold the front and back panels with the wrong sides together. With the main color, join yarn at one top corner, going through both layers. Ch 1 and sc through both layers down the side, working 1 sc in each dc, each ch-1 space and each corner space you meet. Work 3 sc in the bottom corner, continue across the bottom, 3 sc in the next bottom corner, and up the other side. Fasten off. The top stays open.
Part 3: Top Band and Handles
Each panel has 2 squares across the top. Along the top of each square you will work into 12 dc, 3 ch-1 spaces and the 2 corner spaces, which gives 17 stitches per square and 68 stitches all the way around the opening.
Round 1: Join the main color at one side seam at the top of the bag. Ch 1, sc in each dc and each ch-1 space around, and 1 sc in each corner space. Join with a sl st to the first sc. (68 sc)
Round 2 (handles): Ch 1, sc in each of the first 9 sts, ch 60, sk the next 16 sts, sc in each of the next 18 sts, ch 60, sk the next 16 sts, sc in each of the last 9 sts. Join with a sl st to the first sc. (36 sc and 2 chains of 60)
Round 3: Ch 1, sc in each sc and in each ch around. Join. (156 sc)
Round 4: Ch 1, sc in each st around. Join, fasten off and weave in the ends. (156 sc)
Check before Round 2 that each handle will sit in the middle of a panel. With Round 1 starting at a side seam, the 16 skipped stitches fall right in the center of the front and the back.
Adding a Lining (Optional)
A fabric lining makes the bag stronger and keeps small things from slipping through the granny holes. Cut two pieces of fabric the size of your panels plus a seam allowance, sew them into a simple pouch, fold the top edge under and hand stitch it just below the top band.
VIDEO TUTORIAL
Tips for a Beautiful Bag
Block your squares before joining them. Even squares make neat seams.
Use the same color for Round 4 of every square to tie the whole bag together.
Chain the handles loosely so they stay flexible.
If you want longer handles, chain the same extra number for both handles. Rounds 3 and 4 will have more stitches too.
And that’s how a little stack of granny squares turns into a Granny Square Tote Bag! I love carrying a bag like this, because it always starts a conversation.
Make one for the library, one for the beach and one for a friend who loves color as much as you do. Thank you for spending this time with me, and come back soon to Grandma’s Crafts for more cozy patterns.