Hello, dear crochet friends! Welcome to our lovely blog, Grandma’s Crafts. Today, I want to talk with you about something special. This particular pattern is absolutely adorable! Well, without further ado, the pattern we have here today is the Willow Granny Square.
There is something truly special about granny squares, isn’t there? They carry so much charm, warmth, and nostalgia. Every little square feels like a tiny piece of handmade love, and today I’m so happy to share a beautiful crochet project with you: the Willow Granny Square.
Here at Grandma’s Crafts, I love finding crochet patterns that bring together simplicity, beauty, and that wonderful handmade feeling we all cherish. This granny square has a classic charm with a lovely delicate touch, making it a project that feels both traditional and fresh.
The beautiful texture and graceful details of the Willow Granny Square make it a wonderful choice for blankets, pillows, bags, scarves, and many other handmade creations. It’s the kind of pattern that invites you to sit down, pick up your hook, and enjoy a peaceful moment with your yarn.
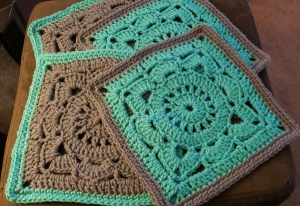
Willow Granny Square
A Little About This Beautiful Granny Square
The Willow Granny Square is a lovely design that combines simple crochet stitches to create an elegant finished piece. Although the final result looks detailed and decorative, the pattern is made with familiar stitches such as chains, single crochet, and double crochet.
One of my favorite things about granny squares is how comforting they are to make. There is a special kind of happiness in watching each round grow, stitch by stitch, until a beautiful little square appears in your hands.
This pattern uses three colors of yarn, which gives you the perfect opportunity to get creative. You can choose soft and gentle shades for a vintage-inspired look, or use bright colors to create something cheerful and full of personality.
Why You’ll Love Making the Willow Granny Square
There are so many reasons why this project is a joy to crochet:
It’s wonderfully versatile: Once you have made your squares, you can join them together to create cozy blankets, decorative pillows, tote bags, and more.
It’s perfect for using your yarn stash: Those beautiful leftover yarn pieces you have saved can become part of something new and special.
It’s relaxing and enjoyable: The repeating rounds make this a lovely project for quiet evenings, relaxing afternoons, or your favorite crochet time.
It has timeless beauty: Granny squares have been loved for generations. They remind us of family, tradition, and the joy of handmade creations.
Choosing Your Yarn Colors
Choosing colors is always such a delightful part of crochet! The Willow Granny Square gives you plenty of room to express your creativity.
A combination of soft cream, gentle green, and dusty pink can create a sweet cottage-style look. Shades of blue and white can give your project a calm and fresh feeling, while warm colors like golden yellow, rust, and earthy tones can make it feel extra cozy.
My advice is simple: choose colors that make your heart happy. Handmade projects become even more special when they reflect your own style and personality.
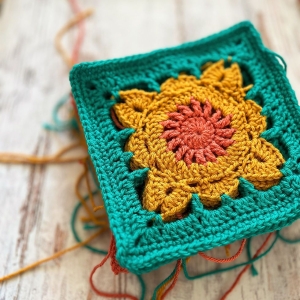
Willow Granny Square
A Handmade Gift Filled With Love
There is nothing quite like receiving something made by hand. A blanket created from beautiful granny squares is not just a useful item, it is a gift filled with patience, care, and love.
The Willow Granny Square would make a wonderful baby blanket, a thoughtful housewarming present, or a treasured keepsake for someone special. Every stitch tells a little story, and handmade gifts always carry a warmth that cannot be found in store-bought items.
Let’s crochet something beautiful together!
If you love classic crochet designs with a touch of elegance, I think you will truly enjoy making the Willow Granny Square. Gather your favorite yarn colors, make yourself comfortable, and enjoy the peaceful rhythm of crochet.
DIMENSIONS
Approximately 7.5 inches square
Level
Easy
Hook Size
US I (9) / 5.5 mm
MITERIALS
Yarn in three colors (Color A, B, and C)
5.5 mm crochet hook
Stitch marker
Scissors
Tapestry needle
ABBREVIATIONS
- ch – Chain
- st(s) – Stitch(es)
- sl st – Slip Stitch
- sc – Single Crochet
- dc – Double Crochet
- sk – Skip
- sp(s) – Space(s)
- pm – Place Marker
- rep – Repeat
Willow Granny Square- PATTERN INSTRUCTIONS
Round 1 – Color A
Begin by making a magic ring. If you prefer, you can also make a small ring by chaining 4 stitches and joining the first chain with a slip stitch.
Step 1: Chain 3. This chain counts as your first double crochet (dc).
If you use stitch markers, place one in the third chain to help you identify the beginning stitch.
Step 2: Work 15 double crochets (dc) into the center of the ring.
You should now have:
- 1 beginning chain-3 (counts as 1 dc)
- 15 additional dc stitches
Step 3: Close the round by making a slip stitch into the top of the beginning chain-3.
Total stitches: 16 dc
Round 2 – Color A
This round creates small spaces between the stitches that will be used in the next round.
Step 1: Chain 4. This counts as 1 double crochet plus 1 chain space.
Place a stitch marker in the third chain if desired.
Step 2: Around the entire circle, work the following pattern:
[1 dc, chain 1] in every stitch around
This means:
- Make 1 double crochet into the next stitch.
- Chain 1.
- Repeat this sequence in every stitch around.
Step 3: Join the round with a slip stitch into the third chain of the beginning chain-4.
Fasten off Color A.
Stitch count: 16 dc and 16 chain-1 spaces
Round 3 – Color B
Attach Color B to any double crochet stitch from the previous round.
Step 1: Chain 3. This counts as your first double crochet.
Place a stitch marker in the third chain if helpful.
Step 2: Work the following pattern around:
- Make 2 dc into the next chain-1 space.
- Make 1 dc into the next double crochet stitch.
- Make 2 dc into the next chain-1 space.
Continue repeating:
[1 dc in dc stitch, 2 dc in chain-1 space]
until you have completed the round.
Step 3: Join with a slip stitch.
Total stitches: 48 dc
Round 4 – Color B
Step 1: Chain 1.
Make 1 single crochet (sc) into the same stitch where you started. Place a stitch marker in this stitch if desired.
Now create the decorative chain spaces by following this sequence:
- Chain 5.
- Slip stitch into the 5th chain from your hook to create a small loop.
- Skip the next 2 stitches.
- Make 1 sc into the next stitch.
- Chain 2.
- Skip the next 2 stitches.
- Make 1 sc into the next stitch.
- Chain 3.
- Skip the next 2 stitches.
- Make 1 sc into the next stitch.
- Chain 2.
- Skip the next 2 stitches.
- Make 1 sc into the next stitch.
Repeat this same sequence around the square.
Finish the round after completing the chain-3 section.
Join with a slip stitch.
Round 5 – Color B
Move your hook with slip stitches until you reach the next chain-5 space.
Step 1: Chain 3. This counts as your first double crochet.
Place a stitch marker in the third chain if desired.
Work all of the following stitches into the same chain-5 space:
- 4 dc
- Chain 3
- 5 dc
This creates the first corner.
Continue around the square:
- Make 1 sc into the next chain-2 space.
- Make 5 dc into the next chain-3 space.
- Make 1 sc into the next chain-2 space.
Repeat this sequence around.
Join with a slip stitch.
Fasten off Color B.
Round 6 – Color C
Attach Color C into any corner chain-3 space.
In the same corner space, work:
- Chain 1
- 1 sc
- Chain 3
- 1 sc
This creates the corner shape.
Continue around the square:
- Chain 5.
- Make 1 dc into the next sc stitch.
- Chain 3.
- Skip the next 2 dc stitches.
- Make 1 sc into the next dc stitch.
- Chain 3.
- Skip the next 2 dc stitches.
- Make 1 dc into the next sc stitch.
- Chain 5.
Repeat this pattern around the square.
Join with a slip stitch.
Round 7 – Color C
Slip stitch into the next corner chain-3 space.
Step 1: Chain 3. This counts as your first double crochet.
In the same corner space, work:
- 2 dc
- Chain 2
- 2 dc
This completes the corner.
Continue around:
- Make 5 dc into the next chain-5 space.
- Make 3 dc into each of the next two chain-3 spaces.
- Make 5 dc into the next chain-5 space.
Repeat this sequence around the square.
Join with a slip stitch.
Round 8 – Color C
Chain 1.
Work 1 single crochet into every stitch around the square.
For each corner chain-2 space, work:
- 2 sc
- Chain 2
- 2 sc
This helps the corners stay square and neat.
Join with a slip stitch.
Round 9 – Color C
Chain 1.
Work 1 single crochet into every stitch around the square.
In each corner chain-2 space, work:
- 3 sc
Join with a slip stitch.
Finishing
Fasten off your yarn.
Using a tapestry needle, carefully weave in all loose yarn ends on the back of your granny square.
Your Willow Granny Square is now complete!
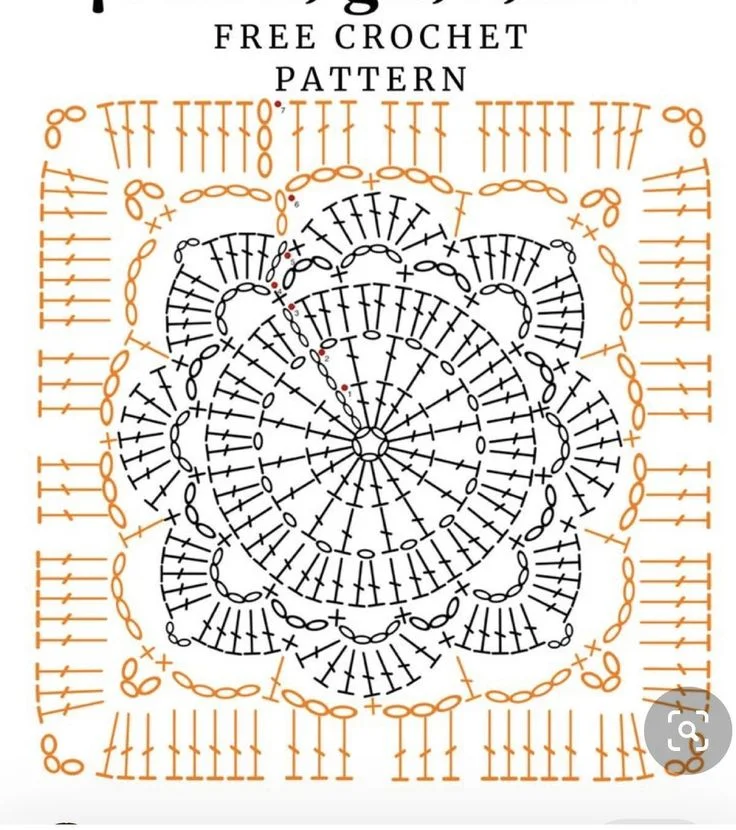 WILLOW SQUARE – GRAPH
VIDEO TUTORIAL
We’ve selected a wonderful video tutorial for you on how to make this beautiful Willow Granny Square. This lovely tutorial is from the Crochet with Yarnhild channel, and you can watch it below
I hope this pattern brings you many happy moments and inspires you to create something beautiful with your own hands.
Thank you for visiting Grandma’s Crafts. I’m always so happy to share cozy crochet ideas, handmade projects, and patterns that bring a little extra warmth into our homes.
Be sure to come back soon for more lovely crochet inspirations, and don’t forget to share your creations with your crochet friends. Let’s continue celebrating the joy of handmade crafts together!
Happy crocheting, my friends! 🧶💕


