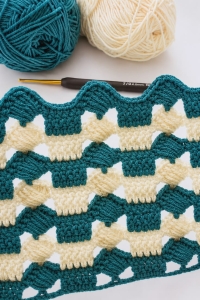
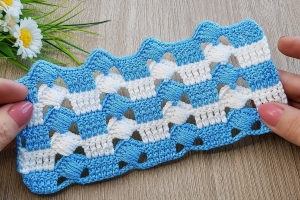
Welcome to Grandma’s Crafts! I’m so happy you stopped by today, especially because I have such a pretty crochet stitch to share with you. The Tilted Block Stitch Pattern has that wonderful combination of texture and openwork that makes a project look much more complicated than it really is. The little angled blocks create a beautiful repeating design, and once you get into the rhythm of the pattern, it becomes one of those relaxing stitches you can happily work on while enjoying a cup of coffee or catching up on your favorite show.
One of my favorite things about this stitch is how much personality it gives to a simple piece of crochet. Instead of having a completely flat surface, the tilted blocks stand out slightly and create lovely dimension throughout the fabric. Between those textured sections, the small open spaces keep the design from feeling too heavy. The result is a crochet fabric that looks detailed and interesting without being overly busy.
And if you are fairly new to crochet, don’t let the finished appearance scare you away! The pattern does use a slightly different technique to form the little blocks, but once you make the first few, everything starts to make sense. The block is created around a treble crochet stitch, which is what gives it that charming tilted appearance. After a couple of rows, you will probably find yourself working through the repeat without having to think about every single stitch.
This is also such a versatile pattern. I can easily imagine it being used for a cozy baby blanket, full-size afghan, scarf, wrap, or even a decorative pillow cover. A soft solid-colored yarn really lets the stitch definition shine, while a gently variegated yarn could create an entirely different look. You can keep the colors neutral and traditional or choose something cheerful and bright depending on the project you have in mind.
Another nice thing about the Tilted Block Stitch is that the repeating rows make it a great pattern for larger projects. Once the foundation rows are finished, you simply continue alternating the main pattern rows until your piece reaches the length you want. I always appreciate patterns like this because you don’t have to keep checking complicated instructions every few minutes. After a while, your hands begin to remember what comes next.
I also think this would be a wonderful stitch for using yarn that has been waiting patiently in your stash for the right project. Because there is such a pretty balance between the solid stitches and the open spaces, even a simple yarn can look extra special.
Just remember to keep your tension comfortable, especially around the chain spaces and the textured blocks. A little consistency goes a long way toward making those repeating motifs look neat and even.
The Tilted Block Stitch creates a beautiful textured fabric made of small diagonal crochet blocks. Although the finished stitch may look detailed, the construction becomes quite simple once you understand how the special block is formed.
For a practice swatch, you can begin with 28 chains. If you would like to make a wider or narrower piece, start with a number that follows a multiple of 8, plus 4 additional chains.
Abbreviations – US Terms
ch – chain
sc – single crochet
dc – double crochet
tr – treble crochet
st – stitch
sts – stitches
How to Make the Tilted Block
Before starting the rows, it helps to understand the stitch that creates the textured section.
When the instructions tell you to make a Tilted Block, work the following:
1 tr, ch 3, 3 dc around the post of the tr just made.
To make this easier to understand:
First, make one treble crochet in the indicated stitch.
Then chain 3.
Now look at the long vertical post of the treble crochet you just completed. Instead of working the next stitches into the top of a stitch, work 3 double crochets around that treble crochet post.
Those stitches gather around the treble and cause the small group to sit at an angle, creating the characteristic block shape.
Starting Chain
Ch 28 for a small practice sample.
Try not to make your foundation chain too tight. A relaxed chain will make the first row easier to work and will help prevent the bottom edge from pulling inward.
Row 1
Beginning in the second chain from the hook, make 1 sc in each chain across.
Turn your work.
You should now have a simple single crochet foundation that will support the textured rows.
Row 2
Ch 3. This turning chain counts as your first dc.
Make 1 dc in each of the next 2 stitches.
You now have a group of three double crochets at the beginning of the row.
Next, repeat the following sequence across:
Skip 2 sts.
Make 1 Tilted Block in the next stitch:
1 tr, ch 3, 3 dc around the post of that tr.
Skip the next 2 sts.
Make 1 dc in each of the next 3 sts.
Continue repeating this sequence across the row.
Turn.
At this point you should begin seeing the textured blocks forming between the groups of double crochet stitches.
Row 3
Ch 3, which counts as the first dc.
Make 1 dc in each of the next 2 dc.
Next:
Ch 2.
Find the ch-3 section at the top of the next Tilted Block and make 1 sc into it.
Ch 2 again.
Then make 1 dc in each of the next 3 dc.
Repeat this sequence across:
Ch 2, 1 sc into the ch-3 section of the next block, ch 2, 1 dc in each of the next 3 dc.
Turn.
This row creates the small chain spaces that prepare the fabric for the next set of tilted blocks.
Row 4
Ch 3, counting it as the first dc.
Make 1 dc in each of the next 2 dc.
Now you will build another row of blocks.
Make 1 Tilted Block in the next sc.
Remember:
1 tr, ch 3, 3 dc around the post of the tr.
Then make 1 dc in each of the next 3 dc.
Continue repeating:
1 Tilted Block in the next sc, then 1 dc in each of the next 3 dc.
Repeat across the row.
Turn.
You should now be able to see how the blocks line up through the fabric and create the repeating diagonal texture.
Continue the Pattern
From this point forward, the stitch becomes much easier to remember.
Simply repeat:
Row 3
then Row 4
Continue alternating these two rows until your crochet piece reaches the length you want.
For a neater upper edge, you can finish your project after completing a Row 3.
Optional Final Row
If you would like a more even edge before fastening off, you can add one simple finishing row.
Ch 1.
Work single crochet evenly across the top edge, making 1 sc in each dc, sc, and chain stitch/space as you come to it.
When you reach the end, fasten off and weave in the yarn ends.
VIDEO TUTORIAL
Helpful Tips for Beginners
The most unusual part of this pattern is probably working the three double crochets around the treble crochet post. If this is your first time making this type of stitch, practice one or two Tilted Blocks separately before starting a large blanket.
Also try to keep your ch-3 sections fairly relaxed and consistent. If some are very tight and others very loose, the blocks may look slightly different from one another.
During the first few rows, stop occasionally and check that your groups of 3 dc are still lining up correctly. Catching a missed stitch early is much easier than discovering it several rows later.
And don’t worry if the blocks look slightly uneven while you are working. Once several rows have been completed, the repeating texture becomes much clearer.
I hope you have fun giving this Tilted Block Stitch Pattern a try and perhaps even turning it into a beautiful blanket or another handmade piece for someone you love. Sometimes discovering a new stitch is all it takes to get excited about crocheting again, and this one is definitely worth adding to your collection.
Thank you so much for spending a little time with me here at Grandma’s Crafts. Be sure to take a look around the blog before you go, because there are plenty of other crochet patterns, stitches, and creative ideas waiting for you. We are always adding new projects and inspiration throughout the week, so come back often to see what’s new. I hope you have a lovely day, enjoy your crochet time, and as always, happy crocheting and happy crafting!