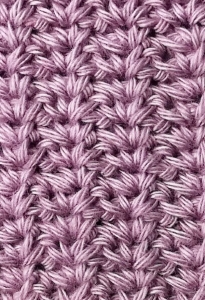
Welcome to Grandma’s Crafts! I’m so happy you are here today. If you enjoy simple crochet stitches that still have a little texture and personality, I think the Spider Stitch is one you will want to keep in your collection. It has a soft, almost pebbled look, but the pattern itself is much easier than it first appears.
What I like most about this stitch is how quickly it becomes repetitive. After the first row, you are simply working into the little chain spaces from the row below, so you do not need to keep checking a long pattern repeat every few minutes.
It is also a really versatile stitch. The fabric comes out textured without being too heavy, which makes it a nice choice for blankets, baby blankets, scarves, washcloths, dishcloths, and plenty of other everyday crochet projects.
And if you are still fairly new to crochet, this is a lovely stitch to practice. You only need single crochet and chain stitches, and the main thing to learn is where to place each new little group.
Why I Like the Spider Stitch
The texture is what makes this stitch special. Each Spider Stitch is made with a simple (sc, ch 1, sc) group, and once those groups start stacking on top of one another, the surface begins to develop that soft textured look.
I also like that the pattern does not need complicated counting once the foundation row is finished. You simply look for the ch-1 space in the center of the stitch below and work the next Spider Stitch right into it.
That makes it the kind of crochet pattern you can actually relax with. Once your hands get used to the movement, the repeat becomes very natural and you can focus more on enjoying the project than constantly checking instructions.
The Spider Stitch also looks beautiful in solid colors because the texture gets a chance to stand out. Cream, soft gray, sage green, dusty pink, baby blue, or any warm neutral would all show the stitch really well.
Of course, you can also use stripes if you want something more playful. Changing colors every few rows can make the texture even more noticeable, especially in blankets and scarves.
Another thing I really like is how easy it is to adjust the size. Since the stitch starts with any odd number of chains, you can make a small washcloth, a wider scarf, or a full blanket using exactly the same stitch pattern.
If this is your first time working the Spider Stitch, I would recommend making a small swatch first. After just a couple of rows, the little chain spaces become much easier to see, and the stitch pattern starts to feel almost automatic.
The Spider Stitch is a simple textured crochet stitch made with single crochet and chain stitches. Once the first row is complete, the entire pattern is created by repeating just one row.
The finished fabric has a lovely subtle texture with very small openings, making it a great choice for blankets, baby blankets, washcloths, scarves, and other cozy projects.
Skill Level
Beginner
Materials
Yarn of your choice
Crochet hook suitable for your yarn
Scissors
Yarn needle
A smooth yarn with good stitch definition will make the texture easier to see.
Abbreviations
ch = chain sc = single crochet sk = skip st(s) = stitch(es ch-1 sp = chain-1 space
Special Stitch: Spider Stitch
Work:
(sc, ch 1, sc)
into the same stitch or chain space.
That complete group forms one Spider Stitch.
Stitch Multiple
Begin with any odd number of chains.
For a small practice swatch, you can:
Ch 21.
Pattern
Row 1
Work (sc, ch 1, sc) in the 3rd ch from hook.
Sk next ch.
Work (sc, ch 1, sc) in next ch.
Continue repeating:
*Sk next ch, (sc, ch 1, sc) in next ch.*
Repeat across until 2 chains remain.
Sk next ch.
Sc in final ch.
Ch 2, turn.
Row 2
The ch-2 turning chain forms the edge of the row.
Locate the first ch-1 space from the previous row.
Work:
(sc, ch 1, sc) in first ch-1 sp.
Continue working:
(sc, ch 1, sc)
in each ch-1 sp across.
After working the final Spider Stitch, sc in the top of the turning ch-2 from the previous row.
Ch 2, turn.
Row 3 and Beyond
Repeat Row 2 until your project reaches the desired length.
That’s it!
Once the first row is established, every Spider Stitch is worked directly into the ch-1 space in the center of the Spider Stitch below.
Understanding the Stitch Placement
The most important thing to remember is that you do not work into every single crochet from the previous row.
Instead, look for the little ch-1 space in the middle of each Spider Stitch.
That is where you will work:
(sc, ch 1, sc)
on the following row.
After a few rows, those chain spaces become much easier to spot.
Tips for Neater Edges
Do not forget the final sc at the end of each row. That small edge stitch is what helps keep the sides straight.
The ch-2 turning chain acts as the first edge stitch, so when you reach the opposite side on the following row, work the final sc into the top of that turning chain.
If you have trouble finding the ch-1 spaces at first, place a few stitch markers in them while practicing. You probably will not need them once the pattern becomes familiar.
Adjusting the Width
This stitch can be made as wide as you like.
Simply begin with any odd number of chains.
For example:
Ch 21 for a small swatch Ch 51 for a wider sample Ch 101 for a larger project
The exact number you need will depend on your yarn, hook size, tension, and desired finished width.
Changing Colors
The Spider Stitch also works beautifully with stripes.
To change colors, begin the final sc of the row with the current color.
Before completing the final yarn over, pull through with the new color.
Ch 2 and turn with the new yarn.
You can change colors every row, every few rows, or keep the entire project in one shade and let the texture stand out.
Pattern Repeat
After Row 1, the entire pattern is simply:
Work (sc, ch 1, sc) in every ch-1 space across, sc in the turning chain, ch 2, turn.
Repeat until you reach your desired length.
One small detail to pay attention to is the edge stitch. Working the final single crochet into the turning chain helps keep the sides neat and straight, especially on larger projects.
VIDEO TUTORIAL
This is exactly the kind of stitch I like for simple handmade projects. It is easy enough to memorize, but the finished fabric still looks like you put a lot more effort into it than you actually did.
So grab a yarn you love, make a small sample, and give the Spider Stitch a try. I think you will be surprised by how quickly the pattern settles into a rhythm.
I hope you enjoy learning the Crochet Spider Stitch and finding a cozy project to use it on. And as always, thank you for spending a little crochet time here with me at Grandma’s Crafts.