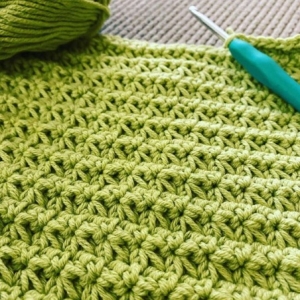
Welcome to Grandma’s Crafts! I’m so happy you are here today. I have such a pretty textured stitch to share with you, and this is one of those little crochet techniques that looks much more complicated than it really is. The Trinity Stitch has this beautiful raised texture that almost looks like tiny stars scattered across the fabric, and once you get into the rhythm, it becomes surprisingly easy to work.
What caught my attention first was how much texture you get from such a simple repeat. The stitch is made with overlapping sc3tog clusters, and each new cluster begins in the same stitch where the previous one ended. That little overlap is what creates the soft, almost star-like pattern across the rows.
I also really like how versatile this stitch is. Because the fabric comes out fairly dense, it works beautifully for things like blankets, bags, home decor, scarves, and other projects where you want a little more structure. If you prefer a softer, drapier fabric, you can simply use a slightly larger hook.
And if you already know how to single crochet, you are much closer to mastering this stitch than you might think. The main thing to learn is the sc3tog, but after the first row the pattern becomes very repetitive. Every row begins and ends with a single crochet, with the textured clusters worked in between.
Why I Like the Trinity Stitch
There is something about textured stitches that makes even the simplest project feel a little more special. A plain blanket can suddenly have so much character just by changing the stitch, and this one gives you plenty of texture without needing cables, front post stitches, or a complicated multi-row repeat.
The Trinity Stitch also has a really nice rhythm once you get used to it. You work a cluster, chain one, begin the next cluster where the last one finished, and keep moving across the row. After a little practice, your hands almost start remembering the movement on their own.
Another thing I love is that you do not need to memorize a huge pattern repeat. The foundation starts with an even number of chains, and after Row 1 you simply repeat the same basic row until your piece reaches the length you want.
That makes it a lovely stitch for a blanket or scarf you want to work on while relaxing. It still looks interesting when finished, but you are not constantly stopping to count a long sequence or checking several different rows.
If this is your first time working a sc3tog cluster, do not worry if the first few feel a little awkward. The important thing is to remember that every new cluster starts in the same place where the previous cluster ended. Once that part clicks, the rest of the stitch becomes much easier to understand.
The Trinity Stitch is a beautifully textured crochet stitch made with overlapping sc3tog clusters separated by chain stitches. The finished fabric is dense, slightly raised, and has a subtle star-like appearance.
It works especially well for blankets, scarves, bags, washcloths, home decor, and anywhere you want a little extra texture without using complicated stitches. Both reference tutorials describe it as a fairly dense stitch pattern.
Skill Level
Easy to Intermediate
Materials
Yarn of your choice
Crochet hook suitable for your yarn
Scissors
Yarn needle
A larger hook can be used if you want the finished fabric to have more drape. The Unraveled Mitten notes that worsted weight yarn with a 6 mm hook creates quite a dense fabric and suggests going larger for scarves or blankets if you prefer a looser result.
Abbreviations
ch = chain sc = single crochet sc3tog = single crochet 3 together st(s) = stitch(es) ch-sp = chain space yo = yarn over
Stitch Multiple
Begin with any even number of chains. Both source tutorials use an even-number foundation chain for this stitch.
Special Stitch: sc3tog
The sc3tog used in Trinity Stitch is slightly unusual because each cluster begins in the same stitch where the previous stitch ended.
To make a sc3tog:
Insert hook into the same stitch as the previous stitch.
Yo and pull up a loop.
Insert hook into the next stitch.
Yo and pull up a loop.
Insert hook into the following stitch.
Yo and pull up a loop.
You should now have 4 loops on your hook.
Yo and pull through all 4 loops.
sc3tog complete.
This overlapping placement is what creates the little textured Trinity shapes across the fabric.
Trinity Stitch Pattern
Foundation
Ch any even number of stitches.
Row 1
Sc in the 2nd ch from hook.
Work 1 sc3tog beginning in the same ch where you just worked the sc, then continue across the next 2 chains.
Ch 1.
Now work the next sc3tog beginning in the same chain where the previous sc3tog ended, then continue across the next 2 chains.
Repeat:
*Ch 1, sc3tog beginning in the same stitch where the previous cluster ended.*
Continue across.
When you reach the final cluster:
Work the last sc3tog as established.
Do not ch 1 after the final sc3tog.
Sc in the same chain where the final leg of the last sc3tog was worked.
Turn.
That missing final ch-1 is important because it keeps the edge straight.
Row 2
Ch 1.
Sc in the first st.
Now work a sc3tog beginning in that same first stitch.
For the remaining legs of the cluster, work into the top of the next sc3tog and the next ch-1 space from the previous row.
Ch 1.
Continue working sc3tog clusters across, always beginning each new cluster in the same place where the previous cluster ended.
Each sc3tog and each ch-1 space from the previous row functions as a stitch position as you work across.
At the end:
Work the final sc3tog.
Do not ch 1.
Sc in the same st as the final leg of the last sc3tog.
Turn.
Row 3 and Beyond
Repeat Row 2 until your project reaches the desired length.
That’s it.
Once the first row is established, you are essentially repeating the same row over and over:
sc → overlapping sc3tog + ch 1 → sc at the opposite edge
The sources both use Row 2 as the repeating row for the rest of the fabric.
Tips for a Neater Trinity Stitch
Keep the loops of your sc3tog clusters at an even height. If you pull them too tightly, the fabric can become stiff.
Pay special attention to the first and last stitches of every row. Starting and finishing with one sc is what helps keep the edges straight.
And remember the most important rule of this stitch: each new sc3tog begins in the same stitch where the previous cluster ended.
Once that movement becomes automatic, the Trinity Stitch is actually very repetitive and relaxing to work.
Adjusting the Size
Since the foundation only needs to be an even number, you can make the swatch as wide as you like.
For a blanket, simply chain an even number until the foundation reaches approximately the width you want, then work the Trinity Stitch repeat until you reach your preferred length.
I think this stitch would be especially beautiful in a soft solid yarn because the texture really gets a chance to stand out. Cream, dusty blue, sage green, blush pink, or even a warm mustard would all show those little textured rows beautifully.
You could also use it as just one section of a larger project. A beautiful stitch does not always need to cover an entire piece, and a few Trinity Stitch rows can add a really pretty textured detail between simpler sections.
VIDEO TUTORIAL
So if you have been wanting to add another easy textured stitch to your crochet collection, give this one a try. Make a small swatch first, get comfortable with the overlapping clusters, and then start imagining all the blankets, scarves, bags, and cozy little projects you could make with it.
I hope you enjoy learning the Trinity Crochet Stitch and adding it to your list of favorites. And as always, thank you for spending a little crochet time here with me at Grandma’s Crafts.