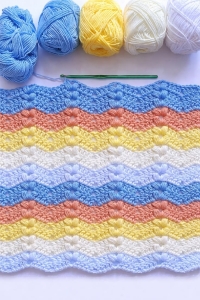
Hello my friend! Welcome to our lovely blog Grandma’s Crafts. Today we’re sharing a beautiful textured stitch that combines soft crochet waves with raised puff details. This Puff Ripple Stitch Crochet Pattern is a lovely choice for anyone who enjoys crochet designs with plenty of movement, texture, and visual interest.
What makes this stitch so attractive is the contrast between the flowing ripple shape and the soft puff stitches worked along the peaks. The valleys create the familiar wave effect, while the puff stitches add dimension and make the finished fabric look much more detailed than a traditional ripple pattern.
Even though the finished stitch looks intricate, the construction becomes much easier once you understand the repeat. The pattern follows a regular sequence of valleys, double crochet sections, and puff stitch peaks, so after a few rows you can begin to recognize the structure directly in the fabric.
This stitch is especially useful for larger crochet projects because the repeat can be adjusted to create almost any width. You can use it for baby blankets, throws, scarves, cushion covers, shawls, bed runners, and many other handmade pieces. Making a small swatch first is always helpful when planning a larger project, especially because yarn weight and tension can change the final size.
Color is another great way to personalize the Puff Ripple Stitch Crochet Pattern. A single color highlights the texture beautifully, while alternating shades can make the waves even more noticeable. You can change colors every few rows for wide stripes or use several coordinating shades for a more colorful and playful effect.
The puff stitches give the fabric a soft raised texture without making the entire project feel overly bulky. Keeping the pulled-up loops even and relaxed helps create round, well-defined puffs and makes them much easier to close with the crochet hook.
Another helpful feature of this pattern is that the peaks and valleys make it easy to see where you are in the repeat. Once you learn to identify the ch-2 spaces at the peaks and the skipped stitches at the valleys, following the pattern becomes much more intuitive.
Because ripple stitches already create decorative top and bottom edges, the finished project can look beautiful without an elaborate border. For blankets, you can leave the natural waves visible or add a simple single crochet edging along the sides for a neater finish.
This Puff Ripple Stitch Crochet Pattern is also a great project for practicing stitch consistency. Keeping the double crochet sections even, maintaining the valleys, and forming similar-sized puff stitches will help the finished fabric look balanced and polished.
The Puff Ripple Stitch combines flowing crochet waves with raised puff stitches placed along the peaks. The result is a soft, textured fabric with plenty of movement, making it a beautiful choice for blankets, scarves, cushion covers, baby projects, and decorative crochet pieces.
This version uses US crochet terminology and has been organized especially for beginners.
Materials
Medium / worsted weight yarn
5 mm crochet hook
Scissors
Yarn needle
Stitch markers, optional
You may use another yarn weight, but choose a hook size appropriate for your yarn.
Abbreviations
ch – chain dc – double crochet st / sts – stitch / stitches sp – space Puff St – puff stitch rep – repeat FO – fasten off
Special Stitch — Puff Stitch
The puffs in this pattern are worked into a ch-2 space rather than into an individual stitch.
Yarn over and insert the hook into the indicated ch-2 space.
Yarn over and pull up a loop.
You now have 3 loops on the hook.
Repeat the following three more times:
Yarn over, insert the hook into the same space, yarn over and pull up a loop.
After the fourth insertion, you should have:
9 loops on the hook.
Yarn over and pull through all 9 loops.
Ch 1 to secure the puff.
That ch-1 is part of the Puff Stitch and does not count as a separate stitch.
A four-draw-up puff producing nine loops is also a standard way of creating a full puff stitch.
Beginner Tip
Pull each loop up to approximately the height of a double crochet. If the loops are too short, getting the hook through all nine loops can become difficult.
Pattern Multiple
For this version, begin with:
a multiple of 12 + 3 chains
The extra 3 chains form the turning chain at the beginning.
For a practice swatch, use:
Ch 51
That is:
48 + 3 chains
This gives enough width to clearly see several waves developing.
Important Notes Before Starting
The beginning turning chain in Row 1 counts as a double crochet.
Beginning with Row 2, the ch-1 used for turning does not count as a stitch.
The ch-2 spaces form the peaks of the ripple. Always work the new puff stitches into those spaces.
Beginning with Row 3, you will encounter the Puff Stitches from the previous row. Do not crochet into them. They are decorative stitches and are deliberately skipped while the new Puff Stitches are worked into the central ch-2 space between them.
This last point is especially important. It prevents the stitch count from growing and keeps the puff columns aligned vertically.
Row 1 — Foundation Ripple Row
Ch a multiple of 12 + 3.
For the sample:
Ch 51.
Work 1 dc in the 4th ch from the hook.
The 3 skipped chains count as the first dc.
Work 1 dc in each of the next 4 chains.
Now repeat:
Skip next 2 ch, 1 dc in each of next 5 ch, ch 2, 1 dc in each of next 5 ch.
Continue repeating until 7 chains remain.
Then:
Skip next 2 ch.
1 dc in each of next 3 ch.
Work 2 dc in next ch.
Work 1 dc in final ch.
Turn.
What You Should See
The skipped chains create the valleys.
The ch-2 spaces create the peaks.
At this stage there are no puff stitches yet.
Row 2 — First Puff Ripple Row
Ch 1.
Remember: this ch-1 does not count as a stitch.
Work:
1 dc in the first dc.
2 dc in the next dc.
1 dc in each of the next 3 dc.
Now repeat:
Skip next 2 dc.
1 dc in each of next 4 dc.
In the next ch-2 space work:
Puff St, ch 2, Puff St
Then work 1 dc in each of next 4 dc.
Repeat across.
When 7 structural stitches remain:
Skip next 2 dc.
1 dc in each of next 3 dc.
2 dc in next dc.
1 dc in the top of the beginning turning chain from Row 1.
Turn.
Row 3 — Established Puff Ripple Row
From this point onward, the puff stitches from the previous row are visible.
Ch 1.
Work:
1 dc in first st.
2 dc in next st.
1 dc in each of next 3 dc.
Now repeat:
Skip next 2 dc.
1 dc in each of next 4 dc.
You will now reach the first Puff St from the previous row.
Skip that Puff St and its closing ch-1.
In the central ch-2 space between the two puffs, work:
Puff St, ch 2, Puff St
Skip the second Puff St from the previous row and its closing ch-1.
Work 1 dc in each of next 4 dc.
Repeat across.
At the end:
Skip next 2 dc.
1 dc in each of next 3 dc.
2 dc in next dc.
1 dc in final st.
Turn.
Row 4 and All Following Rows
Repeat Row 3.
Continue until your fabric reaches the desired length.
This is now a one-row repeat.
The new Puff Stitches will stack directly above the previous puff pairs, while the increases and skipped stitches maintain the ripple shape.
How to Check That You Are Still on Track
After several rows, you should see three very clear features:
Valleys: two dc are skipped at regular intervals.
Peaks: each peak contains one central ch-2 space.
Puff pairs: two Puff Stitches sit on either side of every ch-2 peak.
The puff stitches should form vertical textured lines as the ripple grows.
If a puff begins shifting sideways from row to row, you probably worked into one of the previous puffs instead of skipping it and using the central ch-2 space.
Practice Swatch
For an easy sample:
Ch 51
Then work:
Row 1: Foundation Ripple Row Row 2: First Puff Ripple Row Rows 3–12: Repeat the Established Puff Ripple Row
Twelve rows are usually enough to see the full texture clearly.
For a blanket, always make a swatch before deciding on the final starting chain because yarn thickness and individual tension affect the width considerably.
Changing Colors
This stitch looks particularly pretty in stripes.
For a clean color change, begin the final dc of the row with the old color.
Before completing the final yarn-over, pull the new color through the last two loops.
Turn and continue with the new yarn.
Color changes can be made every row, every two rows, or after several ripple rows.
Changing colors every 2–4 rows usually allows both the wave and the puff texture to remain visible.
Keeping the Edges Straight
Because increases occur close to both edges, it is easy for beginners to overlook the first or last stitch.
Place a stitch marker in:
the first actual stitch and the final stitch
of every row.
Remember that after Row 1, the turning ch-1 does not count as a stitch.
If the Fabric Begins Getting Narrower
The most common reasons are:
accidentally skipping the first stitch after turning;
forgetting the 2 dc increase near an edge;
skipping more than two dc at a valley;
missing one of the four dc sections beside a peak.
Check the previous complete row before continuing.
If the Fabric Begins Getting Wider
The usual cause is crocheting into the Puff Stitches from the previous row.
Beginning with Row 3, those puffs are not structural stitches.
Skip them.
The new puff pair goes directly into the ch-2 space between them.
If the Ripple Looks Flat
Give it a few rows.
The wave becomes much more pronounced once several rows have been worked.
If it still looks unusually flat after 5–6 rows, check that you are:
skipping 2 dc at every valley and working the 2 dc increase near each outer edge.
If Your Puffs Are Too Tight
Pull the loops slightly higher while creating the puff.
You can also temporarily loosen your grip on the working yarn when pulling through all nine loops.
Avoid using an excessively small hook because it can make this stitch unnecessarily difficult.
Suggested Projects
This stitch works beautifully for baby blankets, throws, scarves, shawls, cushion panels, bed runners and other projects where both texture and drape are desirable.
For blankets, I would work a small sample first and decide whether you even want a border. The ripple edges are already decorative and can look beautiful left naturally wavy.
Finishing
After completing the final row, FO.
Cut the yarn leaving enough length for weaving.
Using a yarn needle, weave all yarn tails securely through the back of the fabric.
Gently shape the peaks and valleys with your hands.
Light blocking can help relax the fabric and emphasize the ripple, particularly when using natural fibers.
One More Beginner Tip
Don’t try to memorize the whole pattern immediately.
For the first few rows, remember only this visual sequence:
valley → dc section → puff peak → dc section → valley.
Once you can recognize those three areas in the fabric, the repeat becomes much easier to follow.
We hope you enjoy experimenting with this textured crochet stitch and using it in your own creative projects. Whether you choose soft neutral shades, bright colors, or classic stripes, the combination of ripples and puffs creates a beautiful handmade fabric with plenty of character.
Thank you for visiting Grandma’s Crafts! Be sure to explore the other crochet patterns and stitch tutorials available here on the blog for more inspiration. We’re always adding new projects and updating the site throughout the week, so there is always something new to discover.