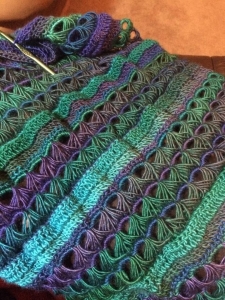
Hi, friend! Welcome back to Grandma’s Crafts. Pull up a chair, pour yourself a fresh cup of coffee, grab your favorite yarn, and let’s talk about a crochet technique that looks far more complicated than it really is. Today we’re making a beautiful Broomstick Lace Infinity Scarf, filled with those long, delicate loops that give the fabric such an elegant, almost vintage feel. If you’ve never tried broomstick lace before, don’t let the unusual name or that giant needle scare you, once you understand the rhythm, it’s actually a wonderfully satisfying technique to work, and the finished scarf is absolutely worth it.
Some crochet stitches immediately stand out, and broomstick lace is definitely one of them. With its long, open loops and gathered sections, this Broomstick Lace Infinity Scarf Pattern creates a fabric that feels light, elegant, and much more intricate than the actual technique suggests.
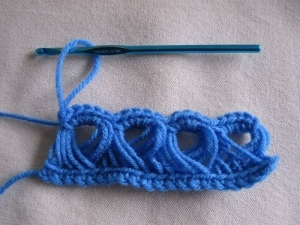
The most distinctive part of this project is the way the lace is formed. Instead of working every stitch directly with the crochet hook, elongated loops are pulled up and placed onto a large knitting needle, dowel, or broomstick lace tool. Those loops are then gathered into small groups and crocheted together, creating the beautiful open “eye” effect that gives this stitch its signature look.
Once the movement becomes familiar, the pattern develops a very relaxing rhythm. You simply alternate between creating the long loops and gathering them into clusters, repeating the same process until the scarf reaches the length you want. Because the construction is repetitive, it is a great project for practicing the technique without constantly changing stitches.
This type of lace looks especially beautiful in smooth yarns with good drape. Worsted-weight yarn creates a nice balance between warmth and openness, while a softer fiber can make the finished scarf feel even more fluid around the neck. Solid colors are particularly effective because they allow the unusual stitch structure to remain the main focus.
The size of the large needle or dowel can also completely change the appearance of the scarf. A smaller tool creates tighter, more structured loops, while a larger one produces dramatic open spaces and a lighter lace effect. This makes the pattern easy to personalize even without changing the stitch count.
Another nice feature of this Broomstick Lace Infinity Scarf Pattern is how simple it is to adjust the width. Since the lace is worked in groups of loops, you can add or remove groups depending on whether you want a delicate narrow scarf or a wider, more substantial accessory.
Length is just as flexible. A longer rectangle can be joined into an infinity scarf that wraps comfortably around the neck twice, while a shorter version can become a simple cowl. This makes the same basic stitch useful for several different accessories.
Color can completely change the mood of the finished piece. Cream or beige gives the lace a soft, timeless look, while burgundy, forest green, caramel, dusty rose, or muted mauve can make the scarf feel richer and more seasonal. A gradient yarn can also create a beautiful effect as the color shifts across the open loops.
One of the most important things when working broomstick lace is keeping the elongated loops consistent. Allowing every loop to rest around the same part of the large needle helps maintain an even fabric and keeps the finished lace looking balanced.
It is also worth checking your stitch count after each cluster row, especially while learning the technique. Each group of elongated loops should produce the same number of single crochet stitches, which keeps the scarf from gradually becoming wider or narrower.
Once the desired length is reached, the two short edges are joined to create the infinity shape. A neat seam keeps the scarf flexible and allows the lace to flow naturally when wrapped around the neck.
The Broomstick Lace Infinity Scarf combines oversized crochet loops with small gathered sections to create a light, elegant fabric that looks much more complicated than it really is.
The scarf is worked flat as a long rectangle and then the two short ends are joined to create a continuous loop.
Finished Size
Approximately:
7–8 inches wide × 52–56 inches around
The final measurements may vary depending on yarn, tension, and the diameter of your broomstick tool.
Materials
Worsted weight / #4 yarn, approximately 300–350 yards
6 mm crochet hook
19–25 mm large knitting needle, dowel, broomstick lace pin, or smooth cylindrical tool
Yarn needle
Scissors
Measuring tape
A tool between approximately 12 and 25 mm is commonly used for broomstick lace; a larger diameter creates larger, more open eyelets.
Abbreviations
ch – chain
sc – single crochet
st / sts – stitch / stitches
lp / lps – loop / loops
rep – repeat
FO – fasten off
Pattern Notes
This pattern uses groups of 5 elongated loops.
The working stitch count must therefore remain a multiple of 5.
For this scarf:
25 working stitches = 5 broomstick lace groups
Each complete lace repeat has two stages:
Loop Row → Cluster Row
Do not pull the single crochets extremely tight. The fabric should remain flexible and drapey.
Foundation
Row 1
Ch 26.
Beginning in the second ch from the hook:
Sc in every chain across.
25 sc
You now have the base needed for five groups of five loops.
Broomstick Lace — Loop Row
This is where the oversized loops are created.
Hold the large knitting needle or dowel horizontally.
Beginning at the first available stitch:
Insert your crochet hook into the stitch.
Yarn over and pull up a long loop.
Extend the loop until it comfortably fits around the large needle.
Place the loop onto the needle.
Continue across the row:
Insert hook into next sc → yarn over → pull up a long loop → place loop onto needle.
At the end you must have:
25 elongated loops on the needle
Important
Make sure every loop:
faces the same direction;
sits at approximately the same height;
is not twisted around the needle.
Uneven or twisted loops will be visible in the finished lace. Crochet.com specifically recommends keeping all the loops oriented consistently.
First Cluster Row
Now the long loops will be grouped into sets of five.
Do not turn the work.
Insert your crochet hook through the first 5 loops together.
Carefully slide those five loops off the large needle.
Keep all five loops gathered together on your crochet hook.
Yarn over and pull through the entire bundle.
Ch 1.
This ch-1 locks the first group together and does not count as a stitch.
Now work:
5 sc around the center of the 5-loop bundle.
Do not work into each individual elongated loop.
All five sc are worked around the entire bundle.
You have completed your first broomstick cluster.
The standard five-stranded technique likewise groups five loops and replaces them with five single crochets, which preserves the stitch count for the following row.
Remaining Clusters
Insert the hook through the next 5 elongated loops.
Carefully remove them from the needle.
Work:
5 sc around the entire bundle.
No additional ch-1 is needed between the later groups.
Repeat across.
You should finish with:
5 clusters
and
25 sc total
Next Loop Row
Do not fasten off.
Use the 25 sc you just created as the foundation for the next lace row.
Pull up one long loop from each sc and place it onto the large needle.
Again you should have:
25 loops
Next Cluster Row
Group the loops in sets of five again.
First group:
insert hook through 5 loops;
draw yarn through the bundle;
ch 1;
work 5 sc around the bundle.
For each remaining set:
5 loops → 5 sc around the bundle
At the end:
25 sc
Pattern Repeat
Continue alternating:
Loop Row
Pull up 25 elongated loops onto the large needle.
Cluster Row
Work those loops in 5 groups of 5, making 5 sc around each group.
Repeat these two stages until the scarf measures approximately:
52–56 inches long
or your preferred finished length.
This two-stage rhythm, pull up loops, then crochet them off in groups, is the basic structure of traditional broomstick lace.
How to Measure the Scarf
Lay the piece flat without stretching it.
Measure from the foundation edge to the working edge.
For an infinity scarf that can comfortably wrap twice around the neck, approximately 52–56 inches before seaming works well for this version.
For a looser scarf, continue to around 60 inches.
Final Stabilizing Row
Finish after a Cluster Row, so you have 25 sc available.
Ch 1.
Work 1 sc in every stitch across.
25 sc
FO, leaving a sewing tail approximately 18–24 inches long.
This extra row gives the final edge a little more stability for seaming.
Joining the Infinity Scarf
Lay the scarf flat.
Bring the two short ends together.
Make sure the lace is not twisted unless you intentionally want a Möbius-style scarf.
Align:
25 stitches on the beginning edge
with
25 stitches on the final edge.
Using the long yarn tail and a yarn needle, whipstitch the two edges together one stitch at a time.
Do not pull the seam too tightly.
The seam should have approximately the same flexibility as the rest of the scarf.
Secure the yarn and weave in the end.
Turn the seam toward the inside.
Your infinity scarf is complete.
Optional Invisible-Looking Seam
For a softer finish, use mattress stitch instead of whipstitch.
Catch only the outer loops along each edge and pull the seam closed gradually.
This makes the joining line less noticeable when the scarf is worn.
Adjusting the Width
Because the pattern uses groups of 5, simply change the foundation by multiples of five.
For a narrower scarf:
20 working sts / 4 lace groups
For this version:
25 working sts / 5 lace groups
For a wider scarf:
30 working sts / 6 lace groups
Remember to chain one additional chain when using the foundation-sc method.
So:
20 working sts → Ch 21 25 working sts → Ch 26 30 working sts → Ch 31
Working broomstick lace in multiples that correspond to the chosen cluster size is standard practice; groups can vary, but groups of five are especially common.
Adjusting the Loop Size
The diameter of your large needle directly changes the appearance of the lace.
Smaller Tool
Around 15–19 mm
Creates:
smaller eyelets;
slightly denser fabric;
more structure.
Larger Tool
Around 20–25 mm
Creates:
dramatic elongated loops;
lighter fabric;
more open lace.
For the look I would use for this scarf, I’d choose approximately 20–25 mm.
Changing Yarn
This pattern works well with:
soft acrylic
wool blends
merino blends
cotton blends
smooth gradient yarn
Avoid very fuzzy yarn when learning the technique because it makes the individual loops harder to see.
The Krocht overview likewise recommends worsted yarn with some drape and notes that cotton blends, soft acrylics, merino, and alpaca-style blends can all suit this kind of scarf.
Changing Colors
For stripes, change yarn after completing a Cluster Row.
That way the next color begins cleanly before the long loops are pulled up.
You could change:
every lace repeat;
every 2 repeats;
every 4–5 repeats.
I would personally use a single solid shade for this one because broomstick lace already has plenty of visual interest.
Dusty rose, burgundy, cream, muted mauve, sage, or a rich caramel would look beautiful.
If Your Loops Are Uneven
Do not try to judge their length by eye.
Pull each loop until it rests comfortably around the same section of the needle.
The needle itself acts as a gauge and keeps all the elongated loops consistent.
If the Loops Twist
Stop before working the cluster row.
Straighten each loop on the needle.
Every loop should have the same orientation.
Twisted loops can make the finished “eyes” look irregular.
If the Fabric Starts Getting Narrower
Count your single crochets after every Cluster Row.
You must always have:
25 sc
for this version.
The most common mistake is working only 4 sc into a five-loop group instead of 5.
Remember:
5 loops → 5 sc
The equal number of loops and sc is what keeps the stitch count stable.
If You Have Too Many Stitches
You probably worked an extra sc into one of the clusters.
Count each group as you make it.
Every bundle receives exactly five single crochets.
If the Loops Are Difficult to Remove
Slide only one group of five off the needle at a time.
You do not need to remove all 25 loops at once.
Keeping the remaining loops on the tool is especially useful while learning.
If the Scarf Feels Too Stiff
Try:
a slightly larger crochet hook;
a larger broomstick tool;
looser sc tension;
a softer yarn with more drape.
The finished fabric should feel open and fluid rather than rigid.
Optional Short Cowl Version
You can use exactly the same pattern to make a shorter cowl.
Work until the rectangle measures approximately:
24–28 inches long
then seam the ends.
The shorter loop is worn once around the neck rather than wrapped twice.
Blocking
After joining, lightly wet-block the scarf if the yarn allows it.
Lay it flat on a towel or blocking mat.
Gently straighten the lace openings with your fingers.
Do not aggressively stretch them.
Allow the scarf to dry completely.
Because broomstick lace has large open loops, gentle reshaping after washing helps preserve their appearance.
Beginner Memory Trick
You really only need to remember:
PULL → GROUP → FIVE
Pull one long loop from every stitch. Group the loops in sets of five. Work five sc around every group.
Then do it all over again.
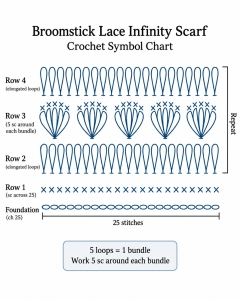
CHART
This Broomstick Lace Infinity Scarf Pattern is a lovely project for anyone who wants to try something a little different from traditional crochet while still using familiar basic stitches. The finished fabric looks sophisticated, but the repeating technique makes it surprisingly approachable once you understand the process.
Thanks for visiting Grandma’s Crafts! We hope this project inspires you to experiment with broomstick lace and discover a new way to create beautiful crochet texture. Be sure to explore the blog for more stitch tutorials, accessories, seasonal projects, and handmade inspiration.