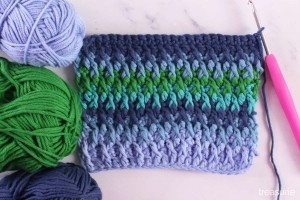
Welcome to Grandma’s Crafts! I’m so happy you are here today. Today I want to teach you a stitch I think you will fall in love with: the Alpine Stitch. It is thick, cozy and full of little raised bumps that look like snow on a mountainside.
The Alpine Stitch is made with just three stitches you probably already know: single crochet, double crochet and front post double crochet. You alternate a row of double crochet texture with a plain row of single crochet. The front post stitches reach down two rows, and because they shift over by one stitch every time, they form that lovely staggered pattern.
It makes a warm, sturdy fabric that is perfect for blankets, scarves, hats and pillows. It has a clear right side and wrong side, so it is not reversible, but the right side is so pretty that you won’t mind at all.
Let’s make a small practice swatch together. Once you learn the four row repeat, you can use it in any project you like.
Skill Level
Intermediate. You should know single crochet, double crochet and front post double crochet.
Materials
Worsted weight (#4) yarn in a smooth, solid or lightly tonal color so the texture shows
5 mm (H-8) crochet hook, or the size recommended on your yarn label
Scissors
Tapestry needle
Abbreviations (US Terms)
ch: chain
sc: single crochet
dc: double crochet
FPdc: front post double crochet
st(s): stitch(es)
sk: skip
yo: yarn over
RS: right side
WS: wrong side
* *: repeat the instructions between the asterisks as directed
Special Stitch
Front post double crochet (FPdc): Yo, insert your hook from front to back to front around the post of the stitch, so the hook goes behind the post. Yo and pull up a loop, then [yo and pull through 2 loops] twice. In this pattern, the FPdc always goes around a dc from two rows below, and you skip the sc behind it.
Pattern Notes
The stitch count is any odd number. The foundation chain is your stitch count plus 2.
The ch 1 and ch 2 at the beginning of the rows do not count as stitches.
Row 1 is the right side. Rows 3 and 5 are right side rows too, and those are the rows with the post stitches.
The first and last stitch of every double crochet row is a plain dc, which keeps the edges straight.
Rows 2 to 5 form the pattern repeat.
Alpine Stitch Pattern
Foundation: Ch 23 (for a practice swatch of 21 stitches), or any odd number plus 2.
Row 1 (RS): Dc in the 3rd ch from the hook and in each ch across. (21 dc)
Row 2 (WS): Ch 1, turn. Sc in each st across. (21 sc)
Row 3 (RS): Ch 2, turn. Dc in the first st. *FPdc around the next dc two rows below, dc in the next st*. Repeat from * across. (21 sts: 10 FPdc and 11 dc)
Row 4 (WS): Ch 1, turn. Sc in each st across. (21 sc)
Row 5 (RS): Ch 2, turn. Dc in each of the first 2 sts. *FPdc around the next dc two rows below, dc in the next st*. Repeat from * until 1 st remains, dc in the last st. (21 sts: 9 FPdc and 12 dc)
Rows 6 and on: Repeat Rows 2 to 5 until your piece is as long as you like. Finish after a Row 3 or a Row 5.
Understanding the Stagger
Look closely at your work after Row 5. In Row 3, the post stitches wrap around every other double crochet of Row 1, starting with the second stitch. In Row 5, they wrap around the double crochets of Row 3 that sit between those post stitches. That little shift of one stitch is what creates the alpine look. If your bumps are lining up in straight columns instead of zigzagging, check which stitch you started on in Row 3 or Row 5.
Making It Bigger
To make a blanket, scarf or pillow, just start with a longer chain. Any odd number of stitches works, plus 2 chains for the foundation. Measure your practice swatch to see how many stitches you get per inch and multiply by the width you want. A plain border of single crochet, with 3 sc in each corner, finishes the edges nicely.
Tips for Beautiful Alpine Texture
Go down between the stitches carefully. The FPdc wraps around the dc two rows below, not around the sc of the row just below.
Always skip the sc behind each FPdc so your stitch count stays the same.
If your fabric feels stiff, try a hook one size larger.
Count your stitches at the end of each post row for the first few repeats.
VIDEO TUTORIAL
Project Ideas
The Alpine Stitch is wonderful for a chunky throw, a warm cowl or a cushion cover. It also looks lovely in stripes. Change color every two rows, right after a single crochet row, and the post stitches will carry little dots of the old color up into the new stripe.
And that’s the Alpine Stitch! It is one of those stitches that looks impressive but is really very relaxing once you know the pattern.
Keep your swatch as a coaster or a little sample to remember the stitch. Thank you for learning with me today, and come back soon to Grandma’s Crafts for more stitches and patterns.