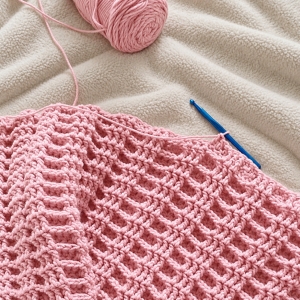
The front post stitches are really what make the texture happen. Instead of working into the top loops of the stitch below, you crochet around the post itself, bringing that section forward and creating the raised part of the grid. If you have never tried a front post double crochet before, it might feel a little different for the first few stitches, but the movement becomes much easier once you get used to where the hook goes.
I think this stitch would look especially beautiful in a solid color because all that texture gets a chance to stand out on its own. Cream, sage green, dusty blue, soft pink, or a warm neutral would all be lovely choices. But you could also change colors every few rows if you want the grid to become even more noticeable.
Another thing I like is that once you begin seeing the stitches as groups of three, the pattern becomes very easy to follow. Instead of counting every individual stitch across a long row, you start thinking in little blocks: three flat stitches, three raised stitches, three flat stitches, and so on.
If your fabric feels a little stiff at first, try relaxing your tension, especially on the front post stitches. Those raised stitches naturally make the fabric thicker, so keeping them comfortable rather than overly tight helps the finished piece stay soft.
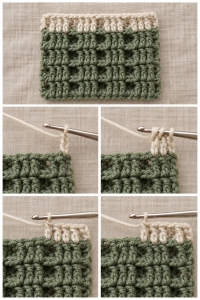
You may also see this textured stitch described informally as a Triple Waffle Stitch or Waffle Grid Stitch. It is a variation of the traditional crochet waffle stitch in which groups of three regular double crochets alternate with groups of three front post double crochets.
The placement of those groups reverses on the following row, creating large raised squares across the fabric.
Skill Level
Easy to Intermediate
Materials
- Yarn of your choice
- Crochet hook suitable for your yarn
- Scissors
- Yarn needle
A smooth yarn is a great choice for this stitch because it helps the raised waffle blocks stand out clearly.
Abbreviations
ch = chain
dc = double crochet
FPdc = front post double crochet
st(s) = stitch(es)
rep = repeat
Special Stitch: Front Post Double Crochet
To make an FPdc:
Yo.
Insert your hook from front to back and then back to front around the post of the indicated stitch.
Yo and pull up a loop.
You should have 3 loops on your hook.
Yo and pull through 2 loops.
Yo again and pull through the remaining 2 loops.
FPdc complete.
This is the stitch that pushes the post forward and creates the raised texture of the waffle design.
Stitch Multiple
For the cleanest complete 3×3 repeat, begin with a multiple of 3 + 2 chains.
Examples: Ch 17, 20, 23, 26, 29, 32…
After skipping the first 2 chains, you will have a stitch count of:
6n + 3 dc
For example:
Ch 17 = 15 dc
This allows the fabric to begin and end with a complete 3-stitch block.
Pattern
Foundation Chain
Ch a multiple of 6 + 5.
For a small practice swatch:
Ch 17.
Row 1
Dc in the 3rd ch from hook.
Dc in each remaining ch across.
Turn.
For the 17-chain sample:
15 dc
The skipped ch-2 does not count as a stitch.
Row 2
Ch 2.
Ch-2 does not count as a stitch.
Dc in each of the first 3 sts.
FPdc around each of the next 3 sts.
Dc in each of the next 3 sts.
Repeat from * to * across.
Turn.
For a 15-stitch swatch, the row will look like:
3 dc | 3 FPdc | 3 dc | 3 FPdc | 3 dc
Row 3
Ch 2.
Ch-2 does not count as a stitch.
FPdc around each of the first 3 sts.
Dc in each of the next 3 sts.
FPdc around each of the next 3 sts.
Repeat from * to * across.
Turn.
For a 15-stitch swatch:
3 FPdc | 3 dc | 3 FPdc | 3 dc | 3 FPdc
This row reverses the placement of the flat and raised blocks, which is what creates the larger checkerboard-style waffle texture.
Row 4
Repeat Row 2.
Row 5
Repeat Row 3.
Pattern Repeat
Continue alternating:
Row 2 → Row 3
until your project reaches the desired length.
That is the entire repeat.
As the rows build, the groups of FPdc create the raised sections while the regular dc groups remain flatter, producing the distinctive 3×3 waffle grid.
Understanding the 3×3 Design
The “3×3” name refers to the groups of three stitches used to create each section.
One row alternates:
3 dc → 3 FPdc → 3 dc
and the next row reverses those blocks:
3 FPdc → 3 dc → 3 FPdc
Adjusting the Width
To make the project wider, simply add 3 chains to your starting chain.
The number of stitches remains the same on every row.
You can continue the pattern for as many rows as needed.
Tips for a Neater Waffle Texture
Try not to work your FPdc stitches too tightly. The post stitches naturally pull the fabric inward a little, and overly tight tension can make the piece stiff.
Keep the ch-2 turning chain loose enough to reach the height of the first dc, but remember that it does not count as a stitch.
Pay attention to groups of three rather than individual stitches. Once you start seeing the fabric as blocks of 3, the pattern becomes very easy to memorize.
Because post stitches add thickness and structure, waffle stitch fabrics work especially well for warm blankets, scarves, hats, hot pads, and other cozy projects.
Using More Than One Color
You can work the entire pattern in one color and let the texture be the focus, or change colors every few rows to emphasize the grid.
If changing colors, complete the final yarn over of the last stitch with the new color, then continue normally on the following row.
A solid yarn usually shows the 3×3 texture most clearly, while alternating shades can make the individual blocks more noticeable.
This is also a great stitch to practice with a small swatch before committing to a full blanket. After just a few rows, you will be able to see the 3×3 grid clearly and decide whether you want to keep the fabric dense or move up a hook size for a little more drape.
So if you have been looking for another textured crochet stitch that is easy to remember but still gives your project a beautiful finished look, give this one a try. Once those waffle blocks start appearing, I have a feeling you will want to keep adding just one more row.
I hope you enjoy learning the 3×3 Waffle Crochet Stitch and finding the perfect project to use it on. And as always, thank you for spending a little crochet time here with me at Grandma’s Crafts.