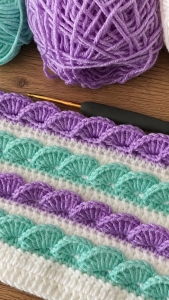
Welcome to Grandma’s Crafts! I’m so happy you are here today. 3D Seashell Crochet Pattern gives a simple crochet fabric raised, curved shells with smooth rows between them. Let’s take it slowly and learn how those little waves are formed.
The texture comes from changing direction briefly while working a shell. You make a small chain arch, turn, and fill that arch with double crochet stitches. Then you continue across the main row. Those short turns are part of the stitch, so keep the unfinished portion of your row nearby as you work.
I recommend beginning with the 26-chain practice sample below. A small sample lets you see the shells clearly and check the edges before choosing the width of a larger project. Use a smooth, light-colored yarn so you can distinguish the stitches from the spaces beneath them.
Read the shell row and the following recovery row before starting. The shell row creates the raised texture; the next row restores the straight double crochet fabric behind it. Understanding that pair of rows makes the repeat easier to follow.
Ways to Use Your Sample
This stitch can add texture to a scarf, a rectangular blanket panel, or a decorative cushion front. First make and measure a sample, then decide how wide your fabric needs to be. This tutorial teaches the stitch pattern rather than a sized garment or a complete cushion cover.
One color makes it easier to inspect the construction while learning. Once you understand the repeat, you can plan contrasting colors for the textured sections. Keep a record of your yarn, hook, starting chain, and row count so matching panels are consistent.
Skill Level and Supplies
This is a practice project for crocheters who can already make chains, slip stitches, half double crochet, and double crochet. The shell placement adds a more involved step than working straight rows.
Use smooth yarn, a hook suitable for that yarn, scissors, a tapestry needle, and removable stitch markers. Choose the hook from your yarn label as a starting point and adjust after examining your sample. The supplied pattern does not specify yarn weight, hook size, yardage, gauge, or finished measurements, so those values are not fixed here.
Abbreviations (US Terms)
ch = chain;
dc = double crochet;
hdc = half double crochet;
sl st = slip stitch;
st(s) = stitch(es);
sp = space.
A ch-4 sp is the opening underneath a group of four chains.
Review the Basic Stitches
For a slip stitch, insert the hook into the indicated stitch or space, yarn over, and draw the yarn through both the insertion point and the loop on your hook.
For hdc, yarn over, insert the hook, yarn over and draw up a loop. Yarn over and pull through all three loops.
For dc, yarn over, insert the hook, yarn over and draw up a loop. Yarn over and pull through two loops, then yarn over and pull through the remaining two loops.
3D Seashell Crochet Stitch
Pattern Notes
The starting chain is a multiple of 4 plus 2. The practice sample begins with 26 chains and has a base width of 24 stitches. Its textured row contains five shells. The eight dc in each shell form the raised decoration; do not count them as eight additional positions in the straight base row.
The three skipped chains at the beginning of Row 1 count as the first dc. Beginning ch 3 on subsequent dc rows also counts as one dc. Work the last dc of a plain dc row into the top of the previous row’s beginning ch 3 when that chain forms the edge stitch. Beginning ch 1 does not count as a stitch. The ch 2 made inside each shell sequence is not an extra base stitch.
3D Seashell Crochet Pattern
Foundation: Ch 26. Keep the chains relaxed enough to insert the hook without forcing it.
Row 1: Dc in the fourth ch from the hook. Dc in each remaining ch. Count 23 worked dc plus the three skipped chains representing the first dc: 24 sts. Ch 3 and turn.
Row 2: Skip the stitch directly beneath the beginning ch 3. Dc in each remaining st, including the top of the previous beginning chain at the far edge. Count 24 sts including the beginning ch 3. Ch 1 and turn.
Row 3, first shell: Hdc in each of the first 6 sts. Ch 4 and turn. Counting backward along the hdc just worked, sl st into the fourth hdc from the hook. This joins the chain back to the row and makes a small arch. Ch 2 and turn again. Work 8 dc into the ch-4 sp, inserting the hook into the opening beneath the chains rather than into individual chain links.
Row 3, remaining shells: Hdc in each of the next 4 unworked sts of the main row. Ch 4 and turn. Sl st through the space next to and underneath the preceding shell. Ch 2 and turn again. Work 8 dc into the new ch-4 sp. Repeat this sequence until only 2 unworked base sts remain. Hdc in each of those last 2 sts. You should have 5 shells, with all 24 base sts accounted for. Ch 3 and turn.
Row 4: The beginning ch 3 represents the first dc. Dc in the second st. Work 4 dc underneath each shell, continuing along the underlying base rather than working across the eight decorative dc at the top of each shell. Dc in each of the last 2 sts. Count 24 sts: the beginning ch 3, one dc, five groups of four dc, and two final dc. Ch 3 and turn.
Row 5: Skip the stitch beneath the beginning ch 3. Dc across the remaining sts, finishing in the top of the previous beginning ch 3. Count 24 sts including the beginning ch 3. Ch 3 and turn.
Row 6: Work as for Row 5, keeping 24 sts. Ch 1 and turn.
Continue: Repeat Rows 3, 4, 5, and 6 in that order. End after Row 6 for a plain double crochet section above the final shell row. On the final row, omit the turning chain, cut the yarn, and pull the tail through the remaining loop. Weave in the ends securely.
Keep the Edges and Shells Consistent
Place markers in the first and last base stitch if the edges are hard to identify. After each recovery row, count the straight row before continuing. Extra stitches often come from working into shell tops or treating the beginning ch 3 as an extra stitch instead of the first one.
The attachment for the first shell differs from later attachments: the first joins into an hdc, while later ones join through the space beside and below the previous shell. That space can be difficult to identify from text alone. Check its physical position in the accompanying demonstration before continuing if you cannot see it clearly.
Adjusting the Width
For a wider sample, add chains in groups of four. Starting chains of 30, 34, and 42 produce base widths of 28, 32, and 40 stitches, with 6, 7, and 9 shells respectively. Keep the same first-six-hdc opening and last-two-hdc ending on the textured row.
To plan a project, measure the width of a completed sample made with your chosen yarn and hook. Use that sample to estimate the number of repeats needed, then make another sample at the intended width before committing to a large piece. No fixed gauge or finished size is assumed here.
Keep the PDF Pattern Handy
If you like having written instructions beside your yarn and hook, dear, the 3D Wavy Shell Stitch PDF is a helpful companion to the video. You can check each row and follow the repeat without scrolling through the article.
Click the button below to open the PDF by Donna Wolfe from Naztazia. Save it for your personal use so you can refer back to the instructions whenever you need a little reminder.
Follow along with Naztazia’s video tutorial below to see how the 3D Wavy Shell Stitch comes together. Pause whenever you need a closer look at the shell attachments, then continue at your own pace, dear.
Before You Put Your Hook Away
Take a moment to check that your shells rise freely from the fabric and that the plain rows keep the same width. If an attachment looks different from its neighbors, undo that section while it is still easy to reach and inspect the insertion point again.
Keep your first sample with a note of the materials and repeat count. It can help you choose colors, compare drape, and decide where a band of raised shells would suit your next crochet project.
Thank you for visiting Grandma’s Crafts, dear. I hope these smaller steps make the construction easier to understand. Come back whenever you are ready to learn another stitch, and we will take the next project one row at a time.