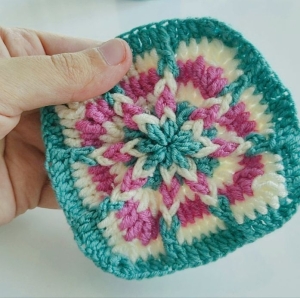
Welcome to Grandma’s Crafts! Today we are sharing a beautiful Three-Dimensional Star Crochet Motif tutorial, a project that combines color, texture, and a very interesting construction technique. At first glance, this square may look complicated, but much of its charm comes from the way the different crochet sections are worked and then carefully arranged to create the raised star in the center.
What makes this motif especially interesting is the way the design gradually comes together as each section is worked toward the center. The layered colors and looped structure create a beautiful sense of depth, giving the finished square a detailed look that feels much more intricate than a traditional crochet motif.
Unlike many traditional crochet squares that begin in the middle and grow outward, this motif is constructed from the outside toward the center.
The original instructions begin with a loose foundation chain joined into a ring, followed by several sections that gradually become smaller as the work moves inward. Long chain loops are created throughout the process and are later used to form the dimensional center.
One of the most interesting parts of this pattern is the finishing technique. Once all of the crochet sections are complete, the long loops are twisted in the same direction and fed through one another, starting with the outermost layer and moving toward the center. The innermost loops are left untwisted, and the center is then secured with yarn and a tapestry needle. This final step is what transforms the flat-looking construction into the beautiful raised star effect.
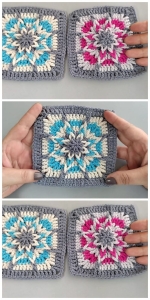
The combination of colors can completely change the personality of this Three-Dimensional Star Crochet Motif. Gray, white, and pink create a soft and elegant result, but the same design could look equally beautiful in neutral shades, earthy colors, pastels, or brighter combinations. Because the pattern naturally creates several visible layers, choosing colors with a little contrast can help the dimensional details stand out even more.
This kind of crochet square can be used in many different handmade projects. Several finished motifs could be joined to create a unique blanket, while individual squares could become cushion covers, bags, table decorations, or decorative panels. The optional single crochet edging mentioned in the original instructions can also add a little more structure to the finished square when needed.
The pattern also uses techniques such as DC2TG and TC2TG, which help shape the sections as they become progressively smaller toward the center. If these stitches are new to you, take your time and follow each movement carefully. The original instructions explain both decreases separately, making it easier to understand how the skipped stitches create the shaping needed for the motif.
Is constructed in a very unusual way. Instead of beginning in the center and working outward, the motif starts with the outer foundation and gradually works inward through several colored sections.
Long chain loops are created between the solid crochet sections. Once all the crochet work is complete, those loops are twisted and fed through one another to form the raised, dimensional star in the center.
This is what gives the motif its distinctive three-dimensional appearance.
Pattern Information
The supplied written instructions use three colors:
Color 1 – outer border and center Color 2 – second and fourth sections Color 3 – middle section
For the pink, white and gray version shown in the reference, you can use:
Color 1: Gray Color 2: White Color 3: Pink
The PDF itself does not specify yarn weight or hook size. The Ravelry listing for the original Magnificent Star pattern suggests fingering-weight yarn and a 2.5 mm crochet hook, producing a motif approximately 6 inches / 15 cm across.
Abbreviations – US Terms
SS – Slip Stitch ST – Stitch CH – Chain SC – Single Crochet DC – Double Crochet TC – Triple Crochet / US Treble Crochet DC2TG – Double Crochet 2 Together TC2TG – Triple Crochet 2 Together
The original pattern uses [4] to indicate that the enclosed sequence is repeated four times.
The source also notes that the beginning ch 3 counts as the first DC.
Before You Begin
The beginning chain should be made loosely.
This is important because the foundation will tighten slightly as the following sections are worked.
Do not worry when the motif looks open or unusual during the first stages. The long ch-9 loops are intentional. They will not remain loose in the finished motif; they are used later to create the dimensional center.
Part 1 – Outer Border
Color 1
Foundation
Ch 80 loosely.
Join the last chain to the first chain with an SS, making sure the foundation chain is not twisted.
You should now have one large foundation ring.
Begin the Border
Ch 3.
The beginning ch 3 counts as the first DC.
Now work the following sequence around the foundation:
After completing all four repeats, join with an SS into the top of the beginning ch 3.
Fasten off and cut the yarn.
What You Should See
At this stage, the piece will not yet resemble the finished star.
You should see four repeated sections around the ring, separated by long ch-9 loops. The more elaborate TC section helps shape the four major areas of the motif.
Do not twist or manipulate the chain loops yet.
Part 2 – First Inner Section
Color 2
Find one of the 8-DC sections from the border.
Insert your hook into the second DC of that section.
Join Color 2.
If possible, crochet over the yarn tails while working so you have fewer ends to weave in later.
Ch 3.
Now work:
6 DC, ch 9.
When you reach the ch-9 loop from the previous level, skip past that chain loop rather than working into it.
Continue with:
3 DC, TC2TG while skipping 1 st, 3 DC, ch 9.
Skip the first DC of the next section to position yourself for the following repeat.
Repeat this sequence 4 times around.
Join with an SS into the top of the beginning ch 3.
Fasten off and cut the yarn.
Check Your Work
You should now have a new Color 2 level sitting slightly farther toward the center.
The solid crochet sections have reduced from 8 DC to 6 DC, while new ch-9 loops have been created.
This gradual reduction is intentional.
Part 3 – Second Inner Section
Color 3
The PDF labels this part “Section 3”; here it is called Part 3 simply to keep our tutorial numbered sequentially.
Find any 6-DC section from the previous round.
Insert your hook into the second DC.
Join Color 3.
Ch 3.
Work:
4 DC, ch 9.
Skip past the ch-9 loop from the previous section.
Then work:
2 DC, TC2TG while skipping 1 st, 2 DC, ch 9.
Skip the first DC of the next solid section.
Repeat the sequence 4 times around.
Join with an SS into the top of the beginning ch 3.
Fasten off and cut the yarn.
Check Your Work
The solid sections have now reduced again:
8 DC → 6 DC → 4 DC
You should also have another set of long ch-9 loops sitting inside the previous ones.
At this stage, the piece begins developing the concentric structure needed for the final star.
Part 4 – Third Inner Section
Return to Color 2
Find one of the 4-DC sections from the previous level.
Insert your hook into the second DC.
Join Color 2.
Ch 3.
Work:
2 DC, ch 9.
Skip past the previous ch-9 loop.
Then work:
1 DC, TC2TG while skipping 1 st, 1 DC, ch 9.
Skip the first DC of the next section.
Repeat this sequence 4 times around.
Join with an SS into the top of the beginning ch 3.
Fasten off and cut the yarn.
Check Your Work
Your solid sections should now have reduced to only 2 DC.
The piece may look somewhat tangled because several levels of ch-9 loops are now sitting on top of one another.
That is normal.
Do not begin weaving or twisting those loops yet.
Part 5 – Innermost Section
Color 1
Find one of the 2-DC sections.
This time, insert your hook into the first DC, rather than the second.
Join Color 1.
Ch 3.
The original PDF then gives the following repeat:
DC2TG, ch 9, TC2TG while skipping 1 st, ch 9.
Repeat 4 times around.
Join with an SS into the top center of the first DC2TG / beginning-chain area.
Fasten off and cut the yarn.
Important Note About This Section
The source states that the beginning ch 3 counts as the first DC, but it does not provide a separate special method for treating that starting chain as part of a beginning DC2TG cluster.
For that reason, this tutorial keeps the original sequence intact rather than inventing a different cluster method.
How to Work TC2TG While Skipping Stitches
This stitch is one of the most important shaping techniques in the motif.
TC2TG – Triple Crochet 2 Together
Yarn over twice.
Insert the hook into the next stitch.
Yarn over and pull up a loop.
Yarn over and pull through 2 loops.
Yarn over and pull through 2 loops again. Two loops remain on the hook.
Yarn over twice again.
Skip the number of stitches specified in the pattern.
Insert the hook into the first stitch after the skipped stitch or stitches.
Yarn over and pull up a loop.
Yarn over and pull through 2 loops.
Yarn over and pull through 2 loops again.
Yarn over and pull through all 3 remaining loops.
The pattern uses this technique while skipping either 2 stitches in the outer section or 1 stitch in the inner sections.
How to Work DC2TG While Skipping 1 Stitch
Yarn over.
Insert the hook into the next stitch.
Yarn over and pull up a loop.
Yarn over and pull through 2 loops. Two loops remain.
Yarn over again.
Skip 1 stitch.
Insert the hook into the following stitch.
Yarn over and pull up a loop.
Yarn over and pull through 2 loops.
Yarn over and pull through all 3 remaining loops.
This joins two double crochets across a skipped stitch and creates the narrowing effect used toward the center of the motif.
Creating the Three-Dimensional Star
Now comes the part that completely changes the appearance of the motif.
Until this stage, the long chains have simply been sitting loose between the crochet sections.
They will now be twisted and fed through one another.
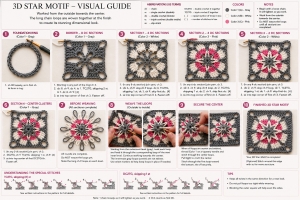
The original pattern specifically instructs you to begin with the outermost level – the border – and work inward.
Step 1 – Choose a Direction
Lay the motif flat.
Choose whether you are going to twist the chain loops clockwise or counterclockwise.
It does not matter which direction you choose, but every twisted loop must follow the same direction.
Consistency is what creates the clean, repeated star structure.
Step 2 – Start With the Outermost Loop
Take one ch-9 loop from the outermost level.
Give the loop a twist.
Take the corresponding loop from the next inner level and feed it through the twisted outer loop.
Twist this next loop in the same direction.
Then feed the following inner loop through it.
Continue moving from the outside toward the center, feeding one level through the previous level.
The PDF includes a small diagram showing this chain-like interlocking arrangement.
Step 3 – Do Not Twist the Innermost Loop
When you reach the innermost layer, feed it into position but do not twist it.
The source specifically notes that the innermost level does not need to be twisted.
Repeat this process around the entire motif.
All loop groups should be twisted in the same direction.
Helpful Tip
Use stitch markers to temporarily hold the woven loops in position while you work around the motif.
The original instructions specifically suggest stitch markers for this purpose.
Securing the Center
Once every loop has been twisted and interlocked, the center needs to be secured.
Thread a tapestry needle with Color 1.
Leave a yarn tail underneath the motif.
Use the needle to cinch the center loops together.
The source instructs you to sew from the center toward the outside.
Continue catching and securing the center loops until the star holds its shape.
To finish, stitch downward through the first loop toward the back of the motif.
Cut the yarn and tie the two tails securely together underneath.
At this point, the loose concentric chain loops should have transformed into the distinctive raised interlocking star seen in the finished motif.
Optional Border
For a firmer and more structured finish, the original instructions suggest working an additional round of SC around the outer edge.
This step is optional.
If you prefer a softer edge for joining several motifs together, you may leave the border as it is.
Final Shaping
Place the finished motif on a flat surface.
Gently straighten the four sides and corners.
Then use your fingers to arrange the twisted loops in the center so that each section of the star is clearly visible.
Avoid pulling one loop much tighter than the others.
The beauty of this design comes from keeping the twisted sections as even and symmetrical as possible.
If blocking the motif, concentrate primarily on the outer square. Do not press the dimensional center completely flat.
Three-Dimensional Star Crochet Motif
Before You Finish, Check That…
Your completed motif should have several concentric crochet levels worked from the outside toward the center, with the solid sections progressively reducing from:
8 DC → 6 DC → 4 DC → 2 DC → center clusters
The ch-9 loops from those different levels should be woven through one another and secured in the center, creating the dimensional star.
That progressive reduction and the final loop manipulation are the key construction features shown in the supplied pattern.
VIDEO TUTORIAL
Turn on the subtitles.
This step-by-step is based on the Magnificent Star crochet motif by Papatyanın Örgü Dünyası. The original design and construction belong to the designer; the instructions here have been reorganized and expanded to make the process easier to follow.
We hope you enjoyed discovering this beautiful Three-Dimensional Star Crochet Motif Tutorial and that it inspires you to try something a little different in your next crochet project. The unusual construction and raised center make this square especially satisfying to see come together, and experimenting with different color combinations can make every version feel completely unique.
Thank you so much for visiting Grandma’s Crafts! Be sure to explore the other crochet patterns and creative projects available here on the blog. We are always adding new ideas and interesting handmade inspiration throughout the week, so come back often to see what’s new and find another project to add to your crochet list.