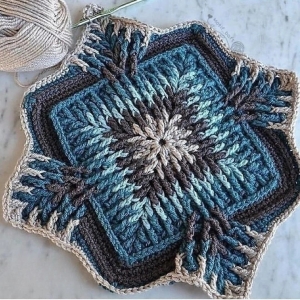
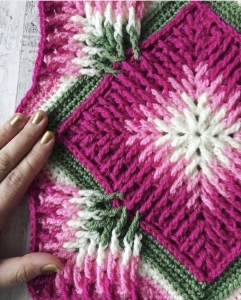
Hello, my sweet crochet friends! Welcome to Grandma’s Crafts, my dear crochet friends! I’m so happy you’re here, and I hope you’ll make yourself comfortable, grab your favorite hook and a cozy ball of yarn, and stay awhile. Here at Grandma’s Crafts, we believe there’s something truly special about handmade crochet, the quiet moments spent creating, the joy of watching a few simple stitches turn into something beautiful, and the memories we make along the way. Today, I’m delighted to share a lovely textured crochet elements square that brings together classic crochet techniques with beautiful raised details and a wonderfully cozy look.
Textured Crochet Elements Square
What I especially love about this pattern is the way the texture slowly comes to life as you work through each round. The combination of simple stitches, little crochet clusters, and raised post stitches gives the square so much character without making it feel overwhelming. It’s the kind of project that is perfect for a peaceful , afternoon with a cup of coffee nearby, and once you finish one square, you may find yourself already thinking about the next one! So, dear friends, let’s pick out some beautiful yarn, take our time, and enjoy every stitch together.
There is something so special about a beautifully textured crochet square. I love the way simple stitches can come together to create little ridges, raised details, and layers that make a project look much more complicated than it really is.
The Textured Crochet Elements Square is such a charming little project, filled with beautiful texture and lovely raised details. Each round adds something special, making the square fun and satisfying to crochet.
I especially love how versatile this design can be. Make a few squares for a cozy blanket, or use a single one for a pillow, bag, or other handmade project. It’s a wonderful way to add a little extra warmth and personality to your crochet.
Today, I’m sharing a lovely textured crochet elements square tutorial that is perfect for anyone who enjoys experimenting with crochet texture. It combines classic stitches with raised post stitches and small granny-style groups to create a dimensional design.
And please don’t let the texture intimidate you! If you know your basic crochet stitches and are comfortable working into different parts of a stitch, you can absolutely give this one a try. Just take your time, keep your tension relaxed, and enjoy the process. ❤️
This square is wonderful for blankets, pillows, bags, table runners, or even a larger sampler afghan made from several different squares.
Let’s get our hooks ready!
Materials
DK-weight yarn in your favorite colors
US H/8 (5 mm) crochet hook
Scissors
Tapestry needle
Stitch marker, optional
Blocking mats and pins, optional but recommended
You can make the entire square in one color for a beautifully sculpted look, or change colors between rounds for extra definition.
Finished Size
The finished size will depend on your yarn, hook, and tension. With DK-weight yarn and a 5 mm hook, your square should measure approximately 7–8 inches, although your individual results may vary.
Skill Level
Intermediate
The pattern uses familiar stitches, but some rounds require working around the post of stitches from previous rounds. Beginners who are comfortable with double crochet and front-post stitches may also enjoy giving it a try.
US Crochet Abbreviations
ch – chain
sc – single crochet
hdc – half double crochet
dc – double crochet
tr – treble crochet
sl st – slip stitch
st/sts – stitch/stitches
sk – skip
sp – space
FPdc – front post double crochet
FPtr – front post treble crochet
sc2tog – single crochet 2 together
rep – repeat
A Little Note About Post Stitches
When working a front post stitch, you don’t insert your hook through the normal top loops of the stitch.
Instead, bring your hook from front to back around the post of the stitch, then complete the stitch normally.
This creates that wonderful raised ridge you can see on textured crochet.
Part 1 – Building the Center
Round 1
Begin with a magic ring.
Ch 3. This counts as your first dc.
Work 15 dc into the magic ring.
Pull the ring closed carefully, then join with a sl st to the top of the beginning ch-3.
You should have 16 dc in total.
Fasten off if you are changing colors.
Round 2
Join your next color in any stitch.
Ch 3, then work 1 dc in the same stitch.
Ch 2.
In the next stitch, work 2 dc, ch 2.
Continue around the square, working 2 dc, ch 2 into every fourth-stitch position so that four corner spaces are formed.
Join with a sl st to the top of the beginning ch-3.
You should now clearly see the beginnings of four corners.
Round 3
Move with a sl st into the nearest corner space.
Ch 3.
Work:
2 dc, ch 2, 3 dc
into the same corner space.
Along the side, work 3 dc into the next open space.
Continue around the square, placing:
3 dc, ch 2, 3 dc
into every corner.
Join with a sl st.
Your square should now be beginning to take shape.
Round 4 – Adding Texture
This is where the fun begins!
Move to a corner space with sl sts.
Ch 3.
Work 2 dc, ch 2, 3 dc into the corner.
Along the side, work a small textured group:
1 dc, 1 FPtr around the center dc from the previous round, 1 dc
Repeat this textured group across the side.
When you reach the next corner, work:
3 dc, ch 2, 3 dc
Repeat around the square.
Join with a sl st.
The front-post trebles should begin standing slightly above the surrounding stitches.
Part 2 – Developing the Raised Design
Round 5
Slip stitch into the corner space.
Ch 3.
Work 2 dc, ch 2, 3 dc in the same corner.
Across the side, alternate between regular dc groups and raised FPtr stitches.
For each textured section, work the FPtr around the corresponding raised stitch from the previous textured round.
Continue around the square.
Work 3 dc, ch 2, 3 dc in each corner.
Join with a sl st.
Tip
Don’t pull your FPtr stitches too tightly.
When you work around a stitch from a lower round, you need enough yarn to allow the post stitch to reach comfortably. Keeping your tension relaxed will make a big difference.
Round 6
Repeat the corner construction:
3 dc, ch 2, 3 dc
in each corner.
Along each side, continue working the textured groups.
When you reach a raised stitch from the previous round, work an FPtr around it.
This creates a stacked ridge.
Continue around all four sides and join with a sl st.
Round 7
For this round, we are going to add another layer of texture.
Work the corner as:
3 dc, ch 2, 3 dc
Across each side, work:
dc, FPtr, dc
in the established textured areas.
Between the textured groups, work regular dc stitches or small dc groups as needed to maintain an even edge.
Repeat around.
Join with a sl st.
Round 8
Continue building the square.
Work the same textured corner structure in all four corners.
On each side, repeat the raised-stitch groups, making sure your FPtr stitches are worked around the corresponding posts from the previous round.
At this point, your square should have noticeable raised ridges.
Don’t worry if it looks slightly uneven.
That is completely normal with heavily textured crochet!
Round 9
Work around the square using a combination of:
sc
dc
FPtr
Keep the corners clearly defined with:
3 dc, ch 2, 3 dc
in each corner space.
As you work across each side, gently spread the stitches with your fingers to make sure the fabric is lying reasonably flat.
Round 10 – Defining the Border
This round gives the textured center a little breathing room.
Work sc across the sides.
When you reach a raised stitch, work an FPdc around the post.
Continue alternating between ordinary sc stitches and raised FPdc stitches where needed.
In each corner, work:
sc, ch 2, sc
Join with a sl st.
You should now have a lovely raised border surrounding the center design.
Part 3 – Creating a Clean Outer Section
Round 11
Change colors if desired.
Join your new yarn in any corner space.
Ch 1.
Work:
sc, ch 2, sc
in the corner.
Work sc evenly across the side.
Repeat the same corner pattern at each corner.
Join with a sl st.
This round helps straighten the edges and gives the textured center a clean transition.
Round 12
Ch 1.
Work sc across the first side.
At each corner, work:
sc, ch 2, sc
Continue around.
Join with a sl st.
If your square is beginning to ripple, check your tension before continuing.
Too many stitches can make the edges wave, while too few stitches can pull the square inward.
Part 4 – Adding One More Textured Layer
Round 13
Join yarn in a corner.
Ch 3.
Work 2 dc, ch 2, 3 dc in the corner.
Across the side, work small granny-style groups of:
3 dc
in the spaces created along the previous round.
Between groups, use the appropriate chain spaces to maintain an even edge.
Continue around the square.
Repeat the corner group in each corner.
Join with a sl st.
Round 14
Slip stitch into the corner space.
Ch 3.
Work:
2 dc, ch 2, 3 dc
in the same corner.
Across the side, continue with 3-dc groups.
To add texture, work an FPtr around selected dc posts from the previous textured round.
Repeat around all four sides.
Join with a sl st.
Round 15
This round brings the raised texture closer to the outer edge.
Work the corners as before.
Across each side, work a combination of sc and FPdc stitches.
Whenever you reach one of the prominent raised posts, work your FPdc around it rather than into the top of the stitch.
This creates another beautiful ridge.
Join with a sl st.
Round 16
Work another round of sc around the square.
At each corner:
sc, ch 2, sc
Where you encounter raised posts, you may work an FPdc around them to continue the textured effect.
Keep your tension relaxed.
Round 17
Change colors if desired.
Join in a corner.
Ch 2.
Work 2 hdc, ch 2, 3 hdc into the corner.
Work hdc across each side.
Repeat around the square.
Join with a sl st.
This softer round helps balance the stronger texture from the previous rounds.
Round 18
Work sc evenly around.
In each corner, work:
sc, ch 2, sc
Pay close attention to your stitch count on each side.
If one side is noticeably longer than another, stop and check your stitches before continuing.
Part 5 – Final Textured Border
Round 19
Join your final color in any corner.
Ch 3.
Work:
2 dc, ch 2, 3 dc
into the corner.
Across the side, work:
dc, FPdc, dc
where appropriate to create a final raised detail.
Repeat around.
Join with a sl st.
Round 20
Ch 1.
Work sc around the entire square.
In each corner, work:
sc, ch 2, sc
This simple round gives the design a neat frame.
Round 21
For the final decorative round, work hdc around the square.
In each corner, work:
3 hdc
This creates a softly rounded, substantial corner.
Continue around all four sides.
Join with a sl st.
Finishing
Fasten off and leave a yarn tail.
Thread the tail onto your tapestry needle and carefully weave it through the back of your work.
Trim the excess yarn.
Take a moment to look at your square from the front.
Isn’t that texture just lovely? ❤️
Blocking Your Crochet Square
I strongly recommend blocking this square, especially if you notice that the edges are slightly wavy or the corners aren’t perfectly even.
Place the finished square on a blocking mat.
Gently stretch it into a square shape.
Use pins around the edges and at the corners to hold it in place.
Don’t pull aggressively. You only want to encourage the stitches to settle into their proper shape.
Allow the square to dry completely before removing the pins.
Blocking can make an amazing difference with textured crochet!
Helpful Tips for a Beautiful Result
Keep your tension relaxed
This is especially important when working FPtr and FPdc stitches.
If your tension becomes too tight, the textured stitches may pull the fabric inward.
Count your corners
Every round should have four clearly defined corners.
If you suddenly have five corners—or only three—something has gone wrong earlier in the round.
Use stitch markers
If you’re newer to crochet, place a marker in each corner.
It makes keeping track of the square much easier.
Don’t be afraid of color
This design can look completely different depending on your color choices.
Try:
Two soft neutral shades
Cream and dusty rose
Blue and white
Sage and cream
Several scraps from your yarn basket
One single color for a sophisticated textured look
Give yourself permission to go slowly
Textured crochet isn’t something I like to rush.
Sometimes the prettiest details come from slowing down, looking carefully at your stitches, and enjoying each little round.
What Can You Make With These Squares?
Once you’ve made several squares, you can join them together to create something truly special.
Try making:
A cozy throw blanket
A decorative pillow
A lap blanket
A baby blanket
A crochet bag
A table runner
A wall hanging
A colorful sampler afghan
You can even make every square in a different color combination and join them together for a wonderfully cheerful scrappy blanket.
VIDEO TUTORIAL
There is something wonderfully satisfying about watching a simple crochet square grow one round at a time.
What starts as a small center slowly becomes a piece filled with texture, raised details, little clusters, and beautiful corners. And that’s one of the things I love most about crochet—the magic isn’t only in the finished project. It’s in every stitch we make along the way. 🧶💕
So grab your favorite yarn, settle into your favorite chair, and give this textured square a try. Don’t worry if your first one isn’t absolutely perfect. Crochet has a funny way of teaching us that handmade doesn’t have to mean flawless.
I hope you have as much fun making this square as I did putting it together for you.
And if you make one, I’d love to see your colors! There are so many beautiful possibilities with this design.
Until next time, keep your hook busy and your heart happy. ❤️