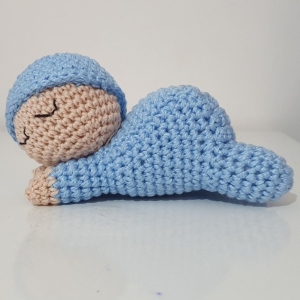
Welcome to Grandma’s Crafts! Today we are sharing an adorable Sleeping Baby Amigurumi crochet pattern, perfect for anyone who loves small crochet projects full of charm and personality. This sweet little baby is designed in a peaceful sleeping position, with tiny hands near the face, bent legs, a rounded body, and a cozy little hat that makes the finished piece even more lovable.
This pattern is made using basic amigurumi techniques and is worked mostly in continuous rounds. The baby is created in separate pieces, including the head, body, arms, legs, and hat, which are then carefully assembled to create the relaxed sleeping pose. The construction is simple to follow, while the final shaping and positioning of the pieces give the amigurumi its special newborn-like appearance.
One of the nicest things about this Sleeping Baby Amigurumi Crochet Pattern is how easy it is to personalize. Soft blue gives the baby a classic and delicate look, but you can easily change the yarn colors to pink, cream, yellow, sage green, lavender, or any shade you prefer. Small details such as the hat, embroidered cheeks, and facial expression can also be customized to make every little baby unique.
The sleeping pose is created mainly during assembly, so it is worth taking a little extra time when positioning the arms, legs, and head. Pinning the pieces before sewing them in place can help you find the most natural position. The head should rest gently toward the hands, while the bent legs and rounded lower body help create that adorable curled-up sleeping appearance.
Sleeping Baby Amigurumi Crochet Pattern
This project can make a lovely handmade decoration for a nursery, a sweet addition to an amigurumi collection, or a thoughtful handmade gift. Since the design uses relatively small amounts of yarn, it can also be a great project for using some of those leftover colors from other crochet creations.
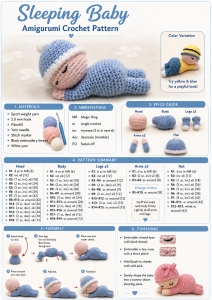
The visual guide above includes the main materials, abbreviations, individual crochet pieces, round-by-round instructions, assembly steps, and finishing details. Follow each section carefully, keep track of your stitch counts, and remember that the final shaping can make a big difference in the appearance of your finished baby.
This adorable pattern can become a truly beautiful handmade piece, full of sweetness and personality. Its delicate sleeping pose and soft details make it especially lovely for nursery décor, but it also works wonderfully as a thoughtful handmade gift for baby showers, newborn celebrations, birthdays, or simply as a special keepsake made with care.
If you love delicate and adorable amigurumi projects, this Sleeping Baby Amigurumi Crochet Pattern is such a sweet one to make. With its peaceful sleeping pose, rounded little body, bent legs, and tiny hands resting near the face, this design creates a lovely baby doll that looks cozy and full of charm.
This project is worked mainly in continuous rounds using simple amigurumi techniques, and the final sleeping position is created during assembly. It is a wonderful pattern for crocheters who enjoy making baby-inspired dolls, nursery décor, or thoughtful handmade gifts.
Skill Level
Confident Beginner / Intermediate
You should be comfortable with:
working in continuous rounds
single crochet
increases and invisible decreases
simple sewing and assembly
stuffing amigurumi pieces
Finished Size
Approximately 6–7 inches / 15–18 cm long, depending on your yarn, hook size, tension, and stuffing.
Materials
Sport weight cotton or cotton-blend yarn
Skin-tone yarn
Light blue yarn
Small amount of white yarn
Black embroidery thread
Small amount of pink thread or blush for the cheeks
2.0 mm crochet hook
Polyester fiberfill
Yarn needle
Stitch marker
Scissors
Pins
Optional: use a fluffy white yarn for the hat trim.
Abbreviations – US Crochet Terms
MR – magic ring
sc – single crochet
inc – increase (2 sc in the same stitch)
dec – invisible decrease
sl st – slip stitch
BLO – back loop only
FO – fasten off
st / sts – stitch / stitches
R – round
Numbers in brackets [ ] indicate the total stitch count at the end of each round.
Pattern Notes
Work in continuous spiral rounds unless otherwise stated.
Use a stitch marker to keep track of the first stitch of each round.
Keep stitches tight enough so the stuffing does not show through.
Stuff the head and body firmly.
Stuff the arms and legs lightly so they stay soft and flexible for shaping.
Head
Using skin-tone yarn:
R1: 6 sc in MR. [6] R2: inc x 6. [12] R3: (1 sc, inc) x 6. [18] R4: (2 sc, inc) x 6. [24] R5: (3 sc, inc) x 6. [30] R6: (4 sc, inc) x 6. [36] R7: (5 sc, inc) x 6. [42]
R8–R13: sc around. [42]
R14: (5 sc, dec) x 6. [36] R15: (4 sc, dec) x 6. [30] R16: (3 sc, dec) x 6. [24] R17: (2 sc, dec) x 6. [18]
Begin stuffing firmly, keeping the head nicely rounded.
R18: (1 sc, dec) x 6. [12]
Finish stuffing.
FO, leaving a long tail for sewing. Do not close the opening.
Body
Using light blue yarn.
The body is worked from the rounded bottom upward toward the neck.
R1: 6 sc in MR. [6] R2: inc x 6. [12] R3: (1 sc, inc) x 6. [18] R4: (2 sc, inc) x 6. [24] R5: (3 sc, inc) x 6. [30]
R6–R9: sc around. [30]
R10: (3 sc, dec) x 6. [24]
R11–R13: sc around. [24]
R14: (2 sc, dec) x 6. [18]
R15–R16: sc around. [18]
Begin stuffing. Add slightly more stuffing to the lower body than to the upper part.
R17: (1 sc, dec) x 6. [12]
Neck
R18–R19: sc around. [12]
Finish stuffing.
FO, leaving a long tail for sewing.
Legs – Make 2
Using light blue yarn.
R1: 6 sc in MR. [6] R2: inc x 6. [12]
R3–R4: sc around. [12]
R5: (2 sc, dec) x 3. [9]
R6–R8: sc around. [9]
Do not stuff this middle section firmly.
R9: (2 sc, inc) x 3. [12]
R10–R12: sc around. [12]
R13: (3 sc, inc) x 3. [15]
R14–R15: sc around. [15]
Stuff the foot moderately. Stuff the upper leg lightly and leave the center softer.
FO, leaving a long tail for sewing. Do not close the opening.
Shaping the Knee
Gently bend the leg around R7–R8. Using matching yarn, place one or two small stitches on the inside of the bend to help the leg hold a curved sleeping shape.
Do not pull tightly.
Repeat for the second leg.
Arms – Make 2
Begin with skin-tone yarn.
R1: 6 sc in MR. [6] R2: (2 sc, inc) x 2. [8]
R3–R4: sc around. [8]
Change to light blue yarn.
R5–R10: sc around. [8]
Stuff the hand lightly. Add only a tiny amount of stuffing to the sleeve, leaving the upper part soft.
Flatten the opening and crochet 4 sc through both layers.
FO, leaving a long tail for sewing.
Sleepy Hat
Using light blue yarn:
R1: 6 sc in MR. [6] R2: inc x 6. [12] R3: (1 sc, inc) x 6. [18] R4: (2 sc, inc) x 6. [24] R5: (3 sc, inc) x 6. [30] R6: (4 sc, inc) x 6. [36] R7: (5 sc, inc) x 6. [42]
R8–R11: sc around. [42]
Change to white yarn.
R12–R13: sc around. [42]
FO and weave in the ends.
Small Pom-Pom
Using white yarn:
R1: 6 sc in MR. [6] R2: inc x 6. [12] R3: sc around. [12]
Add a tiny amount of stuffing.
R4: dec x 6. [6]
FO and close the opening.
Sew securely to the top of the hat.
Optional Pacifier
Pacifier Shield
Using blue yarn:
R1: 6 sc in MR. [6] R2: inc x 6. [12]
Join with a sl st.
FO, leaving a long tail.
Pacifier Center
Using blue yarn:
R1: 5 sc in MR. [5] R2: sc around. [5]
FO.
Add a tiny amount of stuffing and close.
Sew the small center piece onto the middle of the pacifier shield.
Face
It is easier to embroider the face before attaching the head to the body.
Eyes
Embroider two small curved closed eyes around R11–R12. Each eye should be about 2–3 stitches wide.
Leave about 5 stitches between the inner ends of the eyes.
Nose
Using skin-tone yarn, embroider one or two tiny horizontal stitches about one round below the eyes.
Cheeks
Add a very small amount of blush or a few soft pink stitches beneath the eyes.
Assembly
Take your time with this part. The final sleeping pose depends on the way the pieces are attached.
Attach the Head
Insert the 12-stitch neck into the 12-stitch opening of the head.
Turn the head slightly to one side and tilt it downward a little.
Pin in place, then sew securely all the way around.
The head should look as if it is naturally resting toward the baby’s hands.
Attach the Legs
Place the body horizontally with the wider rounded end at the back.
Position one leg on each side of the lower body, around R5–R9.
The legs should angle slightly outward and backward.
Pin both legs before sewing.
Sew the open edge of each leg securely to the body.
If needed, add one small hidden stitch from the lower leg to the body to help keep the sleeping pose.
Attach the First Arm
Attach one arm on the side the face is turned toward.
Sew it near the shoulder area, around R14–R17 of the body.
Bring the hand forward so it rests beneath or beside the cheek.
Secure it with one discreet stitch.
Attach the Second Arm
Attach the second arm on the opposite side.
Place it a little farther back than the first arm and bring the hand toward the face.
It can rest beside the first hand or remain slightly tucked underneath the head.
Add the Hat
Place the hat on the head with the white trim just above the eyes.
Tilt the hat slightly in the same direction as the head.
You may leave it removable, or secure it with a few tiny stitches around the back and sides.
Add the Pacifier
If using the pacifier, center it below the nose.
Sew around the outer edge with small stitches.
Do not pull too tightly.
Final Shaping
After assembly, gently shape the stuffing with your fingers.
Round out the baby’s bottom
Flatten the underside slightly so the body rests naturally
Adjust the knees so they stay bent
Bring the hands closer to the cheek
Turn the head slightly until the sleeping pose looks soft and natural
The final shape should show:
a large rounded head, small shoulders, a fuller lower body, and short bent legs.
VIDEO TUTORIAL
To follow along with this video tutorial, turn on the English voiceover or subtitles!
ANOTHER OPTION…
Your Sleeping Baby Amigurumi Is Finished!
Your little sleeping baby is now complete and ready to display.
This design looks beautiful in soft baby shades like blue, pink, cream, yellow, sage green, or lavender. You can also customize the hat, pajamas, or accessories to create different themed versions.
We hope you enjoyed this adorable project. Be sure to explore more crochet ideas, tutorials, and creative patterns here on the blog, and don’t forget to come back often, as we are always sharing new inspirations for crochet lovers. Thank you so much for visiting Grandma’s Crafts and spending a little creative time with us today!
Be sure to explore the other patterns and craft ideas available here on the blog. We are always adding new and interesting projects throughout the week, so there is always something different to discover. Come back soon to Grandma’s Crafts for more crochet patterns, handmade inspiration, and creative ideas!