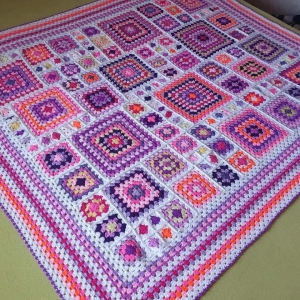
The different sizes are what create that gorgeous patchwork effect.
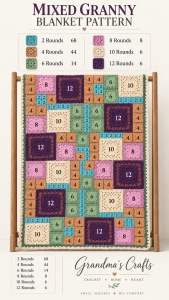
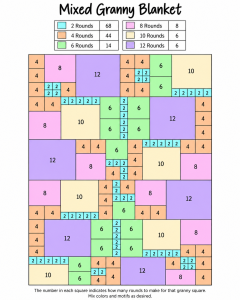
[ MIXED GRANNY BLANKET LAYOUT CHART HERE ]
Each number shown inside the layout tells you the size of the square that belongs in that space.
A block marked 2 uses a 2-round granny square.
A block marked 6 uses a 6-round granny square.
A block marked 12 uses one of the largest squares in the blanket.
Once all of those different sizes are placed together, the smaller squares fill the spaces around the larger ones and everything begins to fit together like a mosaic.
Materials
One of the nicest things about this blanket is that there is no single yarn or color palette you have to use.
You will need:
Worsted weight yarn or another yarn weight of your choice
A crochet hook suitable for your yarn
Scissors
Yarn needle
Blocking mats and pins, optional but very helpful
The most important thing is to use the same yarn weight and a consistent hook size throughout the blanket so your squares remain proportional to one another.
This is also a wonderful scrap yarn project. Those tiny 2-round and 4-round squares are perfect for using leftover yarn from other projects.
Crochet Terms
This pattern uses US Crochet Terms.
ch = chain
dc = double crochet
sl st = slip stitch
sp = space
st(s) = stitch(es)
MR = magic ring
Basic Granny Square Pattern
If you want to keep the project simple, you can use this traditional granny square for every block in the blanket.
You can change colors after any round or keep individual squares in one color.
Round 1
Make a MR.
Ch 3. This counts as your first dc.
Work 2 dc into the ring.
Ch 2.
Work:
(3 dc, ch 2)
three more times into the ring.
Join with a sl st to the top of the beginning ch-3.
You should have four groups of 3 dc and four corner ch-2 spaces.
Pull the center closed.
Round 2
Sl st across to the next corner ch-2 space.
Ch 3, work 2 dc in the same corner.
Ch 2, then work 3 dc in the same corner space.
Ch 1.
In each remaining corner space, work:
(3 dc, ch 2, 3 dc), ch 1
Join with a sl st to the top of the beginning ch-3.
Round 3
Sl st across to the next corner space.
Work:
(3 dc, ch 2, 3 dc)
in the corner.
Ch 1.
Work 3 dc in the next ch-1 space.
Ch 1.
In the next corner, work:
(3 dc, ch 2, 3 dc)
Continue around, working 3 dc in every side ch-1 space, with ch 1 between groups, and (3 dc, ch 2, 3 dc) in every corner.
Join with a sl st.
Additional Rounds
Continue in the same way.
In every corner work:
(3 dc, ch 2, 3 dc)
Along each side work:
3 dc in each ch-1 space
with ch 1 between each group.
Every new round adds another granny cluster to each side.
Continue until your square reaches the required number of rounds.
For example, a block marked 4 stops after Round 4, while a block marked 10 continues until Round 10.
You Can Mix Different Granny Square Designs
This is one of my favorite parts of the entire project.
You absolutely do not have to make all 146 squares using the exact same granny pattern.
Traditional granny squares can sit beside floral motifs, textured granny squares, solid centers, multicolor squares, or other granny-style designs.
That is what gives this kind of blanket so much personality.
The only important rule is size.
If you replace a traditional granny square with another motif, make sure the finished piece matches the size of the square it is replacing.
For example, if you want to place a flower square where the chart calls for a 6-round granny square, compare it with one of your finished 6-round squares. The two motifs should have approximately the same finished measurements before you join them into the blanket.
This gives you the freedom to experiment without losing the structure of the layout.
Choosing Your Colors
You can take this blanket in so many different directions.
A palette of cream, sage, dusty rose, lavender, and soft blue would create a gentle vintage look.
Deeper shades like teal, plum, rust, mustard, and cream can make the blanket feel warm and rich.
You could also go completely in the opposite direction and use every leftover color in your yarn basket.
Because the squares are different sizes, color naturally becomes part of the composition. A bold shade used in a 12-round square will have much more visual impact than the same color appearing in one tiny 2-round motif.
I like the idea of choosing a few colors that appear repeatedly throughout the blanket. That small amount of repetition helps connect all the different squares, even when the individual motifs are completely different.
Planning Your Layout
The chart gives you a complete arrangement to follow, but you can also treat it as inspiration.
You might decide that you want one of the large squares in a different area. You may want several tiny squares grouped together, or perhaps you want your favorite color positioned closer to the center.
That is completely fine.
Lay the squares out on a bed, table, or clean floor before joining anything.
This is the moment to play.
Move things around, step away, look at the whole blanket, and keep adjusting until the colors and square sizes feel balanced to you.
If you decide to change the arrangement significantly, just remember that the combined width of the smaller squares needs to match the side of the larger square beside them.
That is what allows everything to fit together neatly.
Blocking Makes a Big Difference
With a blanket like this, blocking your squares before joining is especially helpful.
You have many different sizes meeting one another, so clean edges make assembly much easier.
Gently block each square to its proper shape, making sure squares with the same number of rounds are approximately the same size.
Your 4-round squares should match one another.
Your 8-round squares should match one another.
Your 12-round squares should match one another.
Once everything is blocked and laid out, the joining process becomes much more enjoyable.
Joining the Granny Squares
I recommend assembling this blanket in sections instead of trying to join all 146 squares at once.
Look at the layout and identify small groups that form larger rectangles or squares.
Join those pieces first, then connect the completed sections together.
You can use whichever joining method you prefer.
A mattress stitch gives you a discreet seam.
A whip stitch is simple and dependable.
A slip stitch join creates a slightly more visible crochet ridge.
A single crochet join can become part of the design itself.
If your blanket contains lots of colors, using one consistent joining color can also help pull everything together.
Adding the Border
Once every section has been joined and the blanket is complete, finish by working around the outside edge.
Because the center of this blanket already has so much visual interest, the border does not need to be complicated.
A simple round of single crochet can clean up the edges beautifully.
You can follow it with a few rounds of double crochet, granny clusters, or another simple border that complements the rest of your blanket.
I especially like using one of the colors that appears throughout the squares. It gives the blanket a finished, intentional look without competing with the mixed granny design.
Make This Blanket Your Own
There is something wonderfully relaxed about this project.
You have a layout to guide you, but you are not trapped by it.
You have suggested square sizes, but the colors and motifs can change completely.
You can make every square traditional, or turn the blanket into a collection of different granny designs you have wanted to try.
And because the smallest squares require so little yarn, even those little leftover balls hiding at the bottom of your basket can finally have a place.
The result is a blanket that feels collected rather than repeated, almost like every square has its own little story.
Follow the layout closely or rearrange it to suit your style. Use a carefully planned color palette or simply crochet with whatever yarn makes you happy that day.
That is the beauty of a Mixed Granny Square Blanket. The structure brings everything together, but the personality is entirely yours.
I hope you enjoy making this one as much as I enjoyed imagining all the different ways it could come together. Sometimes the most beautiful crochet projects begin with a pile of little squares and no two looking quite the same. 🧶