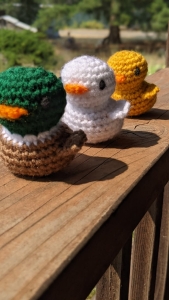
Welcome to Grandma’s Crafts! I’m so happy you are here today. Sometimes the smallest crochet projects are the ones that make me happiest, and this little rubber duck is definitely one of those.
There is just something about a tiny yellow duck that is impossible not to love. It is cheerful, simple, and cute enough to make you want to crochet another one as soon as the first is finished.
I also love projects like this when I have a little leftover yarn sitting in my basket. You do not need much yarn, there are no complicated stitches, and the pieces work up quickly enough that you can actually see your duck taking shape without spending days on it.
This little duck would make a sweet spring decoration, a nursery accent, a small gift, or even a cute addition to an Easter basket. You could also add a keychain loop and turn it into a little bag charm.
And of course, yellow is only the beginning. Once you understand the basic construction, you can make an entire little flock in pastel colors, white, pink, blue, or whatever scraps you already have at home.
This pattern is written using US crochet terminology.
Materials
You will need:
Worsted weight yarn, #4
Yellow for the duck
Orange for the beak
A small amount of pink yarn, optional for cheeks
3.5 mm crochet hook
8 mm safety eyes
Polyester fiberfill
Tapestry needle
Scissors
Stitch marker
Finished Size
Using worsted weight yarn and a 3.5 mm hook, the finished duck should measure approximately 4 to 5 inches tall, depending on your tension and how firmly you stuff it.
Abbreviations
MR = magic ring ch = chain sc = single crochet inc = increase, 2 sc in the same stitch dec = decrease sl st = slip stitch st(s) = stitch(es)
Pattern Notes
The body and head are worked separately in continuous rounds.
Do not join at the end of each round unless instructed.
Use a stitch marker to mark the first stitch of each round.
Stuff the pieces firmly enough to hold their shape, but avoid overstuffing because that can stretch the stitches and create visible gaps.
If you are making this duck for a baby or very young child, embroidered eyes are a safer option than plastic safety eyes.
Body
With yellow yarn:
Round 1
6 sc in MR. (6)
Round 2
Inc in each st around. (12)
Round 3
Sc in next st, inc in next st.
Repeat around. (18)
Round 4
Sc in next 2 sts, inc in next st.
Repeat around. (24)
Round 5
Sc in next 3 sts, inc in next st.
Repeat around. (30)
Rounds 6 to 9
Sc in each st around. (30)
At this point, the body should look like a soft little rounded bowl.
Round 10
Sc in next 3 sts, dec.
Repeat around. (24)
Round 11
Sc in each st around. (24)
Round 12
Sc in next 2 sts, dec.
Repeat around. (18)
Begin stuffing the body.
Round 13
Sc in next st, dec.
Repeat around. (12)
Add more stuffing if needed.
Round 14
Dec around. (6)
Fasten off and close the remaining opening.
Weave in the end.
Head
With yellow yarn:
Round 1
6 sc in MR. (6)
Round 2
Inc in each st around. (12)
Round 3
Sc in next st, inc in next st.
Repeat around. (18)
Round 4
Sc in next 2 sts, inc in next st.
Repeat around. (24)
Rounds 5 to 8
Sc in each st around. (24)
Place the safety eyes between Rounds 6 and 7, approximately 6 stitches apart.
Round 9
Sc in next 2 sts, dec.
Repeat around. (18)
Round 10
Sc in next st, dec.
Repeat around. (12)
Stuff the head.
Try to keep it round rather than packing too much stuffing into the bottom.
Round 11
Dec around. (6)
Fasten off, leaving a long tail for sewing.
Close the small opening.
Beak
With orange yarn:
Ch 5.
Round 1
Beginning in the second ch from the hook:
Sc in the next 3 ch.
Work 3 sc in the last ch.
Continue working along the opposite side of the foundation chain.
Sc in the next 2 ch.
Work 2 sc in the final ch. (10)
Round 2
Sc in each st around. (10)
Fasten off, leaving a long tail.
Gently flatten the piece.
The beak should form a small oval rather than a round ball.
Wings
Make 2.
With yellow yarn:
Round 1
6 sc in MR. (6)
Round 2
Sc in next st, inc in next st.
Repeat around. (9)
Round 3
Sc in each st around. (9)
Fasten off, leaving a long tail.
Do not stuff.
Flatten each wing gently before attaching it to the body.
Tail
With yellow yarn:
Ch 5.
Beginning in the second ch from the hook:
Sl st in next ch.
Sc in next ch.
Hdc in next ch.
Dc in final ch.
Fasten off, leaving a long tail for sewing.
This creates a small triangular tail that will sit slightly upright at the back of the duck.
Assembly
Position the head slightly toward the front of the body rather than directly in the center.
This small detail helps create that recognizable rubber duck silhouette.
Use the long yarn tail to sew the head securely to the body.
Before finishing the seam, check the duck from the side to make sure the head is sitting at the angle you like.
Attach the Beak
Place the flattened orange beak underneath the eyes.
Pin it in place first if necessary.
Sew around the outer edge using the orange yarn tail.
Try not to pull the stitches too tightly because the beak should stay slightly rounded.
Attach the Wings
Place one wing on each side of the body.
I like positioning them slightly toward the front rather than perfectly centered.
Sew around the upper portion of each wing, leaving the bottom edge slightly free so the wings have a little dimension.
Attach the Tail
Position the wider end of the tail at the back of the body.
Sew it securely in place with the pointed end facing slightly upward.
Optional Rosy Cheeks
For a little extra personality, use pink yarn to embroider one or two small horizontal stitches underneath each eye.
This is completely optional, but it gives the duck such a sweet expression.
Make It Your Own
Once you have made one duck, there are so many little variations you can try.
Make a pastel pink or blue version for spring.
Add a tiny crochet bow to the top of the head.
Attach a loop to turn your duck into a keychain or bag charm.
Use fluffy yarn for a softer little chick look.
You could even make several in different colors and place them together in a small basket.
Because the basic construction is so simple, this is also a fun pattern for experimenting with different yarn weights. Just remember that changing the yarn and hook size will also change the finished size of your duck.
VIDEO TUTORIAL
I have a feeling this is one of those patterns that is difficult to make only once.
The little round body, tiny wings, and orange beak come together so quickly, and every duck seems to develop its own personality by the time you finish sewing the pieces in place.
It is also a lovely project for those leftover bits of yarn that are never quite enough for a larger project but feel too good to throw away.
Whether you make one for yourself, tuck one into a gift, or end up with an entire little flock sitting on your shelf, I hope you have fun making this sweet little duck. 🐥💛