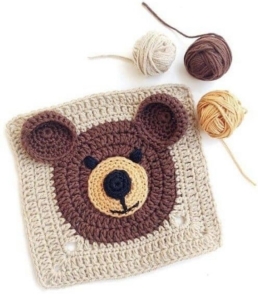
Welcome to Grandma’s Crafts! I’m so happy you are here today. I have one of the sweetest little granny square ideas to share with you, and I honestly think this one would be hard to resist if you enjoy making baby blankets. The Teddy Bear Granny Square combines everything I love about crochet motifs: texture, color, a little dimensional detail, and a finished square that can become so many different projects.
The little bear face is obviously what makes this square special. Instead of simply crocheting a regular granny square and adding an applique on top, the textured center becomes part of the bear itself.
Add two tiny ears, a soft crochet muzzle, and a few embroidered facial details, and suddenly that colorful little motif has a completely different personality.
And the color possibilities are almost endless. I especially love the idea of keeping the outside of every square the same color and changing only the bears. Imagine a soft blue background with cream, peach, lavender, caramel, and dusty pink teddy bears scattered throughout a baby blanket. Everything would still coordinate, but every little bear would feel slightly different.
This is also such a nice project if you enjoy working in smaller pieces. Instead of having an entire blanket sitting on your lap from the beginning, you can make one teddy square at a time, experiment with different colors, and slowly build a little collection before joining them together.
How the Teddy Bear Granny Square Comes Together
The square starts with a round textured center made from crochet clusters. This gives the bear face that full, almost floral appearance you can see before any of the facial details are added.
From there, the motif is transformed into a granny-style square using groups of double crochet around the outside. Once the square shape is established, you can continue adding rounds if you want a larger finished motif.
The ears are made separately as small semicircles and sewn near the top of the bear’s head. I actually prefer them slightly raised rather than completely flat because it gives the finished bear so much more character.
Then comes my favorite little detail: the muzzle. It is crocheted separately in a cream or ivory shade and sewn over the center of the face. You can leave it flat or add just a tiny amount of stuffing underneath to make it slightly puffy.
The nose, mouth, and eyes are added last. For something that will be used by a baby or very young child, I would personally choose embroidered features instead of small plastic pieces. The face still looks adorable, and everything stays soft and securely attached to the square.
This adorable Teddy Bear Granny Square combines a textured granny-style center with dimensional ears and a soft crochet muzzle. Make every bear in the same color or mix cream, peach, lavender, caramel, and other soft shades for a sweet baby blanket.
If you would like to see another take on animal-inspired crochet squares, Yarnspirations also has a sweet free blanket pattern featuring bears, lions, and tigers. It’s a nice extra reference if you want to explore a different way of building cute character squares into a blanket.
Arrange the colors before joining so the different bears are distributed evenly.
Join using whip stitch, mattress stitch, slip stitch, or your favorite granny square joining method.
Then add a simple sc or hdc border around the finished blanket.
VIDEO TUTORIAL
Once you understand how one teddy square is made, the fun really begins because you can start playing with combinations. Make all the bears the same for a more traditional blanket, or give each one its own color while keeping the outer rounds consistent.
I think this would be especially beautiful for a baby blanket, but I would not stop there. A few squares could become a little cushion cover, tote bag, nursery wall hanging, or even the front of a child’s cardigan. Sometimes one cute granny square opens the door to far more projects than you originally planned.
This is also a lovely way to use smaller amounts of yarn. The ears and muzzle need very little, so all those leftover cream, beige, pink, blue, or brown scraps suddenly become useful again.
If you are making several squares for one project, I would lay them all out before joining and move the colors around until the arrangement feels balanced. That little step makes such a difference when every bear has its own personality.
And I have to admit, I think a whole stack of these little teddy faces would be almost as cute as the finished blanket itself. This feels like one of those projects where you make the first square just to try the pattern, then somehow realize you already have twelve of them sitting beside you.
I hope you enjoy making these Teddy Bear Granny Squares and finding your favorite color combinations along the way. They are sweet, playful, and perfect for turning a simple granny square project into something that feels extra special. And as always, thank you for spending a little crochet time here with me at Grandma’s Crafts.