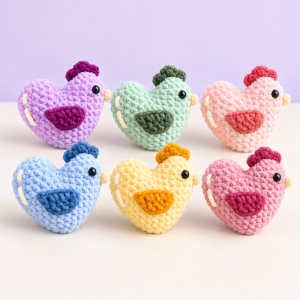
Hello, friends! Welcome to Grandma’s Crafts! We’re so happy you’re here to share another lovely crochet project with us. Today’s find is a little Heart Chicken, a soft, heart-shaped chicken with a cheerful face. Grab your favorite yarn, make yourself comfortable, and let’s take a closer look at this sweet project.
Small crochet projects have a charm all their own. There’s something lovely about watching a few stitches turn into a little character, especially when you can hold the finished piece in the palm of your hand. This one would make a thoughtful handmade surprise for someone who enjoys playful crochet creations.
You might make one for a friend, tuck it into a gift basket, or keep it beside your yarn as a little crafting companion. If you enjoy choosing colors, it’s also an opportunity to try a combination you’ve been saving for a special project.
Before you begin, take a moment to read through the full instructions and gather your supplies. Having everything within reach makes it easier to relax and enjoy the crocheting.
BEFORE YOU START, YOU SHOULD CAREFULLY READ WHAT YOU NEED TO KNOW AND THE TOOLS TO PREPARE
Materials
Yarn: Bulky / Category 5 of your colors choice
4.0mm (C) Hook
Stitch marker
Sewing needle
Scissors
Fiberfill
Plastic safety eyes (7mm x2)
Abbreviations
MR: Magic Ring
st(s): Stitch(es)
sl st: Slip stitch
ch: Chain
SC: Single crochet
INC: Increase
DEC: Decrease
DC: Double crochet
Note
You need to prepare 1 skein of each color.
The pattern is written using crochet terminology common in the U.S.
It is recommended to use a stitch marker to mark the first stitch of each round to avoid getting lost.
The size of the finished piece may vary based on the yarn used and the tension of your stitches. The size is about 7cm x 8cm ~ 2.8 inches x 3.1 inches.
IMPORTANT NOTE BEFORE STARTING TO CROCHET
End the row by slip stitching.
Most of my patterns use the ‘end the row with slip stitch’ technique. I feel it makes the stitches more aligned and prevents the finished piece from skewing to one side. Of course, you can also use the spiral technique, but the feet or arms might end up in the wrong position.
I feel that some crocheters may not be familiar with the correct operation of the finishing part, so please pay more attention to this section.
for the end the row :
To ensure proper end-of-row placement, you should use a stitch marker to mark your first crochet stitch.
After that, thread the needle through –> take the yarn and pull it through to execute the slip stitch. After that, gently pull to tighten it a bit.
Yarn over and thread it through again to make a chain stitch, and then make the first crochet stitch again where you slipped into to finish the row.
BODY
Use color yarn of your choice
Row 1: 5SC in a MR (5) Row 2: 5INC (10) Row 3: (SC, INC) 5 times (15) Row 4: 15SC (15)
Make one more piece until round 4 but DO NOT cut the yarn to connect two pieces.
*Attach the eyes between Rows 4 and 5, with the first eye positioned between the 20th and 21st stitches, and the second eye positioned between the 25th and 26th stitches*
*Stuffing* *Fasten off and leave a long tail for sewing 8 FLO stitches together*
WINGS X2
Use dark pink yarn
Make 4CH, start with the second chain from the hook: INC, SC, 4SC in the last stitch, SC, INC, 2CH, Picot, CH, SLST in the first stitch
*Fasten off and leave a long tail for sewing the wings onto the body at Rows 8–9, on both sides of the body*
BEAK
Use red yarn
Insert the needle through a stitch in Row 2, pull up the yarn, and crochet along a straight line: CH, HDC in the same st, SLST in R1, 2CH, DC in the same st, SLST in R1, CH, HDC in the same st, SLST in R2.
*Fasten off and cut*
BEAK
Use yellow yarn
Insert the needle into the 24th stitch of Row 5, pull up the yarn, and crochet: (CH, HDC, SLST) in one st.
*Fasten off and cut*
Use dark pink yarn to embroider blush under the eyes, aligned with the beak. Use white yarn to embroider two lines on Row 4 and between Rows 6–8. *Fasten off and cut*
You’re Done
Thank you for choosing this pattern!
Before You Start
Set out a small tray or bowl for your supplies so your needle, marker, and scissors stay together. It’s a simple habit, but it saves searching through the sofa cushions when you’re ready to finish a piece.
If you’re trying a new yarn, practice a few stitches first. You want a fabric that feels comfortable to crochet while being close enough to hold the stuffing inside. Take your time finding a tension that works for your hands.
Good lighting also helps, particularly with fluffy yarn. Keep your stitch marker handy and check your stitch count as you go, rather than waiting until the shape looks uneven.
Ideas for Making It Your Own
Choosing a palette is part of the fun. You could try gentle pastel shades for a soft look or stronger contrasts for a brighter little chicken. Lay your yarns next to each other before you start to see which combinations you like best.
If you’re making several as gifts, give each one a different color combination. A handwritten note tucked beside the finished chicken adds a personal touch without needing elaborate packaging.
You can also keep a small project notebook with the yarn and hook you used. Add a photo of your finished piece, and you’ll have a useful reference when you want to make another.
VIDEO TUTORIAL
A Little Handmade Happiness
We hope this sweet Heart Chicken gives you a reason to enjoy a little crochet time. Whether you’re making it for someone special or simply because it made you smile, take your time and enjoy seeing its personality come together.
Thank you for visiting us here at Grandma’s Crafts! We’d love to hear what colors you would choose for your little chicken, so share your ideas in the comments. Come back soon for another project and a friendly chat. Until next time, happy crocheting, friends!