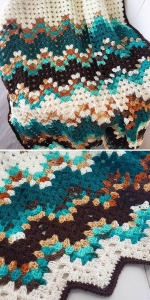
Hello, friends! Welcome to Grandma’s Crafts! We’re so happy to have you here to share another crochet project with us. Today, we’re making a Granny Ripple blanket, with its lovely zigzag waves and cozy granny stitches. Gather your favorite yarn colors, grab your crochet hook, and make yourself comfortable, we’ll walk through it together, one stitch at a time! The Granny Ripple stitch combines classic granny-style clusters with a flowing zigzag shape. Its open texture and repeating peaks and valleys make it a beautiful choice for colorful crochet blankets.
This tutorial explains how to crochet a traditional Granny Ripple blanket. You’ll also discover the Confetti Waves Blanket, a separate pattern to explore if you love the Granny Ripple Confetti look.
One of the most appealing features of a Granny Ripple blanket is its balance of texture and movement. The small groups of stitches create an airy fabric, while the chevrons give each row a flowing shape. Even a simple color palette can bring out the rhythm of the pattern.
The repeating rows make this a satisfying project for crocheters who enjoy settling into a familiar sequence. The foundation and first row deserve careful attention, but once the peaks and valleys are established, they become useful guides as you work.
You can also adapt the blanket to suit your space. Use fewer repeats for a smaller blanket or add more for a wider throw, then continue the rows to your preferred length. A swatch will help you plan the dimensions, since yarn thickness and tension affect the size of each wave.
Before you begin, consider how you want the colors to flow. Broad bands emphasize the chevron shape, while frequent changes create a more detailed striped effect. If the Confetti look caught your eye, you’ll find a link to that separate design later in this article.
Materials
For the blanket described in this tutorial, you’ll need:
A 6 mm crochet hook.
Worsted-weight yarn, category 4, in your chosen colors.
Scissors.
A tapestry needle for weaving in ends.
For a blanket measuring approximately 40 × 50 inches, allow around 1,456–1,820 yards of yarn. Your actual requirements will depend on your yarn, tension, and finished dimensions.
The reference gauge is 12 double crochets and 7 rows per 4 inches. With these materials and tension, each chevron measures approximately 7 inches across.
Make a small swatch before starting to check the fabric and estimate your blanket’s width.
Stitches and Abbreviations
This tutorial uses US crochet terminology.
ch: chain.
dc: double crochet.
sl st: slip stitch.
st: stitch.
3-dc group: three complete double crochets worked into the same stitch or space.
2-dc cluster: two incomplete double crochets worked into the same stitch or space and closed together.
3-dc cluster: three incomplete double crochets worked into the same stitch or space and closed together.
A 3-dc group and a 3-dc cluster are different stitches. Groups create the granny-style sections, while closed clusters help shape the edges and valleys.
How to Work a 2-dc Cluster
Yarn over, insert your hook into the indicated stitch or space, yarn over, and pull up a loop. Yarn over and pull through two loops, leaving the double crochet unfinished.
Repeat once in the same stitch or space. You’ll have three loops on your hook.
Yarn over and pull through all three loops.
How to Work a 3-dc Cluster
Work three unfinished double crochets into the same stitch or space, pulling through two loops each time.
With four loops remaining on your hook, yarn over and pull through all four loops.
Granny Ripple Step-by-Step Instructions
Step 1: Make the Foundation Chain
The foundation repeat is a multiple of 27 chains, plus 3.
For six chevrons:
27 × 6 + 3 = 165 chains.
The source tutorial begins with 170 chains, allowing a few extra chains to be undone afterward. The calculated foundation for six repeats is 165 chains.
Choose the number of repeats according to your desired width. Measure a swatch before committing to a full blanket.
Step 2: Work Row 1
Work a 2-dc cluster into the third chain from your hook.
Continue as follows:
Skip two chains and work three double crochets into the next chain.
Repeat this step twice more, making three 3-dc groups.
Skip two chains. In the next chain, work 3 dc, ch 2, 3 dc to create the peak.
Skip two chains and work three double crochets into the next chain. Repeat twice more, making three groups after the peak.
Skip two chains and work a 2-dc cluster into the next chain.
Skip two chains and work another 2-dc cluster into the next chain.
The two closed clusters form the valley between chevrons.
Continue across the foundation, repeating the groups, peaks, and valleys. At the end of the row, work a 3-dc cluster in place of the pair of 2-dc clusters used for an interior valley.
Step 3: Begin Row 2
Turn your work.
If you’re keeping the same color, slip stitch into the space between the final closed cluster and the adjacent 3-dc group.
If you’re changing colors, fasten off and join the new yarn with a slip stitch in that space.
Chain 3, counting as the first double crochet, then work a 2-dc cluster into the same space.
Step 4: Work the Peaks and Valleys
Work three double crochets into each of the next three spaces between the groups from the previous row.
At the peak’s chain-2 space, work:
3 dc, ch 2, 3 dc.
Work three double crochets into each of the next three spaces.
To form the valley:
Work a 2-dc cluster into the next space.
Skip the space between the two closed clusters from the previous row.
Work a 2-dc cluster into the following space.
Repeat across the row. Finish with a 3-dc cluster, following the edge treatment established in Row 1.
Step 5: Repeat to Your Desired Length
Repeat Row 2 until your blanket reaches the desired length.
Check your work regularly. Each peak should sit above the previous peak, and each valley should remain aligned with the valley below.
If the fabric starts widening or the waves become uneven, check for an extra group or a missed space before continuing.
Step 6: Finish Your Blanket
Fasten off and weave in the yarn ends with a tapestry needle.
Lay the blanket flat and gently arrange the chevrons. If blocking is needed, follow the care instructions for your chosen yarn.
Choosing Colors for Your Granny Ripple Blanket
Color changes can give the same stitch pattern very different looks.
Change colors every row for narrow stripes, or work several rows in each shade for broader bands. A single-color version highlights the crochet texture and the shape of the chevrons.
For a soft palette, try:
Orchid purple.
Dusty pink.
Pale peach.
Ivory.
Sage green.
Ivory adds lightness between stronger shades, while purple gives the waves definition.
This blanket is also a useful project for leftover yarn. Choose yarns of similar thickness to keep the fabric consistent.
For a playful approach, assign each color a number and use dice or a random-number generator to choose your next shade. Give a favorite color more than one number if you’d like it to appear more often.
VIDEO TUTORIAL
Love the Granny Ripple Confetti Look?
If you enjoy colorful waves with small contrasting details, explore the Confetti Waves Blanket by Kate Rowell, published through JellybeanJunction.
This separate design combines clustered stitches with granny-stitch elements. Its color arrangement creates the lively effect associated with the Granny Ripple Confetti look. The official pattern name is Confetti Waves Blanket. View the pattern on Ravelry.
The tutorial above explains a traditional Granny Ripple construction. To recreate the specific Confetti Waves design, follow its own pattern, available for purchase.
The Confetti Waves pattern is written in English using UK crochet terminology, while this tutorial uses US terms. Check the abbreviations before starting: a UK treble crochet corresponds to a US double crochet.
We hope this Granny Ripple tutorial inspires you to pick up your hook and create a blanket you’ll love. Whether you choose soft shades, bright stripes, or a mix of leftover yarn, it’s lovely to watch the waves take shape as you work. Take your time, enjoy choosing your colors, and let the blanket grow at your own pace.
Thank you for spending a little part of your day with us here at Grandma’s Crafts! We’d love to hear which colors you’re planning to use, so feel free to share your ideas and crochet stories in the comments. You’re always welcome back for another project and a friendly chat. Until next time, happy crocheting, friends!