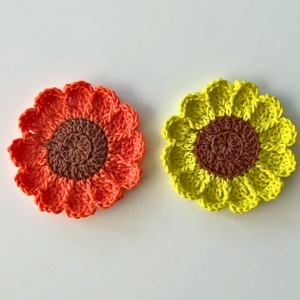
Welcome to Grandma’s Crafts! I’m so happy you are here today. This Crochet Daisy Coaster Pattern begins with a yellow circle and finishes with twelve soft, scalloped petals. We will use a simple repeat for every petal, with the same number of stitches each time, so you can check the flower as it grows.
I love how a change of color can give a small crochet piece a clear shape. Yellow and white suggest a daisy straight away, while cream gives the petals a gentler look. If you have a little cotton yarn left from another project, place the colors together and see what you would enjoy using on your table.
The center is worked in double crochet, followed by one contrasting round for the petals. There are no separate flower parts to sew on. You will practice increases first, then make groups of double crochets into single stitches to form the edge.
Start with one flower, dear, and keep it as your sample before making a set. A smooth yarn and a stitch marker will help you find the start of each round. Take a moment to count before adding the petals; a correct center makes the final repeat much easier to follow.
A Small Flower for Everyday Use
Place a mug on the circular center and let the petals extend around its base. Check that your chosen mug sits steadily before deciding the coaster is the right size. The finished diameter depends on your yarn, hook, and tension, so the stitch counts alone cannot promise a particular measurement.
A few matching flowers can brighten a breakfast tray or make a small gift with a cup. Keep the centers yellow and try white, cream, blush, or another color for the petals. Use the same yarn weight and hook across the set if you want the flowers to have similar proportions.
Skill Level and Materials
This is a beginner practice project for someone who can already make chain stitches, single crochet, double crochet, and slip stitches. You will also need to identify the top of a stitch and work several double crochets into one insertion point.
Choose smooth cotton yarn in two colors, one for the center and one for the petals. Use the same yarn weight for both. Select a crochet hook recommended for the yarn and evaluate it in your first sample. You will also need scissors, a tapestry needle, a removable stitch marker, and a ruler. Optional rustproof pins and a blocking mat can help with shaping if the yarn label permits blocking.
No fixed gauge, yardage, or completion time is specified for this version. Make one coaster, measure it, and use that result to plan the rest of your set. If it is too small or too large, try another yarn weight and an appropriate hook while keeping the pattern counts unchanged.
Abbreviations (US Terms)
ch = chain;
sc = single crochet;
dc = double crochet;
sl st = slip stitch;
st(s) = stitch(es).
An increase here means 2 dc worked into the same stitch. A shell means 7 dc in one stitch. The number in parentheses at the end of a round is its completed stitch count.
How the Center and Petals Fit Together
The four center rounds have 12, 24, 36, and 48 double crochets. Each new round adds twelve stitches, distributed evenly. In the final round, every petal repeat uses four of those 48 stitches: one for a single crochet, one skipped stitch, one for the shell, and another skipped stitch.
Twelve repeats use all 48 stitches without sharing a base stitch between neighboring petals. Each shell contains seven double crochets, and each single crochet makes a low point between shells. We count those two types separately when checking the petal round.
Notes Before You Pick Up Your Hook
Work in joined rounds without turning. Ch 2 at the start of a center round provides height but never counts as a dc. Work the first dc into the same stitch as the previous join, and close the round with a sl st in the first actual dc. Do not work into the joining slip stitch or the beginning chains as extra stitches.
The petal round starts with ch 1, which does not count as a sc. Work through both top loops throughout the pattern. Move the marker to the first actual stitch of each round so it remains easy to identify at the end.
Useful Techniques for Your First Flower
Magic ring: make a loop with the yarn tail crossing over the working yarn. Draw the working yarn through the loop with your hook, then ch 1 to secure it. Work the first round around both the loop and the tail. Pull the tail to close the center and secure it later when weaving in the ends. The securing chain is separate from the ch 2 in Round 1 and does not count.
Double crochet: yarn over, insert the hook into the indicated stitch or ring, yarn over and pull up a loop. Yarn over and pull through two loops, then yarn over and pull through the last two. For an increase, complete a second dc in the same place before moving on.
Seven-stitch shell: complete 7 dc in one base stitch. Count each completed dc as you make it. There are no chains between the stitches of the shell, and you do not spread them across seven different base stitches.
Crochet Daisy Coaster Pattern
Make the Yellow Center
Round 1: With yellow yarn, make a magic ring. Ch 2, then work 12 dc into the ring. Pull the tail to close the opening and join with a sl st to the first dc. Do not turn. (12 dc)
Round 2: Ch 2. Starting in the stitch where you joined, work 2 dc in every stitch around. Join to the first dc with a sl st. Do not turn. (24 dc)
Round 3: Ch 2. Repeat [2 dc in the next stitch, 1 dc in the following stitch] 12 times. Join to the first dc. Do not turn. (36 dc)
Round 4: Ch 2. Repeat [2 dc in the next stitch, 1 dc in each of the next 2 stitches] 12 times. Join to the first dc. Fasten off the yellow yarn. (48 dc)
Lay the center on a flat surface before continuing. Recount the last round if it has developed obvious waves or a bowl shape. Check for an extra or missing increase, and verify that the joining slip stitches have not been included as additional stitches.
Add Twelve Petals
Round 5: With the right side facing you, attach the petal color with a sl st in any dc of Round 4. Ch 1. Work 1 sc in that same stitch, skip the next stitch, work 7 dc in the next stitch, and skip the following stitch. This completes the first four-stitch repeat.
Repeat [sc in the next stitch, skip the next stitch, 7 dc in the next stitch, skip the following stitch] 11 more times. After the last skipped stitch, join with a sl st to the first sc of the round. Fasten off. (12 shells: 84 dc and 12 sc, 96 stitches in total)
To see the placement clearly, number the center stitches from the place where you attached the petal yarn. The first repeat uses stitches 1 through 4: sc in 1, skip 2, shell in 3, skip 4. The last repeat uses stitches 45 through 48: sc in 45, skip 46, shell in 47, skip 48. The closing join returns to the sc made in stitch 1.
Spread the stitches of each shell gently with your fingers so you can see all twelve petals. The joining slip stitch closes the round and is not included in the count of 96. There is no additional edging round in this version.
Secure the Ends and Shape the Flower
Turn the coaster over and thread a tail through your tapestry needle. Weave it through several neighboring stitches on the back, change direction, and weave through another section. Keep the fabric relaxed as you pull the yarn through. Secure the magic-ring tail carefully before trimming.
Follow the yarn label for washing and blocking. If wet blocking is suitable, dampen the flower, press out excess water in a towel, and lay it flat. Arrange the center into a circle and spread the shells evenly. Use rustproof pins only if needed, then leave the coaster to dry completely.
Blocking can help with minor unevenness, but it does not replace correcting a stitch error. Do not stretch a flower aggressively to reach a measurement. Check that a cup rests flat on the center after the coaster is dry.
If Your Flower Needs Another Look
If you have eleven or thirteen shells, recount the center and review the four-stitch repeat. Every shell belongs in one base stitch, with a skipped stitch on either side. A shell made across several stitches changes the spacing and will not match the repeat.
If the center count is right but the fabric still cups or waves, tension and yarn choice may be affecting the circle. Make a fresh sample with a different hook rather than adding unplanned increases. Keep the four center rounds and twelve petal repeats together as one construction.
If the shells overlap or pull inward, check for tight single crochets at their bases, a missed skipped stitch, or fewer than seven dc in a shell. The final round may need a more relaxed tension. Even with correct counts, this adaptation should be assessed in an actual sample before you make a large set.
Color and Care for a Matching Set
For a classic daisy, choose yellow and white. For a softer table setting, try mustard and ivory. You can also keep the yellow centers consistent and make each flower in a different petal shade. Lay the first completed coaster beside the next one when choosing colors and checking size.
Care for the finished pieces according to the yarn label. After washing, reshape the petals and dry them as directed. Keep decorative beads, buttons, and raised embroidery away from the cup-resting area. This pattern is a coaster; it has not been evaluated as protection for a hot pan.
VIDEO TUTORIAL
Before You Make the Next Daisy
I would finish one flower completely before beginning the rest of a set. Secure the ends, let it dry if you have blocked it, and try it with the cup you use most often. That small check tells you more than comparing it with a photograph made in another yarn.
Write down your yarn and hook, and save the finished sample as a guide. When you make the next flower, count the center rounds and the twelve shells again. You can change the petal colors while keeping the construction consistent.
Thank you for visiting Grandma’s Crafts today, dear. I hope you enjoy watching this little yellow circle turn into a flower for your table. Come back when you are ready to try another project, and we can make room for a few more stitches together.