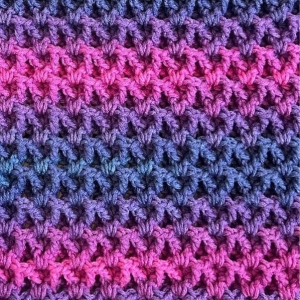
Welcome to Grandma’s Crafts! I’m so happy you are here today. This 3D V-Stitch Autumn Crochet Blanket gives us a lovely reason to explore raised stitches and warm colors. We will begin with a small practice piece, learn where each stitch belongs, and then use that same repeat to make a blanket in the width you choose.
I love seeing what happens when a familiar stitch is worked in a different place. Here, some double crochets go into a chain space and others wrap around a stitch post. That combination gives the V shapes their relief without requiring separate motifs or seams.
For an autumn palette, try oatmeal, terracotta, and a muted golden shade. Set the yarns beside one another before deciding how to arrange them. A single color is also a useful choice for learning, since you can concentrate on placement before adding color changes.
There is no need to start with a long chain while the stitch is still new to you, dear. A short sample lets you spot the chain spaces and find the posts with your hook. Keep the sample and your notes nearby when you begin the full piece.
A Blanket You Can Size for Your Home
A textured rectangle can become a chair throw or a larger blanket for a sofa. Decide how you want to use it before choosing the width. Measure the area you want to cover, allowing for any drape you prefer, rather than expecting a particular chain count to produce the same size with every yarn.
This version has a plain single crochet foundation, repeated textured rows, and an unbordered finish. The three-color option uses wider bands so there are fewer changes to manage. Neither the measurements nor the stripe arrangement depend on matching a photograph.
Skill Level and Supplies
This is an advanced beginner project. You should be comfortable making chains, single crochet, and double crochet, and identifying the top of a stitch. The new skill is working a front post double crochet around the upright body of a stitch.
Choose medium weight yarn, also called category 4 or worsted weight, and a hook suited to it. A 5.5 mm hook, US I/9, is a starting option to try in your sample; change it if the fabric feels too stiff or the stitches are difficult to work. Use one yarn weight across all colors. Keep scissors, a tapestry needle, stitch markers, a measuring tape, and a scale nearby if you want to estimate yarn from your sample.
There is no verified yardage, gauge, or fixed finished size for this version. Buy matching dye lots once you have evaluated a sample. Yarn requirements change with your blanket size, fiber, hook, and tension, so do not use another blanket’s supply list as a guarantee.
3D V-Stitch Autumn Crochet Blanket
Abbreviations (US Terms)
ch = chain;
sc = single crochet;
dc = double crochet;
fpdc = front post double crochet;
st(s) = stitch(es);
ch-1 space = the opening beneath one chain;
yo = yarn over.
A V-stitch in this pattern means (dc, ch 1, dc) in one indicated space. Brackets mark a sequence to repeat.
How to Make the Raised Stitches
Double crochet: yo, insert the hook into the indicated stitch or space, yo and draw up a loop. Yo and pull through two loops, then yo and pull through the remaining two loops.
Front post double crochet: yo, take the hook from the front of the fabric to the back on one side of the designated post, then bring it out at the front on the other side. The post lies across the front of your hook. Yo and draw up a loop around the post. Finish as a double crochet by pulling through two loops twice. Work around the whole post, not through its top loops.
Do not tighten that first drawn-up loop against the post. Let it reach the height of the row you are making. If the stitch is too tight, it may pull the fabric downward. Practice several post stitches on your sample before deciding whether to change hooks.
Understand One Repeat
The setup creates groups of (2 dc, ch 1, 2 dc). In each textured row, work fpdc around the inner left post, a V-stitch in the central space, and fpdc around the inner right post. Leave the two outer posts unworked. This rebuilds four tall stitches and one central chain space for each group.
Across a completed group, the new order is fpdc, dc, ch 1, dc, fpdc. After turning, choose the two dc nearest its central opening as the posts for the next row. The outer fpdc stitches are skipped. Keep using the previous row only; you do not reach down through two rows.
Notes for Straight Edges
Work in rows and turn at the end of each one. The ch 1 for the foundation row does not count as a stitch. From the setup row onward, ch 3 counts as the first edge dc. Skip the stitch directly beneath this ch 3, and finish every later row with a dc in the top of the previous turning ch 3.
There is one edge dc at either side of every textured row. These edge stitches are separate from the four-stitch groups. Place a marker in the top of the turning chain if you have trouble finding the last insertion point.
Make a Sample and Choose Your Width
For a five-group sample, ch 22 and follow the instructions below using five repeats. Work several textured rows so the fabric has settled, then wash or block it according to the yarn label. Measure across five central spaces, from the center of the first to the center of the fifth. Divide that distance by four to estimate the pitch of one repeat.
To estimate a starting width, choose a number of groups and use this formula: foundation chains = 4 times the number of groups + 2. For example, 25 groups require 102 chains. This is a stitch-count example, not a promised blanket measurement. Measure a larger sample or the early blanket rows before continuing if fitting an exact width matters.
For a rough first estimate, divide the desired width by your measured repeat pitch and round to a whole number. The two edge stitches add width, so allow for them and verify the actual result. You can use more or fewer groups without changing the textured-row instructions.
Blanket Instructions
The example below uses 25 groups. Replace 25 with your chosen group count throughout. Its foundation has 101 sc; each setup or textured row has 102 tall stitches and 25 ch-1 spaces. Tall-stitch counts include the beginning ch 3 as one dc, but exclude the central chains.
Foundation: Ch 102. For another width, ch (4 times your group count + 2). Keep the chain relaxed. If it is difficult to insert your hook, try making the chain with a slightly larger hook and return to your working hook for the rows.
Row 1: Sc in the second chain from the hook and in every remaining chain. Turn. (101 sc for 25 groups)
Row 2, setup: Ch 3, skip the first sc. Repeat [2 dc in the next sc, ch 1, 2 dc in the next sc, skip the next 2 sc] 24 times. For the last group, work 2 dc in the next sc, ch 1, and 2 dc in the next sc; skip only the next sc, then dc in the last sc. Turn. (25 groups, 102 dc including the turning chain, 25 ch-1 spaces)
For a different group count, repeat the bracketed sequence one fewer time than your number of groups, then work the last-group instructions. For the five-group sample, repeat it four times before the last group.
Row 3, texture: Ch 3 and skip the edge dc beneath it. For each group, skip its first dc, fpdc around its second dc, work (dc, ch 1, dc) in its central ch-1 space, fpdc around its third dc, and skip its fourth dc. After all 25 groups, dc in the top of the turning ch 3 at the far edge. Turn. (102 tall stitches: 50 fpdc and 52 dc including the turning chain; 25 ch-1 spaces)
Row 4: Ch 3 and skip the edge dc beneath it. For each group, skip its outer fpdc, fpdc around the next dc, work (dc, ch 1, dc) in its ch-1 space, fpdc around the next dc, and skip its outer fpdc. Dc in the top of the turning ch 3 at the far edge. Turn. (Same count as Row 3)
Row 5 and onward: Repeat Row 4 until the blanket reaches the length you want. Count the central spaces after each row: there should still be 25. If using another group count, that number stays constant instead.
An Optional Three-Color Rhythm
Call your colors A, B, and C. Use A for the foundation and Rows 1 through 5, B for Rows 6 through 9, and C for Rows 10 through 13. Then continue with four-row bands of A, B, and C. Stop at your desired length, whether or not the final band is complete.
For a color change, work the final edge dc until two loops remain on the hook. Yo with the incoming color and pull through both loops. Turn and make the next row’s ch 3 with that new yarn. Cut the old color with a tail for weaving; this avoids carrying yarn up an exposed side edge.
Finish Without a Border
When the length is right, complete the last textured row and fasten off. Secure the tails on the back, weaving them through several stitches without cinching the edges. Trim only after checking they are secure. This version ends here, with no additional edging rounds.
Wash or block only as the yarn label allows. Arrange the rectangle on a flat surface, smooth the edges gently, and let it dry completely. Do not stretch the chain spaces to force a size, and avoid flattening the raised texture with pressure.
Checks That Help as You Work
A missing chain space usually means a V-stitch was forgotten. Extra width often comes from working into an outer post that should have been skipped, or adding a stitch beneath the turning chain. Compare the number of groups with the setup row before pulling out a large section.
For a yarn estimate, weigh a dry sample and measure its area. Divide the planned blanket area by the sample area, then multiply by the sample weight. For example, a sample weighing 20 g over 200 square cm gives an estimate of 1,000 g for 10,000 square cm of similar fabric. This is an estimate only; edge proportions, washing, tails, and tension can change the result. Allow extra yarn based on your own sample and available skein sizes.
VIDEO TUTORIAL
A Few Quiet Rows to Enjoy
Once you can find the inner posts and central opening, give yourself a small check at each edge and enjoy the repeating work. I would keep counting the groups even after the movements feel familiar. It is a simple habit that helps a long blanket stay the width you planned.
Keep a note of the hook, group count, colors, and completed rows beside your project. If you set the blanket aside for a while, those details make it easier to return to the same rhythm. Your washed sample is useful too, especially when you are deciding whether the length is enough.
Thank you for joining me at Grandma’s Crafts today, dear. I hope these raised V shapes give you something satisfying to explore with your autumn yarn. When you are ready to start another piece, bring your hook and your sample notes, and we can look at a new stitch together.