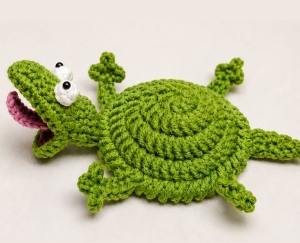
Welcome to Grandma’s Crafts! Today we’re sharing a playful project that combines crochet, creativity, and a little bit of personality. These Fun Crochet Animal Coasters are much more than simple table accessories — their expressive details, tiny paws, cheerful faces, and colorful features turn an everyday crochet project into something truly fun to make and display.
One of the nicest things about this pattern is the way a simple round crochet base gradually becomes an adorable little character. The main body works as the coaster itself, while the smaller crocheted pieces are added afterward to create the face, mouth, eyes, legs, tail, and other details. Because each component is made separately, you can take your time with every part and assemble everything only when you are happy with the placement.
The pattern is also a lovely project for crocheters who want to practice working with smaller pieces. You’ll use basic crochet techniques while learning how simple shapes can be combined to create something much more detailed. The instructions are organized step by step, making the project approachable even if you have never made this type of crochet accessory before.
These coasters are especially fun because there is plenty of room for customization. You can stay with classic natural shades or experiment with bright greens, blues, pinks, yellows, purples, or completely unexpected color combinations. Small changes to the eyes, mouth, tongue, or facial expression can also give each finished coaster its own personality.
You could even make several Fun Crochet Animal Coasters in different colors and turn them into a complete set. They would look adorable on a coffee table, craft-room desk, patio table, or anywhere you want to add a handmade detail. A colorful set could also make a charming handmade gift for someone who enjoys unusual and cheerful crochet creations.
Another advantage of this project is that it doesn’t require a large amount of yarn. Small leftover amounts from previous projects can be perfect for the eyes, mouth, tongue, and other details, making this a great opportunity to use some of the yarn already sitting in your craft basket.
This cute crochet animal coaster is made from several simple pieces that are sewn together at the end. The round body forms the actual coaster, while the head, open mouth, tongue, tail, eyes, and tiny legs give the project its playful lizard shape.
The pattern is written using US crochet terminology.
Materials
Worsted weight cotton yarn in green
Small amount of red yarn for the inside of the mouth
Small amount of pink yarn for the tongue
Small amount of white yarn for the eyes
Black embroidery thread or small safety eyes
Crochet hook suitable for your yarn
Yarn needle
Scissors
Stitch marker
Small amount of fiberfill, optional
Cotton yarn is especially suitable for the body because it creates a firm, relatively flat coaster.
Abbreviations
ch – chain
st / sts – stitch / stitches
sl st – slip stitch
sc – single crochet
hdc – half double crochet
dc – double crochet
inc – work 2 stitches into the same stitch
dec – single crochet 2 stitches together
MR – magic ring
rnd – round
rep – repeat
Important Notes Before You Begin
The body is worked in joined rounds.
Unless otherwise stated, a beginning chain does not count as a stitch.
When making the small pieces, do not worry if they curl slightly. They can be shaped during assembly.
Keep the coaster body as flat as possible. If the circle begins to cup, your tension may be too tight. If it becomes noticeably wavy, your tension may be too loose.
The head and mouth are intentionally assembled in layers so that the lizard looks as though its mouth is open.
Main Coaster Body
Using green yarn, make a magic ring.
Round 1
Ch 2.
Work 10 dc into the magic ring.
Pull the ring closed.
Join with a sl st to the first dc.
10 sts
Round 2
Ch 2.
Work 2 dc in every stitch around.
Join with a sl st to the first dc.
20 sts
Round 3
Ch 2.
Repeat:
1 dc in next st, 2 dc in next st
around.
Join with a sl st.
30 sts
Round 4
Ch 2.
Repeat:
1 dc in each of the next 2 sts, 2 dc in next st
around.
Join with a sl st.
40 sts
Round 5
Ch 2.
Repeat:
1 dc in each of the next 3 sts, 2 dc in next st
around.
Join with a sl st.
50 sts
Round 6 – Border
Ch 1.
Work 1 sc in every stitch around.
Join with a sl st to the first sc.
50 sts
Fasten off and weave in the yarn end.
Lay the circle flat before continuing.
Head Base
Using green yarn:
Ch 7.
The head is worked around both sides of this foundation chain to create an oval.
Round 1
Beginning in the second chain from the hook:
Sc in each of the next 5 chains.
Work 3 sc in the final chain.
Rotate the work.
You will now crochet along the unused loops on the opposite side of the foundation chain.
Sc in each of the next 4 chains.
Work 2 sc in the final chain.
Join with a sl st.
14 sts
Round 2
Ch 1.
Work:
2 sc in first st
1 sc in each of next 4 sts
2 sc in each of next 3 sts
1 sc in each of next 4 sts
2 sc in each of final 2 sts
Join with a sl st.
20 sts
Fasten off, leaving a long tail for sewing.
The piece should look like a small oval.
Upper Jaw
Using green yarn:
Ch 9.
Row 1
Beginning in second chain from hook, sc across.
8 sts
Turn.
Row 2
Ch 1.
2 sc in first st.
Sc in each of next 6 sts.
2 sc in final st.
10 sts
Turn.
Row 3
Ch 1.
Sc across.
10 sts
Turn.
Row 4
Ch 1.
Sc2tog.
Sc in each of next 6 sts.
Sc2tog.
8 sts
Fasten off, leaving a long tail for sewing.
This piece forms the upper portion of the snout.
Lower Jaw
Using green yarn:
Ch 7.
Row 1
Beginning in second chain from hook, sc across.
6 sts
Turn.
Row 2
Ch 1.
2 sc in first st.
Sc in each of next 4 sts.
2 sc in final st.
8 sts
Turn.
Row 3
Ch 1.
Sc across.
8 sts
Turn.
Row 4
Ch 1.
Sc2tog.
Sc in each of next 4 sts.
Sc2tog.
6 sts
Fasten off, leaving a long tail for sewing.
Inside of the Mouth
Using red yarn:
Ch 6.
You will crochet around both sides of the foundation chain.
Round 1
Beginning in second chain from hook:
Sc in each of next 4 chains.
Work 3 sc in final chain.
Rotate the work.
Sc in each of next 3 chains along the opposite side.
Work 2 sc in the final chain.
Join with a sl st.
12 sts
Round 2
Ch 1.
Work:
2 sc in first st, sc in next 3 sts, 2 sc in each of next 3 sts, sc in next 3 sts, 2 sc in each of final 2 sts.
Join with a sl st.
18 sts
Fasten off, leaving a sewing tail.
The red piece should form a small flat oval.
Tongue
Using pink yarn:
Ch 8.
Beginning in the second chain from the hook, work 1 sc in each chain across.
7 sts
Fasten off, leaving a tail for sewing.
For a playful look, allow approximately half of the tongue to extend outside the mouth.
Optional Forked Tongue
Instead of fastening off immediately, make a small ch-2 branch at the end, secure it with a sl st, and repeat on the opposite side of the tip.
For beginners, the straight tongue is much easier and looks just as cute.
Eyes
Make 2.
Using white yarn, make a magic ring.
Round 1
Work 6 sc into the MR.
Pull the ring closed.
Join with a sl st.
6 sts
Round 2
Ch 1.
Work 2 sc in every stitch around.
Join.
12 sts
Fasten off, leaving a sewing tail.
Attach a small safety eye through the center or embroider a black pupil with black yarn.
If using safety eyes, remember that the finished coaster should not be given to very young children unless the eyes are securely attached.
Tail
The tail is worked from the wide base toward the narrow tip.
Using green yarn:
Ch 9.
Row 1
Beginning in second ch from hook, sc across.
8 sts
Turn.
Row 2
Ch 1, sc across.
8 sts
Row 3
Ch 1.
Sc2tog, sc in remaining 6 sts.
7 sts
Row 4
Ch 1, sc across.
7 sts
Row 5
Ch 1.
Sc2tog, sc in remaining 5 sts.
6 sts
Row 6
Sc across.
6 sts
Row 7
Sc2tog, sc in remaining 4 sts.
5 sts
Row 8
Sc across.
5 sts
Row 9
Sc2tog, sc in remaining 3 sts.
4 sts
Row 10
Sc across.
4 sts
Row 11
Sc2tog, sc in remaining 2 sts.
3 sts
Row 12
Sc across.
3 sts
Row 13
Sc2tog, sc in final st.
2 sts
Row 14
Sc2tog.
1 st
Fasten off.
Do not stuff the tail.
Gently stretch it lengthwise and curve the narrow end slightly before sewing it to the coaster.
Legs
Make 4 identical pieces.
Using green yarn:
Ch 7.
Sl st into the second chain from the hook. This point will become the center of the little foot.
Now make the toes.
First Toe
Ch 3.
Beginning in second ch from hook, sl st in each of the 2 chains.
Sl st back into the same foot point.
Second Toe
Ch 3.
Sl st in second ch from hook and in next ch.
Sl st back into the same foot point.
Third Toe
Ch 3.
Sl st in second ch from hook and in next ch.
Sl st back into the same foot point.
You should now have three tiny toes coming from the same spot.
Continue along the remaining foundation chain.
Work 1 sc in each of the remaining 5 chains.
Fasten off, leaving a long tail for sewing.
Repeat until you have four legs.
Assembly
Do not rush this part. The positioning is what gives the lizard its personality.
1. Position the Body
Place the circular coaster right side up.
Choose one side to be the front and the opposite side to be the back.
2. Attach the Head
Place the oval head base against the front edge of the coaster.
Approximately one-third of the oval may overlap the coaster.
Sew only the back portion of the head securely to the body.
Keep the front portion free for the mouth.
3. Attach the Lower Jaw
Position the lower jaw at the lower front edge of the head.
Sew the back edge of the jaw to the head.
Allow the front of the jaw to project outward.
4. Add the Red Mouth
Place the red oval over the lower jaw.
The front of the red piece may extend slightly beyond the green jaw.
Sew it securely around its edges.
5. Attach the Tongue
Sew one end of the pink tongue near the center of the red mouth.
Leave the remaining length hanging freely outside.
6. Attach the Upper Jaw
Place the upper jaw over the red mouthpiece.
Sew only its back edge firmly to the head.
Do not sew the front edge to the lower jaw.
This creates the open-mouth effect.
You can gently bend the upper jaw upward with your fingers to make the opening more visible.
7. Attach the Eyes
Place both white eyes toward the back portion of the upper head.
Keep them close enough together to create the exaggerated lizard expression.
Sew firmly around the base of each eye.
8. Attach the Tail
Place the wide end of the tail against the back edge of the circular body.
Sew the first 1–2 rows firmly to the coaster.
Allow the rest of the tail to remain loose.
Curve it gently toward either side.
9. Attach the Legs
Place two legs on each side of the coaster.
Position one pair closer to the head and the second pair closer to the tail.
Sew only the upper portion of each leg to the body.
Do not sew the entire leg flat.
Leaving the lower section free allows the feet and toes to sit naturally.
Angle the front legs slightly toward the head and the back legs slightly toward the tail.
Final Finishing
Weave in every loose yarn end securely.
Shape the head, mouth, legs, and tail with your fingers.
Place the coaster on a flat surface and check the underside. No thick knots or bulky yarn ends should sit directly underneath the area where a mug will rest.
If necessary, lightly block the circular body only.
Avoid aggressively pressing or flattening the head, eyes, mouth, legs, or tail because those raised details are what give the lizard its character.
VIDEO TUTORIAL
VIDEO TUTORIAL FOR OTHER ANIMALS
Beginner Tip
Before sewing anything permanently, arrange all the pieces on top of the coaster first.
Move the head, legs, and tail around until the proportions look balanced. Taking a quick photo at this stage can help you remember exactly where everything should go while sewing.
Once all the pieces are finished, the assembly is where the character really comes to life. Before sewing everything permanently, arrange the pieces over the main body and experiment with their positioning. Tiny changes in the angle of the legs, eyes, or facial features can completely change the expression of your finished coaster.
We hope you enjoy making these Fun Crochet Animal Coasters as much as we enjoyed sharing the project with you. They are playful, practical, customizable, and a wonderful reminder that even the smallest crochet projects can have plenty of character.
Thank you so much for visiting Grandma’s Crafts! Be sure to explore the other patterns available here on the blog for more creative and unusual crochet ideas. We’re always adding new projects and updating the site throughout the week, so there’s always something different waiting for your next crochet session.