Hello, my dear friends, and welcome to our blog Grandma’s Crafts. Today, I am so happy to share a pattern that is as practical as it is full of love, a beautiful crochet flower bucket hat, thoughtfully made to keep our furry companions warm and comfortable.
There’s something truly special about a handmade bucket hat, especially when it’s decorated with lovely crochet flowers. A Flower Bucket Hat is the perfect mix of style, comfort, and creativity. Whether you’re making one for yourself, your child, or as a thoughtful handmade gift, this project is a wonderful way to bring color and personality into your crochet collection.
At Grandma’ Crafts, we absolutely adore projects that are both practical and beautiful, and this floral hat is exactly that. It’s cozy enough for cooler days, lightweight enough for spring and summer, and stylish all year long.
Why Everyone Loves Flower Bucket Hats
Bucket hats have become incredibly popular again, and it’s easy to understand why. They’re comfortable, easy to wear, and match so many different outfits. When you add crochet flowers to the design, the result becomes even more charming and unique.
One of the best things about this project is how customizable it can be. You can create a soft pastel version for a delicate and romantic look, or choose bright and bold colors for something playful and fun. Every hat becomes completely one of a kind.
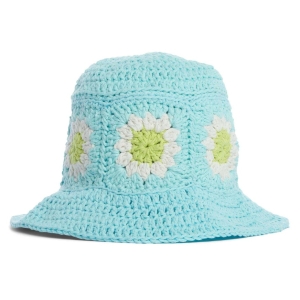
Flower Bucket Hat
A Great Project for Beginners
If you’re still learning crochet, don’t worry — a Flower Bucket Hat can be a very beginner-friendly project. Many patterns use simple stitches like:
- Single crochet
- Double crochet
- Slip stitch
- Basic increases and decreases
The flower appliqués are also a fantastic way to practice working in the round while creating something adorable at the same time.
Even if your stitches aren’t perfect yet, handmade pieces always carry a special kind of beauty that store-bought items simply can’t replace.
Choosing the Perfect Yarn
For bucket hats, cotton yarn is often the favorite choice because it helps the hat hold its shape nicely while remaining breathable and comfortable. Soft acrylic yarn can also work beautifully, especially for colder weather.
Some lovely color combinations include:
- Cream and sunflower yellow
- Sage green with white daisies
- Pink, peach, and lavender
- Neutral beige with tiny colorful flowers
Don’t be afraid to experiment and use leftover yarn from previous projects. Flower hats are perfect for using small colorful scraps in creative ways.
Styling Your Crochet Flower Hat
One of the sweetest things about this accessory is how versatile it is. A crochet flower bucket hat pairs wonderfully with:
- Casual jeans and sweaters
- Summer dresses
- Beach outfits
- Cottagecore-inspired looks
- Handmade crochet bags and cardigans
It adds a soft handmade touch to any outfit and instantly makes a look feel more cozy and personal.
Handmade with Love
Crochet projects like this remind us that crafting is about much more than simply making clothes or accessories. Every stitch carries patience, creativity, and care. Sitting down with yarn and a crochet hook can become a peaceful moment of relaxation in a busy day.
And when someone compliments your handmade flower hat, you’ll have the joy of saying: “I made it myself.”
That’s one of the most rewarding feelings in the world.
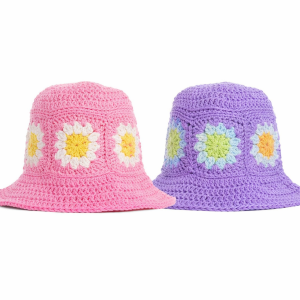
Flower Bucket Hat – Pink and Purple
MATERIALS
You will need:
Medium weight cotton yarn in 3 colors
- Main Color (MC)
- Contrast A (flower center)
- Contrast B (petals)
Crochet hook US H/8 (5 mm)
Yarn needle
Size:
Adult (fits approx. 21″ head circumference)
GAUGE
13 dc × 4 rows = 4 inches
Each motif ≈ 4 inches square
STITCHES (US TERMS)
- ch = chain
- dc = double crochet
- sc = single crochet
- sl st = slip stitch
- cluster = group stitch for petals
- dcbl = double crochet in back loop
Ch 3 at the beginning counts as a dc.
HOW THIS HAT IS BUILT
Let me explain gently before we begin:
You crochet a round top (circle)
You make 6 flower motifs
Join motifs into a ring (the sides)
Attach the top
Add a brim
Like building a little hat step by step.
PART 1: THE TOP (CROWN)
We begin at the very top of the hat.
Round 1
Create a small ring
Work dc into the center
This forms a tiny circle.
Rounds 2–7 (Growing the Circle)
Each round:
Increase stitches evenly
Follow a simple pattern:
- Add extra stitches
- Then space them out more each round
20 → 30 → 40 → 50 → 60 → 70 stitches
Your circle grows flat and even.
PART 2: FLOWER MOTIFS (MAKE 6)
Now we create the beautiful flowers 🌼
Round 1 (Base)
- Make a ring
- Work dc + chain spaces
This creates a delicate open circle.
Round 2 (Petals)
- Work cluster stitches in spaces
These form the flower petals.
Round 3 (Square Shape)
- Work dc groups
- Create corners using (dc, ch, dc)
This turns your flower into a square.
Repeat until you have 6 motifs.
PART 3: JOINING THE MOTIFS
- Sew the sides together
- Form a ring
This becomes the side wall of the hat.
PART 4: ATTACHING THE TOP
As shown on page 2:
- Place the round top over the motif ring
- Sew using whip stitch
Take your time—this is an important step.
PART 5: EDGING THE SIDES
Top Edge:
- Work single crochet evenly around
Bottom Edge:
- Repeat the same
This prepares for the brim.
PART 6: THE BRIM
Now we make that lovely bucket hat shape.
Round 1
- Work dc in back loops only
- Add increases
This helps the brim begin to flare outward.
Round 2
Work evenly in dc
Round 3
Add more increases
The brim becomes wider and more relaxed.
Round 4
Final even round
Fasten off.
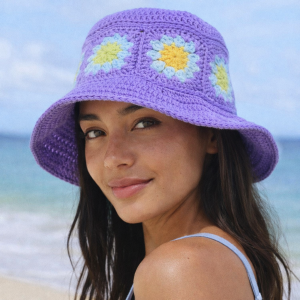
Girl and Flower Bucket Hat
VIDEO TUTORIAL
FINAL TOUCHES
Weave in all ends carefully, gently shape the brim and adjust the fit if needed.
As you work through this pattern, you may find yourself enjoying the quiet rhythm of each row, the soft movement of yarn through your fingers, and the gentle satisfaction of watching your project grow. And when your little companion wears the finished sweater, you’ll know that every stitch carries a bit of your care and affection.
Thank you, my dear, for spending this time with me here at Grandma’s Crafts. I warmly invite you to explore our other articles, where many more cozy patterns and gentle inspirations are waiting just for you


