Welcome to Grandma’s Craft, dear friend. There’s always a special kind of joy in welcoming you here.bWhether you’re picking up your crochet hook for the very first time or returning to a familiar hobby, this little corner is meant to feel warm, peaceful, and inspiring, just like sitting down with a cup of tea and a basket of yarn nearby. Today we have something special for you, an lovely pattern… The Crochet Star Blanket.
Today’s project is one of those designs that truly captures the heart… There is something deeply comforting about a handmade blanket, the kind that carries warmth not only in its fibers, but in the time and care behind every stitch.
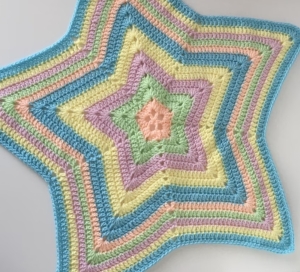
The crochet star blanket is a particularly lovely example of that feeling. With its soft points and gentle shape, it brings a touch of whimsy while still feeling cozy and familiar. It’s the kind of piece that looks beautiful draped over a chair, folded at the foot of a bed, or wrapped around someone you love.
Crochet Star Blanket
Why This Pattern Is So Loved
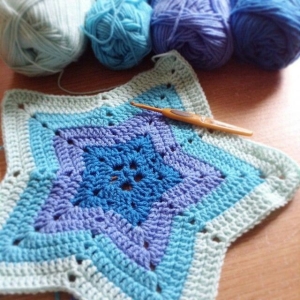
Unlike traditional blankets made in straight rows, this design grows outward from the center, slowly forming a star as it expands.
There is a quiet rhythm to this process, a sense of flow that many crocheters come to treasure. As the rounds build upon one another, the shape reveals itself little by little, making each moment feel rewarding. It’s not just about the final result… it’s about enjoying the journey along the way.
At first glance, a star-shaped blanket may seem a little more advanced — but it’s often much simpler than it appears.
The stitches themselves are familiar and approachable, and with a bit of patience, the pattern becomes easy to follow. It’s a wonderful way to grow in confidence while still working on something relaxing and enjoyable.
There’s no need to rush. Each round is simply another step forward.
This blanket offers so much room for creativity. Soft pastel shades can create a calm and delicate piece, while richer tones bring warmth and depth. Some may enjoy changing colors every few rounds, watching the blanket gently transform as it grows.
Others may prefer a single color for a more classic and timeless look. Both choices are equally beautiful, it simply depends on what brings you the most joy.
To get started, it’s recommended to gather the following supplies:
- Yarn in any color(s) of your choice
(DK weight yarn is a great option, but different yarn weights will affect the final size) - A crochet hook suitable for your yarn
(For DK yarn, a 4.5 mm hook is recommended) - Scissors
- A yarn needle (also known as a darning needle)
Finished Size and Gauge
The finished star typically measures approximately 85 cm x 85 cm (33.5″ x 33.5″) from point to point.
To adjust the size, simply continue repeating the pattern rounds as desired.
Gauge (optional):
Approximately 8 stitches and 5 rows = 6 x 6 cm (2.5″)
ABBREVIATIONS (US Crochet Terms)
- CH – Chain
- SC – Single Crochet
- DC – Double Crochet
- SL ST – Slip Stitch
- SK – Skip
- ST – Stitch
- FO – Fasten Off
Before You Begin
This pattern forms a 5-point star with 10 sides.
The term “side” refers to each section between the star points, including stitches worked into the chain spaces.
Instructions
Round 1 – Creating the Center
Chain 4
Join with a slip stitch to the first chain to form a ring
Then:
- Chain 6 (counts as 1 DC + CH 3)
- Make 1 DC into the ring
- Chain 3
Repeat this sequence 4 more times, creating 5 chain-3 spaces.
Finish with a slip stitch into the 3rd chain of the starting chain.
Round 2 – Building the Structure
Slip stitch into the next chain-3 space
Inside that space, work:
- Chain 3
- 2 DC
- Chain 2
- 3 DC
Repeat the following in each chain space around:
(3 DC, CH 2, 3 DC)
Join with a slip stitch at the top of the chain 3 and fasten off.
Round 3 – Continuing the Pattern
Attach a new color to any double crochet stitch.
Then:
Chain 3
Work 1 DC in the next stitch
Repeat the following sequence:
In the chain-2 space: (3 DC, CH 2, 3 DC)
- DC in the next 2 stitches
- Skip the next 2 stitches
- DC in the next 2 stitches
Continue around.
Finish with a slip stitch to the top of the starting chain.
Round 4 – Expanding the Star
Slip stitch into the next stitch
Chain 3
Then:
DC in the next 3 stitches
Repeat around:
In the chain-2 space: (3 DC, CH 2, 3 DC)
DC in the next 4 stitches
Skip the next 2 stitches
DC in the next 4 stitches
Join with a slip stitch and fasten off.
Continuing the Pattern
To continue growing the blanket:
Always skip 2 stitches between each side
Each round increases by 2 DC stitches per side
Progression example:
Round 3 → 5 DC per side
Round 4 → 7 DC
Round 5 → 9 DC
…and so on.
Recommendation:
It is suggested to work 2 rounds per color for a balanced striped look, though a single-color version also creates a beautiful result.
Color Change Tip
When changing colors, it is recommended to turn the work before starting the new round.
This helps distribute the joins more evenly and creates a cleaner overall finish.
Final Round
Once the desired size is reached:
Work 1 SC in every stitch around, including previously skipped stitches
To complete the project:
Use a yarn needle to carefully weave in all loose ends.
In a busy world, crochet offers something gentle. It invites you to slow your hands, settle your thoughts, and enjoy the simple rhythm of creating. Projects like this remind us that beauty doesn’t need to be rushed, it can be built slowly, one stitch at a time.
CROCHET BLANKET STAR PDF PATTERN
The crochet star blanket is more than just a pattern, it’s an experience. It’s the feeling of watching something grow beneath your hands… the quiet satisfaction of each completed round… and the warmth of knowing you’ve created something truly special.
And that, dear friend, is what makes crochet so wonderful.


