You can use the same shade for every flower or gradually change colors along the scarf to create a subtle gradient.
Crochet Bird Motifs
The birds are the most distinctive part of this design.
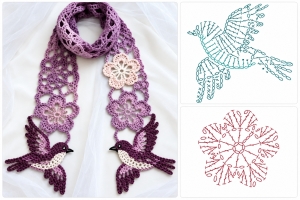
Each one is built from several smaller crochet sections, including the body, head, wing, chest, tail, and beak. Working the pieces separately makes it much easier to control the shape and create the layered feathered appearance.
One bird is positioned at each end of the scarf, facing in the opposite direction. The wings and tail feathers can be left partially free from the lace base so they retain a little movement and dimension.
Choosing Your Yarn
A sport-weight or light DK yarn works beautifully for this project because it provides enough definition for the birds and flowers while keeping the lace soft and flexible.
Cotton, bamboo blends, or smooth acrylic yarns can all work well. Using a yarn with good stitch definition is especially helpful for the decorative motifs, where the individual stitches contribute to the shape.
Make It Your Own
There are many ways to personalize this Birds and Flowers Lace Scarf.
Try contrasting birds against a neutral scarf, make each flower a different color, or use a variegated yarn for the lace and solid shades for the appliqués. You can also add more flowers, change their placement, or leave the optional decorative edging off for a cleaner finish.
A carefully chosen color palette can make this same pattern feel romantic, vintage, whimsical, or much more modern.
Complete Birds & Flowers Lace Scarf Pattern
The pattern below includes the lace scarf base, crochet flowers, bird motifs, assembly, and finishing details.
Skill Level: Confident Beginner / Intermediate
US Crochet Terms
Finished Size
Approximately 7 in x 62 in / 18 x 157 cm, not including the parts of the bird motifs that extend beyond the ends.
Materials
- Sport-weight or light DK yarn
- Lilac or purple for the lace scarf
- 2–3 coordinating shades for the flowers
- Cream or light beige for the bird body
- Dark purple for the wings and tail
- Small amount of black yarn for the eyes
- Small amount of gold, mustard, or black for the beak
- 2.75 mm crochet hook
- Yarn needle
- Scissors
- Blocking pins
Abbreviations
ch – chain
sl st – slip stitch
sc – single crochet
hdc – half double crochet
dc – double crochet
tr – treble crochet
inc – 2 stitches worked into the same stitch
MR – magic ring
Lace Scarf Base
The scarf is worked lengthwise, creating an open chain-mesh fabric.
Foundation
Ch 304 loosely.
If your tension is different, the foundation can be adjusted using a multiple of 5 + 4.
Row 1
Sc in the 9th ch from hook.
Ch 5, skip 4 ch, sc in next ch.
Repeat across.
You should have 60 chain spaces.
Row 2
Ch 5, turn.
Sc in first ch-5 space.
Ch 5, sc in next ch-5 space.
Repeat across.
Rows 3–9
Repeat Row 2.
Fasten off.
The mesh should now form a long, airy rectangle approximately 7 inches wide.
Don’t worry if it looks slightly uneven before blocking. The chain spaces will open beautifully after the scarf is assembled and blocked.
Crochet Flower Motif
Make 9 flowers.
You can use one color for all of them or gradually change from pale lilac to deeper purple.
Round 1
Make an MR.
Ch 1 and work 12 sc into the ring.
Join with sl st to first sc.
12 sts
Round 2
Sl st in next st, ch 4, skip next st.
Repeat around.
Join.
You will have 6 ch-4 loops.
Round 3 – Petals
Into each ch-4 loop work:
(sc, 2 hdc, 2 dc, 2 hdc, sc)
Repeat in every loop.
Join with sl st.
Fasten off, leaving a long tail for sewing.
Each flower should have 6 rounded petals.
Optional Flower Centers
For a little extra dimension, use cream or a contrasting shade.
Make an MR and work 6 sc into the ring.
Join and fasten off.
Sew the small circle into the center of each flower.
This step is optional, but it gives the flowers a more finished dimensional appearance.
Crochet Bird Motif
Make 2 birds.
Each bird is assembled from a body, head, wing, chest, tail and beak. This makes the shaping much easier than trying to create the entire bird in one complicated piece.
Bird Body
With cream, beige, or your main bird color:
Ch 12.
Round 1
Work 2 sc in second ch from hook.
Sc in next 9 ch.
Work 4 sc in last ch.
Continue along the opposite side of the foundation chain.
Sc in next 9 ch.
Work 2 sc into the remaining end.
Join.
26 sts
Round 2
Inc in each of the next 2 sts.
Sc in next 9 sts.
Inc in each of the next 4 sts.
Sc in next 9 sts.
Inc in each of the final 2 sts.
Join.
34 sts
Round 3
(Sc, inc) twice.
Sc in next 9 sts.
(Sc, inc) four times.
Sc in next 9 sts.
(Sc, inc) twice.
Join.
42 sts
Fasten off.
This creates the elongated oval body.
Bird Head
With the body color:
Round 1
MR, 6 sc.
6 sts
Round 2
Inc in every stitch.
12 sts
Round 3
(Sc, inc) around.
18 sts
Fasten off, leaving a long sewing tail.
Slightly overlap the head with the front upper portion of the body and sew securely.
Bird Chest
With cream or a lighter contrasting shade:
Make an MR.
Row 1
Ch 2.
Work 6 hdc into the ring.
Turn.
Row 2
Ch 2.
Work 2 hdc in each stitch across.
12 hdc
Fasten off.
Position the half-circle underneath the head and across the front of the body.
Sew in place.
Bird Wing
With dark purple or another contrasting shade:
Make an MR but do not join the rounds, since the wing is worked as a fan.
Row 1
Ch 3.
Work 9 dc into the ring.
Turn.
10 dc including beginning ch
Row 2
Ch 3.
Dc in same stitch.
Work 2 dc in each remaining stitch across.
20 dc
Turn.
Row 3 – Feather Tips
Ch 1.
Repeat the following across:
Sc in next 3 sts, ch 4, sl st in 2nd ch from hook and in next 2 ch, sc in next st.
Repeat 5 times.
Fasten off.
The five pointed sections form the lower wing feathers.
Place the narrow part of the wing near the bird’s shoulder and angle the wider feathered edge upward and outward.
Sew only along the upper portion of the wing if you would like the feather tips to remain slightly raised.
Tail Feathers
Join dark purple yarn to the rear of the body.
Feather 1
Ch 12.
Starting in second ch from hook, sl st back along the chain.
Sl st into body.
Feather 2
Ch 10.
Sl st back along chain.
Sl st into body.
Feather 3
Ch 8.
Sl st back along chain.
Fasten off.
Arrange the three feathers so they spread slightly apart.
Beak
With gold, mustard, or black:
Ch 4.
Sl st into second ch from hook and across the remaining chains.
Fasten off.
Sew the small pointed piece to the front of the head.
Eye
Using black yarn, make a small French knot or one short embroidered stitch on each side of the head.
Keep the eye small so the bird retains the delicate lace-like appearance of the scarf.
Second Bird
Make the second bird using exactly the same instructions.
When assembling it, simply reverse the orientation so the two birds face opposite directions when attached to the scarf.
Arrange the Flowers
Lay the blocked lace rectangle flat.
Leave approximately 5–6 inches free at each end for the bird motifs.
Arrange the 9 flowers evenly along the center of the scarf, alternating slightly from one side of the center line to the other instead of positioning them in a perfectly straight row.
This gives the finished scarf a more organic vine-like appearance.
Pin everything before sewing.
Attach each flower by sewing:
- through the center,
- through two or three petal tips,
- and into nearby intersections of the lace mesh.
Do not sew every petal completely flat. Leaving a few edges loose creates more dimension.
Attach the Birds
Place one bird near each end of the scarf.
Angle the birds slightly upward so they appear to be flying toward the floral section.
Sew the body securely to the mesh.
The wing tips and tail feathers can remain partially free, which creates movement and keeps the appliqué from looking flat.
Make sure the second bird faces the opposite direction.
Optional Lace Edge
If you want an additional decorative finish, join the main scarf color into the first mesh space along one long edge.
Work:
(sc, ch 3, sc) in each ch-5 space
across.
Fasten off.
Repeat along the opposite long edge.
This creates a small scalloped finish without competing with the flowers and birds.
Finishing
Weave in all remaining ends.
Pin the scarf carefully to blocking mats, gently opening the lace mesh and arranging the flowers, wings, and tail feathers.
Lightly wet-block or steam-block according to the fiber you used.
Allow the scarf to dry completely before removing the pins.
The finished scarf should have an airy, delicate appearance, with dimensional flowers running through the center and one graceful bird decorating each end.
Once all of the motifs have been attached, take a little time to block the finished scarf.
Blocking helps open the lace mesh, smooth the flowers, and define the wings and tail feathers. Arrange each decorative piece carefully before allowing the scarf to dry completely so everything keeps the shape you want.
The result is a lightweight crochet accessory with plenty of texture and personality, but still delicate enough to wear comfortably.
We hope this Elegant Birds & Flowers Lace Scarf Crochet Pattern inspires you to experiment with lace crochet and decorative motifs in a new way. It is a lovely project for anyone who enjoys pieces that feel a little more artistic and detailed than a traditional scarf.
Thank you so much for visiting Grandma’s Crafts! Come back often for more crochet patterns, handmade projects, and creative ideas to add to your collection.


