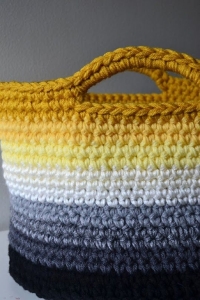
Welcome to Grandma’s Crafts! I’m so happy you are here today. If you love crochet projects that are pretty, practical, and actually useful around the house, I think you are going to love this one.
There is something so satisfying about making your own crochet basket. You can use it for yarn, unfinished crochet projects, blankets, toys, towels, or all those little things that somehow never seem to have a proper place.
And the best part is that this basket is much easier to make than it looks.
This pattern is worked from the bottom up. We will first crochet a round base, then create the sides, and finally make the handles directly into the top of the basket. The thick yarn gives it a cozy look while also helping the basket hold its shape.
If you have never crocheted a basket before, don’t worry. I’ll walk you through the whole process below.
Crochet Basket Finished Size
The finished basket measures approximately 11 inches (28 cm) in diameter and 9½ inches (24.5 cm) high.
It is a lovely medium-sized basket that works especially well for storing yarn, craft supplies, small blankets, or everyday household items.
Materials
For this crochet basket you will need super bulky weight yarn. The original project uses Bernat Pop! Bulky and an 8 mm (US L/11) crochet hook.
You will need approximately two balls of super bulky yarn, plus your crochet hook, scissors, yarn needle, and a stitch marker.
The original gauge is 8 single crochet stitches and 8 rows = 4 inches (10 cm).
Gauge is not quite as critical for a basket as it would be for a sweater, but keeping your stitches reasonably firm will help the basket stand up nicely.
Abbreviations
This pattern uses US crochet terminology.
ch = chain hdc = half double crochet sc = single crochet sl st = slip stitch st(s) = stitch(es) rnd = round BLO = back loop only
One important little note before we begin: the ch 2 at the beginning of the hdc rounds does not count as a stitch.
How to Crochet the Basket Base
Start with ch 4 and join to the first chain with a sl st to form a ring.
Round 1
Ch 2.
Work 12 hdc into the ring.
Join with a sl st to the first hdc.
You should have 12 hdc.
Round 2
Ch 2.
Work 2 hdc in each stitch around.
Join with a sl st to the first hdc.
You should now have 24 hdc.
Round 3
Ch 2.
Work 2 hdc in the first stitch.
Then repeat 1 hdc in the next stitch, 2 hdc in the following stitch around.
Join with a sl st to the first hdc.
You should have 36 hdc.
Round 4
Ch 2.
Work 2 hdc in the first stitch.
Then repeat 1 hdc in each of the next 2 stitches, 2 hdc in the next stitch around.
Join with a sl st.
You should have 48 hdc.
These first four rounds build the circular base through evenly spaced increases.
Round 5
Ch 2.
Work 2 hdc in the first stitch.
Then repeat 1 hdc in each of the next 3 stitches, 2 hdc in the next stitch around.
Join with a sl st.
You should have 60 hdc.
Round 6
Ch 2.
Work 2 hdc in the first stitch.
Work 1 hdc in each of the next 9 stitches, then 2 hdc in the following stitch.
Continue spacing the increases evenly around the round.
Join with a sl st to the first hdc.
You should finish with 66 hdc.
At this point, your basket base should look like a nice flat circle.
Starting the Sides of the Basket
Now comes one of my favorite little crochet tricks.
We are going to work one round through the back loops only. This creates a subtle ridge around the base and encourages the crochet fabric to turn upward instead of continuing to grow outward.
Round 7
Ch 1.
Working in the back loops only, make 1 sc in each stitch around.
Join with a sl st to the first sc.
Place a stitch marker at the end of this round.
You will use this marked round as the starting point when measuring the height of the basket.
Crocheting the Basket Sides
Round 8
Ch 1.
Working through both loops again, make 1 sc in each stitch around.
Join with a sl st to the first sc.
Repeat this round until the basket measures approximately 8½ inches from the marked round.
This is the wonderfully relaxing part of the project.
No increasing, no complicated stitch pattern, just simple single crochet rounds while the basket slowly grows taller.
It is also a very nice project to work on while watching your favorite show because once you get into the rhythm, you hardly have to think about it.
How to Make the Crochet Basket Handles
Once your basket has reached the correct height, it is time to create the handles.
And no sewing them on afterward. They are worked directly into the basket.
Handle Round
Ch 1.
Work 1 sc in each of the next 23 stitches.
Ch 10.
Skip the next 10 stitches.
Work 1 sc in each of the next 23 stitches.
Ch 10.
Skip the next 10 stitches.
Join with a sl st to the first sc.
You should now be able to see the two handle openings on opposite sides of the basket.
Strengthening the Handles
For the next round, ch 1.
Work 1 sc in each of the next 23 stitches.
Then work 1 sc in each of the 10 chains that form the handle.
Repeat the same process on the other side and join with a sl st.
This turns the chain openings into stronger crochet handles.
Finishing the Top
Work 3 more rounds of single crochet, making 1 sc in every stitch around.
Join each round with a sl st.
After the final round, fasten off and weave in your yarn ends.
And that’s it.
You have a soft but sturdy crochet basket with built-in handles, ready to fill with whatever needs a new home.
Want the Printable Crochet Basket Pattern?
Sometimes it is much easier to crochet with a printable pattern beside you, especially when you don’t want to keep checking your phone while you work.
If you would like another basket idea, I also have a second pattern for you.
This version is especially nice if you like the color-block look.
Another Crochet Basket Version
The second basket pattern is made a little differently.
Instead of super bulky yarn, it uses three strands of yarn held together throughout, which creates a dense and sturdy crochet fabric.
It also includes instructions for two sizes.
The small basket is approximately 8 inches high with a 30-inch circumference, while the large version is approximately 12 inches high with a 42-inch circumference.
The construction begins at the center of the base with single crochet increases, then switches to BLO for the first side round before continuing upward in regular single crochet.
The color change near the top gives the basket that simple two-tone look that works beautifully with neutral yarn colors.
One question people often have when making crochet baskets is how to keep them from collapsing.
The yarn makes a huge difference.
A thick yarn naturally creates a firmer fabric. You can also hold two or three strands together to make your stitches thicker and more structured.
In fact, these two basket styles show both approaches perfectly. One uses super bulky yarn, while the other holds three yarn strands together throughout the project.
Another little trick is to keep your tension fairly firm.
You do not want painfully tight stitches, of course, but a loose crochet fabric will usually produce a softer basket that folds in on itself.
Using single crochet for the sides is helpful too because it creates a compact and relatively dense fabric.
What Can You Use a Crochet Basket For?
Honestly, almost anything.
I love the idea of keeping one next to the sofa filled with yarn and current crochet projects. A smaller one would also be adorable in a bathroom for rolled washcloths or toiletries.
You could use one in a nursery for baby items, in a craft room for supplies, or even beside your bed for all those little things that somehow accumulate on the nightstand.
And because you are making it yourself, you can easily choose yarn colors that match the room.
That may be my favorite thing about handmade storage. Something as ordinary as organizing the house suddenly feels a little more personal.
VIDEO TUTORIAL
A Simple Project You’ll Actually Use
I have a soft spot for crochet projects that are both pretty and useful, and this basket definitely falls into that category.
The stitches are simple, the construction is repetitive enough to be relaxing, and once you understand how the base becomes the sides, the whole project makes perfect sense.
Make one for your yarn, make another for the living room, and then try not to start making them for every room in the house.
Although between us, I’m not promising anything. 😊