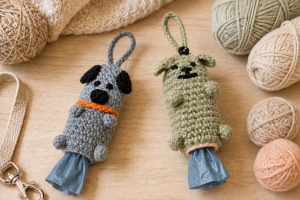
Welcome to Grandma’s Crafts! Today we are sharing a fun and practical Dog Poop Bag Holder Crochet Pattern, perfect for anyone who loves combining crochet with useful everyday projects. This little holder is designed to look like an adorable dog while keeping a roll of waste bags neatly stored and easy to carry during walks.
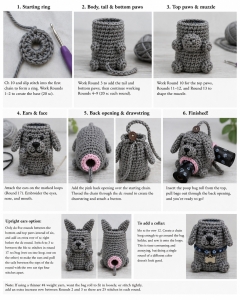
The project is worked mainly in the round and begins with a small chain ring that forms the opening at the bottom. As the body grows, the tail, lower paws, upper paws, muzzle, and ear placement are all incorporated into the construction, which gives the finished piece its cute dog shape without requiring too many separate parts.
One of the nicest details in this Dog Poop Bag Holder Crochet Pattern is how much personality you can add with just a few finishing touches. The ears are worked directly into the marked loops near the top of the body, while the eyes, nose, and mouth are embroidered with black yarn or embroidery floss. A small pink detail is also added around the bottom opening, giving the design an extra playful touch.
The top of the holder is finished with a long crochet chain that is woven through the double crochet round like a drawstring. A small button is then attached to create a practical loop, making it easy to hang the holder from a leash, bag, or other accessory.
Dog Poop Bag Holder Crochet
This project is also easy to customize. You can change the main yarn color to match your own dog, use different shades for the facial details, or even add a small crochet collar. The original pattern also includes an option for upright ears, which is a great way to give the holder a completely different look.
Because the pattern uses worsted weight yarn and a relatively small crochet hook, the finished holder has a compact and sturdy amigurumi-style structure. The original instructions recommend a 3.5 mm crochet hook and also note that an extra increase round can be added when using thinner yarn, crocheting tightly, or when a looser fit is preferred for the bag roll.
This adorable Dog Poop Bag Holder is a fun and practical crochet project that turns a simple bag dispenser into a cute little dog. The body is worked in the round, and the tail, paws, muzzle, and ear placement are built directly into the main piece. A drawstring-style top loop is then added to hold the poop bag roll securely in place.
Before getting started, take a moment to gather your yarn, hook, and the few simple supplies needed for this project. The steps below will guide you through the body, details, and finishing touches so you can create your own Dog Poop Bag Holder Crochet Pattern from start to finish.
Materials
Worsted weight yarn
Fluffy yarn is recommended for the body
Black yarn for the face
Pink yarn for the back detail
3.5 mm crochet hook
Small button for the top loop
Yarn needle
Scissors
Abbreviations – US Terms
blo sc – back loop only single crochet
dc – double crochet
dc2tog – double crochet two together
sc – single crochet
sc increase – 2 sc in the same stitch
trc3tog – triple crochet three together, worked like a bobble-style decrease in the same loop
trc decrease – triple crochet two together with the legs in different stitches
Pattern Notes
The body is worked in the round.
The opening at the top is designed so a chain loop can be woven through the dc round.
If you use a thinner worsted yarn, crochet tightly, or want the poop bag roll to fit more loosely, the source suggests adding an extra increase round between Rounds 2 and 3 so that you have 25 stitches per round.
Foundation: Ch 10 and slip stitch into the first chain to form a ring. Be careful not to twist the chain.
Round 1
Work [sc increase, sc] x 5. You should have 15 sc.
Round 2
Work [2 sc, sc increase] x 5. You should have 20 sc.
Round 3 – Tail and Bottom Paws
Ch 6 to form the tail. Slip stitch into the 2nd chain from the hook and then into each remaining chain stitch to complete the tail.
Continue the round as follows:
7 sc
1 trc3tog
5 sc
1 trc3tog
6 sc
When you complete the round, make sure the tail stays positioned on the outside of the body.
Rounds 4–9
Sc in each stitch around. 20 sc in each round.
Round 10 – Top Paws
Work:
9 sc
1 trc3tog
4 sc
1 trc3tog
5 sc
These top paws should line up above the bottom paws. If needed, adjust the placement slightly.
Rounds 11–12
Sc in each stitch around. 20 sc in each round.
Round 13 – Muzzle
Work:
11 sc
2 dc2tog
7 sc
This section forms the muzzle and should be centered over the front paws. If you adjusted Round 10, adjust this round as well so the face stays centered.
The source notes that you may use dc3tog instead if you want a more pronounced muzzle.
Rounds 14–16
Sc in each stitch around. 20 sc in each round.
Round 17 – Ear Placement
Work:
8 sc
2 blo sc
5 sc
2 blo sc
3 sc
The two groups of blo sc mark the places where the ears will be attached later. Adjust them if you would like the ears placed slightly differently.
Round 18 – Drawstring Opening
If working continuously in the round, ch 1. If not, ch 2.
Then work dc all the way around for a total of 20 dc. This is the round where the top chain loop will be threaded.
Round 19
Sc in each stitch around. 20 sc. Tie off the yarn.
At this point, the main body should be complete.
Ears
Attach yarn to the first marked loop.
For each ear:
Slip stitch onto the first loop
Ch 3
Work a trc decrease, placing one leg of the stitch in each loop
Ch 3
Slip stitch onto the second loop
Repeat for the second ear.
This creates soft floppy ears on each side of the head.
Back Detail
Using pink yarn, work sc in each loop of the starting chain. Tie off when finished.
You should have 10 sc.
This finishes the bottom opening with a small contrasting pink detail.
Face
Using black yarn or black embroidery floss and a needle, embroider:
the eyes
the nose
the mouth
You can keep the face simple and cute, just like the example in the PDF.
Top Loop / Closure
Make a chain approximately 10–12 inches long. Leave a tail at each end so you can attach the button later.
Thread the chain through the double crochet round like a drawstring:
leave 2 dc in front
thread the chain under the next 2 dc
continue going over and under sets of 2 dc all the way around until you return to the beginning
Attach the button so the loop can close securely at the top.
This top loop holds the poop bag roll inside while still allowing the bags to pull out through the bottom opening.
Optional Variation – Upright Ears
The PDF also includes a version with upright ears. For that variation:
work only 5 rounds between the bottom paws and top paws instead of 6
add an extra round of sc right before the dc round
change Round 17 so there are 3 sc between the blo sc stitches
use trc3tog for the ears, working two legs in one loop and one leg in the other
pull the tails between the tops of the dc round so the two ear tips sit 4 stitches apart
The source explains that this prevents the ears from interfering with the drawstring.
Optional Collar
For a collar:
work blo sc for Round 12
create a chain long enough to go around the bag holder
sew the chain onto those loops
The source notes that this takes more time, but gives a nicer result than simply adding one contrasting round.
VIDEO TUTORIAL
Finished!
Your Dog Poop Bag Holder is now ready to use. It is a fun, practical little crochet project that also makes a cute gift for dog lovers.
This Dog Poop Bag Holder Crochet Pattern can also make a fun handmade gift for dog lovers. It is practical, cute, and small enough to work up without becoming a huge project, making it a lovely idea for birthdays, pet-themed gifts, or simply as a little handmade accessory for yourself.
We hope you enjoyed this playful and useful crochet project. Thank you so much for visiting Grandma’s Crafts and spending some creative time with us today!
Be sure to explore the other crochet patterns and handmade ideas here on the blog. We are always adding new projects throughout the week, so come back often to discover more fun patterns, useful accessories, and creative inspiration for your next crochet project.