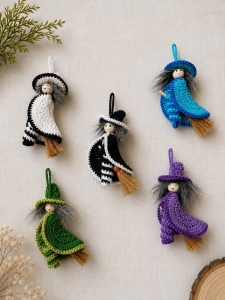
This adorable Crochet Witch on a Broomstick is a fun Halloween amigurumi project made from several simple pieces that are assembled at the end. The witch has a rounded head, dress-shaped body, long striped legs, tiny arms, a pointed hat, yarn hair, and a fully crocheted broomstick.
The instructions below use US crochet terminology.
Materials
- Worsted weight yarn in:
- Skin tone
- Black
- Purple
- Orange or rust for the hair
- Brown for the broom handle
- Mustard, tan, or golden yellow for the broom bristles
- Optional contrasting colors for striped stockings
- 3.0–3.5 mm crochet hook, or a size suitable for your yarn
- Polyester fiberfill
- Yarn needle
- Scissors
- Stitch marker
- 6–8 mm safety eyes, optional
- Black embroidery thread for facial details
For a decoration intended for a small child, embroidered eyes are preferable to plastic safety eyes.
Abbreviations
- MR – magic ring
- ch – chain
- sl st – slip stitch
- sc – single crochet
- inc – increase: 2 sc in the same stitch
- dec – invisible decrease
- BLO – back loop only
- st / sts – stitch / stitches
- Rnd – round
- FO – fasten off
Numbers in parentheses indicate the stitch count at the end of the round.
Important Pattern Notes
The head, body, arms, legs, hat, hair cap, and broom handle are worked in continuous spiral rounds unless stated otherwise.
Do not join the rounds. Place a stitch marker in the first stitch of every round and move it upward as you work.
Use fairly firm tension so the stuffing does not show between the stitches.
Stuff gradually rather than filling a piece all at once.
Before sewing the finished pieces permanently, pin or arrange them together to check the proportions and positioning.
Head
Using skin-tone yarn:
Rnd 1
6 sc in MR.
(6)
Rnd 2
Inc in each st around.
(12)
Rnd 3
[Sc in next st, inc in next st] ×6.
(18)
Rnd 4
[Sc in next 2 sts, inc in next st] ×6.
(24)
Rnd 5
[Sc in next 3 sts, inc in next st] ×6.
(30)
Rnds 6–11
Sc in each st around.
(30)
If using safety eyes, insert them approximately between Rounds 8 and 9, leaving about 5 stitches between the eyes.
Rnd 12
[Sc in next 3 sts, dec] ×6.
(24)
Rnd 13
[Sc in next 2 sts, dec] ×6.
(18)
Begin stuffing the head firmly but evenly.
Rnd 14
[Sc in next st, dec] ×6.
(12)
Add more stuffing and shape the cheeks and forehead with your fingers.
Rnd 15
Dec ×6.
(6)
FO, leaving a long tail.
Thread the tail through the remaining front loops and pull gently to close the opening.
Hair Cap
Using orange, rust, brown, gray, or your preferred hair color:
Rnd 1
6 sc in MR.
(6)
Rnd 2
Inc around.
(12)
Rnd 3
[Sc, inc] ×6.
(18)
Rnd 4
[2 sc, inc] ×6.
(24)
Rnd 5
[3 sc, inc] ×6.
(30)
Rnds 6–7
Sc around.
(30)
FO, leaving a long tail.
The piece should resemble a shallow cap.
Place it over the upper and back portion of the head. The front edge should sit slightly above the eyes.
Sew the cap securely to the head.
Adding the Hair Strands
Cut several yarn strands approximately 6–8 inches long.
Fold one strand in half.
Insert the hook through a stitch along the lower edge of the hair cap, catch the folded center of the strand and pull it partially through.
Pass the two loose ends through the loop and tighten gently.
Repeat around the sides and back of the head.
Trim the hair only after the hat has been positioned.
Body and Dress
Using black, purple, or your main dress color:
Rnd 1
6 sc in MR.
(6)
Rnd 2
Inc around.
(12)
Rnd 3
[Sc, inc] ×6.
(18)
Rnd 4
[2 sc, inc] ×6.
(24)
Rnds 5–8
Sc around.
(24)
This creates the wider lower section of the dress.
Rnd 9
[Sc in next 2 sts, dec] ×6.
(18)
Rnds 10–11
Sc around.
(18)
Rnd 12
[Sc, dec] ×6.
(12)
Rnds 13–14
Sc around.
(12)
Lightly stuff the body.
Keep the lower dress softer than the torso so the finished witch can sit naturally over the broom.
FO, leaving a long tail for sewing.
Arms
Make 2.
Begin with skin-tone yarn.
Rnd 1
6 sc in MR.
(6)
Rnds 2–4
Sc around.
(6)
Change to the dress color.
Rnds 5–10
Sc around.
(6)
Add only a very small amount of stuffing to the lower half of the arm.
Do not overstuff.
Flatten the open end.
FO, leaving a long tail for sewing.
Legs and Shoes
Make 2.
The shoe and leg are made as one continuous piece.
Begin with black yarn.
Rnd 1
Ch 5.
Beginning in the second ch from the hook:
Sc in next 3 ch.
Work 3 sc in the final ch.
Rotate the foundation chain so you can work along the opposite side.
Sc in next 2 ch.
Work 2 sc in the final ch.
You should now have crocheted around both sides of the chain.
(10)
Rnd 2
Sc around.
(10)
Rnd 3
Working in BLO, sc around.
(10)
This creates the edge between the sole and upper shoe.
Rnd 4
Sc in next 3 sts, dec ×2, sc in next 3 sts.
(8)
Rnd 5
Sc in next 2 sts, dec ×2, sc in next 2 sts.
(6)
Lightly stuff the toe of the shoe.
Change to the stocking color.
Rnds 6–13
Sc around.
(6)
For striped stockings, change between purple, black, orange, green, or another contrasting color every 1–2 rounds.
Add only a tiny amount of stuffing to the upper portion of the leg.
FO, leaving a long tail.
Shaping the Shoe
Pinch the front tip of the shoe slightly upward.
Using a small matching yarn stitch, secure the curve if you want the classic pointed witch-shoe appearance.
Repeat for the second leg.
Pointed Witch Hat
Using black yarn:
Rnd 1
4 sc in MR.
(4)
Rnd 2
Sc around.
(4)
Rnd 3
[Sc, inc] ×2.
(6)
Rnd 4
Sc around.
(6)
Rnd 5
[2 sc, inc] ×2.
(8)
Rnd 6
Sc around.
(8)
Rnd 7
[3 sc, inc] ×2.
(10)
Rnd 8
Sc around.
(10)
Rnd 9
[4 sc, inc] ×2.
(12)
Rnd 10
Sc around.
(12)
Rnd 11
[5 sc, inc] ×2.
(14)
Rnd 12
Sc around.
(14)
Rnd 13
[6 sc, inc] ×2.
(16)
Rnd 14
Sc around.
(16)
Rnd 15
[Sc, inc] ×8.
(24)
Rnd 16
[2 sc, inc] ×8.
(32)
The pointed crown is now complete.
Hat Brim
Rnd 17
Working in BLO:
[3 sc, inc] ×8.
(40)
Rnd 18
Sc around.
(40)
Sl st in the next stitch.
FO and weave in the end.
Do not stuff the hat.
Gently bend the point toward one side for a whimsical shape.
Optional Hat Band
Using purple, orange, or another contrasting yarn:
Ch enough stitches to fit comfortably around the base of the hat crown.
Beginning in the second chain from the hook, sl st across.
FO.
Wrap the strip around the hat and sew the ends together at the back.
You can also simply make a long chain and use it as a narrow hatband.
Crochet Broom Handle
Using brown yarn:
Rnd 1
6 sc in MR.
(6)
Rnds 2–32
Sc around.
(6)
Do not stuff heavily.
Instead, place a few thin strands of scrap yarn inside as you work if you want the handle to feel slightly firmer.
FO, leaving a yarn tail.
The finished piece should be a long, narrow crocheted tube.
Crochet Broom Bristles
Using mustard, tan, golden yellow, or light brown yarn:
Attach the yarn to one end of the broom handle.
First Bristle
Ch 14.
Beginning in the second ch from the hook, sl st back down all 13 chains.
Sl st into the end of the broom handle.
Remaining Bristles
Repeat:
Ch 14, sl st back along the chain, sl st into the broom end
until you have approximately 10–14 bristles distributed around the end of the handle.
FO securely.
Arrange the strands together with your fingers.
Wrap a short piece of brown yarn firmly around the base of the bristles several times and knot securely.
This creates the tied broom appearance without requiring loose cut strands.
Facial Details
Using black embroidery thread, embroider a small curved mouth below the eyes.
Optional details include:
- Tiny eyelashes
- Eyebrows
- A small nose
- Freckles
- Rosy cheeks embroidered with pink yarn
Keep these details small so they do not overpower the face.
Assembly
This is the most important stage for giving the witch the correct pose.
Attach the Head
Place the head directly over the narrow upper opening of the body.
Make sure the eyes face forward.
Using the long yarn tail from the body or head, sew around the neck several times.
Check the head from the front and side before tightening the final stitches.
It should sit straight without wobbling.
Attach the Hair
If you have not already sewn the hair cap to the head, do so now.
Arrange the yarn strands around the face.
Keep most of the hair toward the sides and back so the facial features remain visible.
Do not trim the final hairstyle until the hat has been attached.
Attach the Legs
Position the two legs underneath the lower dress.
Leave a small space between them.
Sew the top of each leg securely to the underside of the body.
Angle the legs slightly outward rather than straight downward.
This will make it much easier to position the witch over the broom later.
Attach the Arms
Position one arm on each side near the upper body.
Do not sew the hands to the body.
The arms need to angle forward so the witch can appear to hold the broomstick.
Sew only the upper end of each arm securely at the shoulder.
Position the Hat
Place the hat over the hair.
Tilt it slightly backward or toward one side.
Make sure the eyes and most of the face remain visible.
Using black yarn, sew several small hidden stitches around the underside of the brim to secure the hat to the hair and head.
You do not need to sew around the entire brim.
A few well-spaced stitches are enough.
Positioning the Witch on the Broom
Place the broom horizontally.
Set the witch approximately over the center of the handle.
The broom should pass beneath the lower body, between the legs.
Position one leg naturally on each side of the handle.
Before sewing anything, look at the project from the front and side.
The witch should appear to be sitting astride the broom, rather than simply lying on top of it.
Secure the Body to the Broom
Using matching yarn, make several small hidden stitches between the bottom of the dress and the broom handle.
These stitches should be strong enough to hold the witch firmly but discreet enough that they are not obvious from the front.
Position the Hands
Bring both arms forward.
Curve each hand gently toward the broom handle.
Secure the lower end of each arm to the handle with 1–2 small stitches.
Do not sew the entire arm down.
Leaving most of the arm free creates a much more natural pose.
Final Shaping
Gently bend the tip of the hat.
Shape the shoes upward slightly.
Arrange the hair.
Separate and straighten the broom bristles.
Check that the witch sits centered over the broom.
If one side feels heavier, reposition the legs or arms slightly before securing the last yarn ends.
Finally, weave all loose ends securely into the nearest crocheted piece.
Optional Hanging Loop
To turn the project into a hanging Halloween decoration, attach a strong yarn loop behind the upper part of the head or hat.
Before tying it permanently, hold the project by the loop and test the balance.
Move the attachment point slightly forward or backward until the broom hangs approximately horizontally.
Beginner Assembly Tip
Do not sew each piece immediately after crocheting it.
Finish the head, body, hat, legs, arms, and broom first. Then lay everything together and experiment with the positioning.
The individual pieces may look strange by themselves, that is completely normal with amigurumi. The character really appears during assembly.


