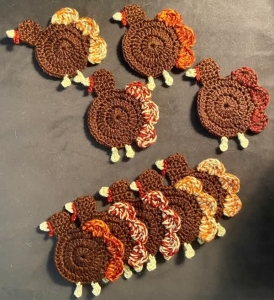
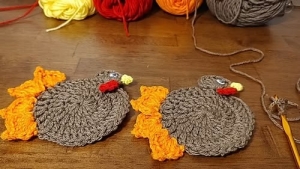
Welcome to Grandma’s Crafts! Today we are sharing a fun and festive Crochet Turkey Coaster Pattern, perfect for adding a handmade touch to your Thanksgiving table. This little turkey coaster combines a simple round crochet base with colorful tail feathers, a tiny head, beak, wattle, and feet (optional), creating a charming seasonal coaster that is both decorative and practical.
The body of this crochet turkey coaster is made with basic double crochet stitches worked in the round, making the main section quick and easy to complete. The simple circular construction also gives the coaster a nice flat surface, which is important when using it under mugs, glasses, or small serving dishes.
One of the most eye-catching details of this pattern is the colorful feather section. The feathers are made with two strands of yarn held together, giving them extra thickness and helping them stand out around the back of the turkey. You can use traditional fall colors such as orange, mustard, burgundy, brown, and red, or mix in your own favorite shades for a more playful look.
These turkey coasters are also easy to customize depending on the look you want for your table. You can keep the colors soft and neutral for a more rustic style, or use brighter autumn shades to make the feathers stand out and give each turkey its own personality.
Because the pattern is made in small sections, it is also a nice project to work on in batches. You can crochet several bodies first, then add the feathers and finishing details afterward, which makes it easier to create a matching set for family dinners, holiday gatherings, or handmade gifts.
The small details are what really bring this crochet turkey to life. After completing the body and feathers, the head is worked directly along the edge of the coaster, followed by the little beak, red wattle, embroidered eye, and tiny feet. These finishing touches turn a simple crochet circle into an adorable Thanksgiving turkey without requiring complicated shaping or extensive sewing.
This project is also a great way to use small amounts of leftover yarn. Since each part requires only a little yarn, you can easily combine scraps from previous projects and create several coasters in different color combinations. A complete set would look especially cute on a Thanksgiving table or could be bundled together as a handmade fall gift.
The Crochet Turkey Coaster Pattern is a lovely project for anyone who enjoys seasonal crochet decorations that can actually be used around the home. Make just one as a fun accent piece or crochet a whole flock to decorate your table throughout the fall season.
This cute crochet turkey is worked from a simple round body, with a textured fan of feathers made using two strands of yarn held together. The head, beak, wattle, and little feet are added directly to the body after the main circle is complete.
Materials
Worsted weight yarn (#4)
Brown yarn for the body and head
Two or more colors for the tail feathers
Yellow or mustard yarn for the beak and feet
Red yarn for the wattle
Small amount of black yarn for the eye
5.0 mm crochet hook, or a size suitable for your yarn
Yarn needle
Scissors
Note: The body is worked with one strand of yarn. For the feathers, hold two strands of yarn together throughout.
US Crochet Abbreviations
ch – chain
sl st – slip stitch
sc – single crochet
hdc – half double crochet
dc – double crochet
tr – treble crochet
sc2tog – single crochet two stitches together
The beginning chains do not count as stitches unless otherwise stated.
PATTERN INSTRUCTIONS
Body
With brown yarn:
Round 1
Ch 4.
Work 14 dc into the first ch made.
Join with a sl st to the first dc.
(14 dc)
Round 2
Ch 2.
Work 2 dc in each stitch around.
Join with a sl st to the first dc.
(28 dc)
Round 3
Ch 2.
Repeat around:
2 dc in next st, 1 dc in next st.
Join with a sl st to the first dc.
(42 dc)
Fasten off and weave in the end.
Tail Feathers
The feathers are worked over approximately half of the outside edge of the body.
Hold two strands of feather-colored yarn together.
Choose a stitch along the upper/back half of the body and join the yarn with a sl st.
Feather Repeat
Ch 2, dc in the same st.
Work 2 tr in the next st.
Work 1 dc and 1 hdc in the next st.
Skip the next st.
Sl st in the following st.
One feather is complete.
Without fastening off, begin the next feather directly from the same stitch where the previous feather ended:
Ch 2, dc in the same st, 2 tr in next st, dc and hdc in next st, skip next st, sl st in next st.
Repeat until you have made 5 feathers total.
Fasten off and weave in the ends.
Optional Color Changes
For a colorful Thanksgiving turkey, the feathers may be worked in different shades such as rust, mustard, orange, red, burgundy, or golden brown.
If changing colors between feathers, make the color change at the sl st between two feather sections.
Head and Neck
Position the turkey so the feathers are at the back.
On one side of the body, count approximately 2–3 stitches away from the end of the feather section.
Join brown yarn.
Row 1
Sc in the same st where the yarn was joined and in the next 4 sts.
(5 sc)
Ch 1 and turn.
Row 2
Sc in each st across.
(5 sc)
Ch 1 and turn.
Row 3
Work 2 sc in the first st, sc in each of the next 3 sts, and 2 sc in the last st.
(7 sc)
Ch 1 and turn.
Row 4
Sc in each st across.
(7 sc)
Ch 1 and turn.
Row 5
Sc2tog, sc in each of the next 3 sts, sc2tog.
(5 sc)
Ch 1 and turn.
Row 6
Sc2tog, sc in next st, sc2tog.
(3 sc)
Fasten off.
This creates a small rounded turkey head extending from the edge of the body.
Beak
With yellow or mustard yarn, join the yarn along the front edge of the head.
Ch 3.
Sl st in the second ch from the hook.
Sc in the next ch.
Sl st back into the head to secure the base of the beak.
Fasten off.
Gently shape the stitches into a small pointed beak.
Wattle
With red yarn, join just underneath the beak.
Ch 4.
Beginning in the second ch from the hook, sl st in each chain back toward the head.
Sl st into the head to secure.
Fasten off.
Allow the small red piece to hang naturally beneath the beak.
Eye
Using a small amount of black yarn, embroider a tiny eye on the side of the head.
A French knot or one small straight stitch works well.
Secure the yarn neatly on the back.
Feet (OPTIONAL)
Turn the turkey so the lower edge of the body is facing you.
With yellow or mustard yarn, join to a stitch near the bottom of the body.
First Foot
Ch 5.
Work 3 sc in the second ch from the hook.
Sl st in each of the remaining chains back toward the body.
Sl st into the same body stitch to secure the leg.
Fasten off.
Second Foot
Move approximately 3 stitches across along the bottom edge of the body.
Repeat the instructions for the first foot.
Fasten off and weave in the ends.
Crochet Turkey Coaster Pattern
Finishing
Weave in all remaining yarn ends.
Gently shape the body and arrange the five tail feathers so they spread evenly behind the turkey.
If necessary, lightly block the finished piece so the circular body lies flat while the feathers remain clearly defined.
Because the feathers are made with two strands held together, they should appear thicker and more pronounced than the body, helping create the full fan-shaped turkey tail.
VIDEO TUTORIAL
Thank you so much for visiting Grandma’s Crafts! We hope you enjoy making this cheerful little turkey coaster and adding another handmade project to your seasonal collection.
Be sure to explore the other crochet patterns available here on the blog. We are always adding new and interesting projects, with fresh patterns and creative ideas shared regularly, so there is always something new to discover on your next visit.