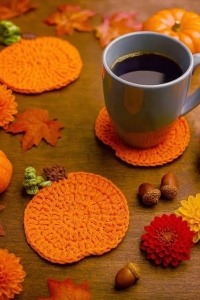
Hello, my friend! Welcome to Grandma’s Crafts, our lovely little space where we share crochet patterns, handmade ideas, and creative projects to make your days a little more colorful. We are so happy to have you here, and today we wanted to bring you something especially charming for the fall season: this adorable Crochet Pumpkin Coaster Pattern.
There is something so cozy about decorating the house with little handmade details when autumn arrives. These crochet pumpkin coasters are simple, useful, and full of personality, making them perfect for your morning coffee, a warm cup of tea, or a beautiful fall table setting.
The pumpkin itself has a softly shaped body, a small brown stem, and a curly green vine that gives the finished coaster such a sweet handmade look. You can even add the optional crochet leaf for a little extra detail.
What I love about this little project is how quickly it starts to take shape. In just a few rounds, the flat crochet circle begins to look like a pumpkin, and the small finishing details bring the whole piece to life.
It is also a wonderful pattern for using up leftover yarn from other projects. You only need small amounts for the stem, vine, and leaf, so it is easy to mix colors you already have in your stash and create a collection without buying much extra yarn.
And because each coaster is small and easy to carry around, this is the kind of project you can work on almost anywhere. Make one during a quiet afternoon, bring a few with you while traveling, or crochet an entire set over the weekend.
A Simple Fall Crochet Project
One of the nicest things about this pattern is that the basic pumpkin begins with a very simple crochet circle.
The shaping is added afterward by changing the stitches around the outer edge, creating the little indentations at the top and bottom and giving the piece its recognizable pumpkin silhouette.
Because the project is relatively small, it is also a lovely way to practice crochet shaping without committing to a large project.
Materials You’ll Need
For this Crochet Pumpkin Coaster, we recommend using 100% cotton yarn in a medium weight.
Cotton works especially well for coasters because it is absorbent, durable, and holds the shape of the pumpkin nicely.
You will need:
Medium-weight cotton yarn
Pumpkin-colored yarn
Small amount of brown yarn
Small amount of green yarn
5 mm crochet hook
Yarn needle
Scissors
Orange is the obvious classic choice, but don’t feel limited to traditional pumpkin colors.
Make a Whole Pumpkin Collection
These little coasters would look adorable made in several different fall shades.
Try a combination of burnt orange, cream, mustard, rust, sage green, and warm brown to create a beautiful handmade autumn set.
You can also make the stem and vine in slightly different colors for each pumpkin, making every coaster feel unique while still keeping the collection coordinated.
The Curly Crochet Vine
The little green vine is one of my favorite details in this project.
It is created by working several stitches into each chain, which naturally causes the crochet piece to curl into a tiny spiral.
Once attached beside the brown stem, it adds just enough texture to make the pumpkin feel more dimensional without making the coaster bulky.
Optional Crochet Leaf
If you would like to add another decorative detail, the pattern also includes a small crochet leaf.
You can sew it next to the stem and vine or leave it off for a simpler pumpkin.
This is also another opportunity to play with color. A muted olive or sage leaf can create a softer, more rustic look, while a bright green leaf gives the coaster a more playful appearance.
Crochet Pumpkin Coaster Pattern
The complete pattern below includes the pumpkin body, stem, curly vine, optional leaf, and finishing instructions.
Finished Size
Approximately 4.5–5 in / 11.5–12.5 cm wide, excluding the stem and vine.
Materials
#4 worsted-weight 100% cotton yarn
Orange, cream, rust, or another pumpkin color
Small amount of brown yarn
Small amount of green yarn
5 mm / H-8 crochet hook
Yarn needle
Scissors
Cotton is the best choice here because it is absorbent and works much better for coasters than acrylic.
Abbreviations
ch – chain sl st – slip stitch sc – single crochet hdc – half double crochet dc – double crochet st(s) – stitch(es) inc – 2 dc in the same stitch MR – magic ring
Pattern Notes
Ch 2 at the beginning of a round does not count as a stitch.
Join each round with a sl st to the first stitch.
The pumpkin body is worked in joined rounds.
Keep your tension fairly relaxed so the coaster stays flat.
Pumpkin Body
With your pumpkin color, make a magic ring.
Round 1
Ch 2.
Work 12 dc into the MR.
Join with sl st.
12 sts
Round 2
Ch 2.
Work 2 dc in each stitch around.
Join.
24 sts
Round 3
Ch 2.
Repeat:
1 dc in next st, 2 dc in next st
around.
Join.
36 sts
At this point you should have a flat crochet circle.
Round 4 – Shape the Pumpkin
This round turns the circle into a wider pumpkin shape and creates the indentations at the top and bottom.
Ch 1.
Sl st in next 2 sts.
Then repeat:
3 dc, 2 dc in next st
4 times.
Sl st in next 2 sts.
Repeat:
3 dc, 2 dc in next st
4 times.
Join with sl st to the first sl st.
You have used all 36 stitches from Round 3:
2 sts for the top indentation
16 sts along one side
2 sts for the bottom indentation
16 sts along the other side
The increases make the sides fuller while the slip stitches pull the top and bottom inward, creating the pumpkin silhouette.
Fasten off.
Stem
Turn the pumpkin so one of the 2-slip-stitch indentations is at the top.
Join brown yarn into the first stitch of that indentation.
Row 1
Ch 1.
Sc in the same stitch and in the next stitch.
2 sc
Turn.
Row 2
Ch 1.
Sc in each stitch across.
2 sc
Turn.
Row 3
Repeat Row 2.
Fasten off and weave in the end.
The short rectangular piece becomes the pumpkin stem.
Curly Vine
With green yarn:
Ch 9.
Starting in the second chain from the hook, work:
3 sc in each chain across.
The extra stitches will cause the chain to curl naturally.
Fasten off, leaving a tail.
Sew one end of the vine beside the brown stem.
Optional Crochet Leaf
With green yarn:
Ch 6.
Beginning in the second chain from the hook, work:
sl st, sc, hdc, dc, 4 dc in last chain.
Continue along the opposite side of the foundation chain:
dc, hdc, sc, sl st.
Fasten off.
Sew the leaf beside the stem and vine.
Finishing
Weave in all loose ends securely.
Gently stretch the pumpkin into shape with your hands.
If necessary, lightly wet-block the coaster and allow it to dry flat.
For a set, make several pumpkins in different fall colors such as:
These Crochet Pumpkin Coasters are perfect for adding a handmade touch to your fall décor.
Use them on a coffee table, dining table, kitchen counter, or create a complete set for Thanksgiving. They would also look beautiful paired with a cozy mug, candle, or small bag of coffee as part of a handmade autumn gift.
And because each coaster works up relatively quickly, this is the kind of project that is easy to make in multiples.
A Cute Handmade Gift
A set of four or six pumpkin coasters would make such a sweet seasonal gift for a friend, neighbor, teacher, or hostess.
Tie them together with a piece of twine or ribbon and you already have a simple handmade present that feels thoughtful and personal.
They could also be a lovely addition to a fall craft market collection, especially when displayed in several different colors.
Have Fun With the Colors
One of the best parts of simple crochet projects like this is making them your own.
You can stay with classic orange pumpkins or create an entire collection inspired by modern fall décor. Cream pumpkins with brown stems look beautifully neutral, while sage, mustard, and rust create a warmer vintage-inspired palette.
No matter which colors you choose, the small stem, curly vine, and pumpkin shape will keep the finished coasters unmistakably festive.
We hope you enjoy making this Crochet Pumpkin Coaster Pattern and adding a little handmade charm to your home this fall. Sometimes the smallest crochet projects are the ones that bring the most personality to a space.
Thank you so much for spending a little time with us here at Grandma’s Crafts. We hope you found some inspiration for your next crochet project, and we would love to have you back soon for more patterns, handmade ideas, and creative projects made with love. 🧶🍂