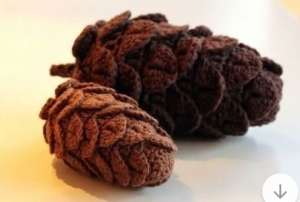
Hello, friends! Welcome to Grandma’s Crafts! We’re so happy you’re here to share another crochet project with us. Today, we’re making a little pine cone with layers of textured stitches. Gather your favorite brown yarn, grab your hook, and make yourself comfortable—we’ll walk through the project together.
There’s something lovely about bringing woodland shapes into our crafting. These little pine cones can add a handmade touch to autumn arrangements, Christmas decorations, or thoughtfully wrapped gifts. Their texture gives them plenty of character, even in a single color.
You can choose a warm brown for a natural look or try ivory for a winter-inspired version. Make one as a small decoration, or plan a matching collection for a garland.
The outer texture is formed with a stitch we’ll refer to here as the pine cone scale stitch, or scale stitch for short. Read through the instructions before beginning, paying particular attention to the front and back loops used throughout the project.
Materials
Worsted-weight yarn in your preferred shade of brown.
A 3.5 mm crochet hook.
A yarn needle for weaving in ends.
Stuffing.
A stitch marker.
Finished Size
Each finished pine cone measures approximately 3 inches / 7.5 cm in length.
Your finished size may vary with your yarn and crochet tension.
Stitches and Abbreviations
This pattern uses US crochet terminology.
ch — chain.
R — round.
st/sts — stitch/stitches.
sc — single crochet.
sl st — slip stitch.
inc — increase: work two single crochets into the next stitch.
sc2tog — single crochet two stitches together.
BLO — back loop only.
yo — yarn over.
Magic ring — an adjustable ring used to begin the inner shape.
Scale stitch — the grouped stitch described below, used to create the pine cone’s textured outer layers.
How to Make the Pine Cone Scale Stitch
Yarn over and insert your hook into the indicated stitch.
Yarn over and pull up a loop.
Yarn over and pull through two loops. Two loops remain on your hook.
Yarn over and insert your hook into the same stitch.
Yarn over and pull up a loop.
Yarn over and pull through two loops.
Yarn over and pull through all three remaining loops.
Pattern Notes
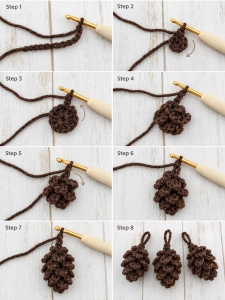
The pine cone is worked in two stages.
First, you’ll crochet and stuff the inner shape. Certain rounds are worked in the back loops only, leaving the front loops available for the outer details.
Next, you’ll add the scales, moving down the inner shape and working into the reserved loops.
Use a stitch marker to keep track of your rounds. At the end of the inner shape, do not fasten off: you’ll continue directly into the outer layer.
Step 1: Crochet the Inner Pine Cone
R1: Work 6 sc into a magic ring. (6)
R2: Increase in every stitch around. (12)
R3: Working in BLO, repeat (sc, inc) six times. (18)
R4: Work one sc into every stitch around. (18)
R5: Working in BLO, work one sc into every stitch around. (18)
R6: Work one sc into every stitch around. (18)
R7: Working in BLO, work one sc into every stitch around. (18)
R8: Work one sc into every stitch around. (18)
R9: Working in BLO, work one sc into every stitch around. (18)
R10: Repeat (sc, sc2tog) six times. (12)
Stuff the inner pine cone.
R11: Working in BLO, work one sc into every stitch around. (12)
R12: Work sc2tog six times around. Remove the stitch marker, then work two additional sc2tog. (4)
Do not fasten off.
Step 2: Begin the Pine Cone Scales
Keep the final loop from the last stitch on your hook.
Using the four stitches remaining from R12, repeat the following sequence twice:
Ch 2, work a scale stitch into the next stitch, ch 2, sl st into the next stitch.
You’ll now move down to the next layer of reserved loops.
Move from R12 to R11
Chain 2 and turn the piece so you can work around a stitch post in R12, directly below the loop on your hook.
Around that post, work:
One scale stitch, ch 2.
Slip stitch into the front loop of R11 directly below.
This connecting scale sits sideways, but it blends into the surrounding texture.
Step 3: Work the Scales Around R11
Hold the pine cone upside down for the remainder of the pattern.
Working into the front loops remaining from R11, repeat this sequence six times:
Ch 2, scale stitch into the next stitch, ch 2, sl st into the next stitch.
There may be a slight gap where the beginning and end of the round meet. Continue working across it.
Move from R11 to R9
Chain 2 and turn the piece to reach a stitch post in R10, directly below the loop on your hook.
Work one scale stitch, ch 2 around that post.
Slip stitch into the back loop of R9 directly below.
Step 4: Work the Scales Around R9
Working into the front loops remaining from R9, repeat this sequence nine times:
Ch 2, scale stitch into the next stitch, ch 2, sl st into the next stitch.
Move from R9 to R7
Chain 2 and turn the piece to reach a stitch post in R8, directly below the loop on your hook.
Work one scale stitch, ch 2 around that post.
Slip stitch into the back loop of R7 directly below.
Step 5: Work the Scales Around R7
Working into the front loops remaining from R7, repeat this sequence nine times:
Ch 2, scale stitch into the next stitch, ch 2, sl st into the next stitch.
Move from R7 to R5
Chain 2 and turn the piece to reach a stitch post in R6, directly below the loop on your hook.
Work one scale stitch, ch 2 around that post.
Slip stitch into the back loop of R5 directly below.
Step 6: Work the Scales Around R5
Working into the front loops remaining from R5, repeat this sequence nine times:
Ch 2, scale stitch into the next stitch, ch 2, sl st into the next stitch.
Move from R5 to R3
Chain 2 and turn the piece to reach a stitch post in R4, directly below the loop on your hook.
Work one scale stitch, ch 2 around that post.
Slip stitch into the back loop of R3 directly below.
Step 7: Work the Final Layer Around R3
Working into the front loops remaining from R3, repeat this sequence nine times:
Ch 2, scale stitch into the next stitch, ch 2, sl st into the next stitch.
The textured outer layer is now complete.
Step 8: Finish Your Pine Cone
Choose the finishing method that suits how you plan to use your decoration.
Option 1: Add a Hanging Loop
Keep the last loop on your hook and slip stitch into the posts of R1 and R2 to bring your hook to the center of the pine cone.
Chain to your preferred hanging-loop length.
Slip stitch back into the center to secure the loop. Fasten off, cut the yarn, and weave in the end.
Option 2: Leave a Tail for Attaching
Fasten off after the final stitch, leaving a long yarn tail.
Use the tail to attach your pine cone to a crocheted chain for a garland or to secure it to another decoration. Weave in any remaining ends once it is attached.
Ideas for Your Finished Pine Cones
A small group of pine cones can make a lovely display in a wooden bowl or on a seasonal tray. Try pairing them with linen, ribbon, or greenery in colors that complement your yarn.
For gift wrapping, attach one to a ribbon around a kraft-paper package. A handwritten tag adds a personal finishing touch.
If you’re making a garland, lay out the pine cones before attaching them so you can decide on the spacing. You might use a single shade throughout or alternate two complementary colors.
VIDEO TUTORIAL
Thank You for Crafting with Us
We hope you enjoy watching your little pine cone take shape, from the simple inner form to the final textured layer. Take your time with the scales, enjoy the process, and look forward to finding a special place for your finished creation.
Thank you for spending part of your day with us here at Grandma’s Crafts! We’d love to hear whether you’re making ornaments, a garland, or something of your own, so share your plans in the comments. Until next time, happy crocheting, friends!