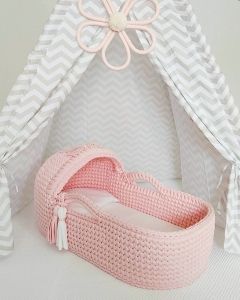
A handmade basket like this can also be a beautiful piece for nursery décor, baby photography, keepsake storage, or organizing blankets and other small items. If it will be used around a baby, always follow current infant safety recommendations and make sure any product intended for sleep meets the appropriate safety standards.
Instructions
This crochet Moses basket is made with a wooden base and thick cotton cord, creating a sturdy, structured basket with a beautiful handmade finish. The main body uses the waistcoat stitch, which creates a dense fabric that works especially well for baskets.
You can make the basic version with handles or add the optional hood for a more traditional Moses basket appearance.
Important Safety Note
This is a handmade crochet project and should not automatically be considered an approved infant sleep product.
Unless the completed basket, base, mattress, and construction meet all applicable infant sleep safety standards, use it for decorative purposes, newborn photography, storage, or supervised awake-time use only.
Do not add pillows, loose blankets, soft padding, or other loose items around a baby. For infant sleep, current safe-sleep guidance recommends a firm, flat, non-inclined surface designed and approved for infant sleep, with only a fitted sheet.
Materials
- Oval wooden crochet basket base
- Approx. 29.5 in long
- Approx. 16 in wide
- 6 mm thick
- 110 holes, approximately 12 mm each
- 9 mm braided cotton cord
- About 3 bundles for the basic basket
- About 4 bundles if adding the hood
- 8 mm crochet hook
- 9 mm crochet hook
- Stitch markers
- Scissors
- Tape measure
The quantities above are based on the dimensions used for the original project. If your wooden base is a different size or has a different number of holes, the stitch counts may need to be adjusted.
Abbreviations – US Terms
- ch – chain
- sc – single crochet
- sl st – slip stitch
- st / sts – stitch / stitches
Waistcoat Stitch
The waistcoat stitch is worked differently from an ordinary single crochet.
Instead of inserting your hook beneath the two loops at the top of the stitch, insert the hook directly through the center of the little “V” on the front of the stitch.
Yarn over, pull up a loop, yarn over again, and pull through both loops on your hook.
This creates the firm, knit-like texture used for the basket walls.
Step 1 – Cover the Wooden Base
Use your 8 mm crochet hook.
Begin at approximately the center of one of the shorter ends of the wooden base.
Pull a loop of cord through the first hole.
Work 1 sl st through each hole around the entire wooden base.
Keep the cord snug enough to cover the edges of the holes neatly, but avoid pulling so tightly that the base begins to distort.
When you return to the first hole, join to complete the round.
This first round gives the wooden edge a cleaner finish and prepares it for the basket wall.
Step 2 – First Round of the Basket Wall
Continue using the 8 mm hook.
Ch 1. This chain does not count as a stitch.
Work 1 sc through the holes around the wooden base.
Because this particular base contains 110 holes, you need to skip 10 holes altogether, distributing those skipped holes as evenly as possible around the base.
At the end of the round you should have:
100 sc
Finish the round neatly with an invisible join.
Reducing the number of stitches from 110 to 100 helps prevent the lower part of the basket from spreading outward too much.
Step 3 – Build the Basket Walls
Change to your 9 mm crochet hook.
Beginning with the next round, work 1 waistcoat stitch in every stitch around.
Continue in this manner for 9 complete rounds.
These rounds form the main sides of your basket.
Place a stitch marker in the first stitch of each round so you can easily keep track of your starting point.
Try to maintain firm, consistent tension throughout. Thick cord can be tiring to work with, so it is perfectly fine to take breaks as needed.
Finish each round neatly before beginning the next.
After completing these rounds, you should have a tall, structured basket wall.
Step 4 – Make the Handle Openings
For the next round, you will create an opening on each long side of the basket.
First, locate the center of one long side.
Use stitch markers to mark a section of 7 stitches for the first handle opening.
Repeat on the opposite long side, making sure both handle openings are positioned as evenly as possible.
Work in waistcoat stitch until you reach the first marked section.
Ch 8.
Skip the 7 marked stitches and continue working waistcoat stitch into the basket wall after the marked section.
Continue around until you reach the second handle position.
Again:
Ch 8, skip 7 sts, and continue working around.
Finish the round neatly.
You will now have two chain openings positioned opposite one another.
Step 5 – Finish the Handles and Upper Edge
Work another round around the basket using the waistcoat stitch.
When you reach each ch-8 handle opening, work:
9 sc around the chain
Then continue working waistcoat stitch along the regular basket stitches.
Repeat the same process for the second handle.
Continue around the remaining edge and finish the round neatly.
Fasten off and securely weave in the remaining cord ends.
Your basic crochet Moses basket is now finished.
Optional Crochet Hood
If you would like the basket to have the traditional hooded appearance, make the hood after completing the handle round and before working the final edging round.
Place stitch markers along the head end of the basket to show where you want the hood to begin and end.
Hood Row 1
Join a new length of cord at the first marker.
Work waistcoat stitch across to the second marker.
Fasten off.
Hood Row 2
Begin approximately 2 stitches before the beginning of the previous row.
Work across the previous hood section and continue approximately 2 stitches beyond its opposite end.
Fasten off.
Following Hood Rows
Repeat this widening method for approximately 3–4 rows, beginning each new row slightly farther out than the row before it.
This gradual expansion creates the curved hood shape.
Once you are happy with the size and shape of the hood, work the final basket edging round all the way around. This joins and secures the hood sections into the upper edge of the basket.
Joining a New Bundle of Cord
If you run out of cord while crocheting the basket, position the beginning of the new cord alongside the end of the old one.
Crochet over both ends together for several stitches until they are firmly secured, then trim the excess from the old cord.
This keeps the join hidden inside the dense basket fabric.
Beginner Tips
Count your stitches regularly, especially during the first few rounds. The shape of the basket depends heavily on keeping the foundation even.
The waistcoat stitch can also feel quite tight when worked with thick cord. If you are struggling to insert the hook into the center of the “V,” loosen your tension just slightly rather than forcing the hook through every stitch.
Before making the handles, place the basket on a flat surface and look at it from both ends. Taking an extra minute to center the markers will help the finished handles look much more balanced.
And if this is your first large basket project, I would make the basic version without the hood first. The basket itself follows a very repetitive construction once the foundation is finished, while the hood requires a little more judgment when shaping the short rows.