Crochet Flame Bucket Hat Pattern

Written byGRANDMASCRAFT in

Welcome to Grandma’s Crafts! Today we are sharing a fun and colorful Crochet Flame Bucket Hat Pattern, perfect for anyone who loves bold handmade accessories. The classic bucket hat shape gets a completely different personality with bright flames worked around the sides, creating a design that feels playful, modern, and full of character.

One of the best things about this project is how easy it is to customize. A black background with red, orange, and yellow flames creates the traditional fire effect, but you can completely change the look by choosing your own color combination. Pink and purple flames, blue and green tones, or even pastel shades can turn the same pattern into something totally different.
The hat is worked from the top down, beginning with a simple circular crown. Once the top reaches the correct size, the increases stop and the sides are worked straight to create the familiar bucket hat shape.

Crochet Flame Design

The most eye-catching part of this hat is, of course, the flame section.

The flames are created using tapestry crochet, changing between the background and flame colors while carrying the unused yarn inside the stitches. This makes it possible to create the design without cutting and joining yarn constantly.

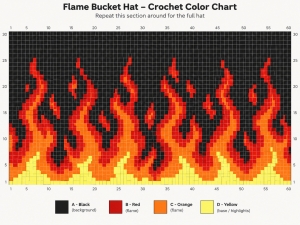
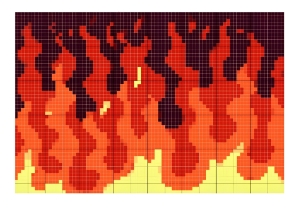
Our flame chart uses black, red, orange, and yellow, with the colors gradually building from the bottom of the design toward the pointed flames above.

GRAPH

The chart can be repeated around the hat, allowing the flame design to continue across the entire circumference instead of appearing only on one side.

Beginner-Friendly Construction

Even though the finished design looks detailed, the basic construction is quite approachable.

The crown is created with simple single crochet increases, followed by straight rounds for the sides. The main challenge is keeping track of the color changes in the flame section, so using the chart row by row makes the process much easier.

A stitch marker can also be very helpful for keeping track of the beginning of each round.

Materials

For this project, you will need:

  • Medium-weight cotton or cotton-blend yarn
  • Black yarn for the background
  • Red yarn
  • Orange yarn
  • Yellow yarn
  • 4 mm crochet hook
  • Yarn needle
  • Scissors
  • Stitch marker

Cotton yarn works especially well for bucket hats because it gives the finished piece enough structure while still remaining comfortable to wear.

Crochet Flame Bucket Hat Pattern

The full pattern includes the crown, side shaping, flame colorwork, brim construction, and finishing instructions.

Follow the flame chart carefully as you work around the sides, and remember that each square represents one crochet stitch.

Creating the Bucket Hat Shape

After completing the crown, one round can be worked through the back loops only to create a subtle ridge and help the sides turn downward.

The sides are then worked without increases until the desired depth is reached.

Once the flame section is complete, increases are introduced again to create the brim. Spacing these increases gradually helps the brim flare outward without becoming overly ruffled.

Choosing Your Flame Colors

Traditional fire colors are always a great option, but this pattern can easily be adapted to match your own style.

Try black with hot pink and purple flames for a more playful look, cream with muted orange and brown for something softer, or dark blue with turquoise and green flames for a completely unexpected version.

Using three shades within the flames also creates more depth than working the design in just one contrasting color.

Adjusting the Size

Because the hat begins with a circular crown, the size can be adjusted before beginning the sides.

For a larger hat, continue increasing until the crown reaches the diameter needed for the desired head circumference. For a smaller version, stop the increases earlier.

It is always helpful to check the fit before beginning the flame section, especially if you are making the hat for someone else.

A Fun Crochet Accessory

This Crochet Flame Bucket Hat is a great project for festivals, summer outfits, casual looks, handmade gifts, or anyone who enjoys crochet pieces that stand out.

It is also a fun way to practice tapestry crochet on a relatively small project before moving on to larger colorwork designs such as bags, sweaters, or blankets.

Once you understand the basic construction, you can use the same bucket hat shape with many other charts and colorwork ideas.

Finished size: Adult Medium, approximately 22–22.5 in / 56–57 cm head circumference
Top diameter: approximately 7 in / 18 cm
Finished brim diameter: approximately 10.5–11 in / 27–28 cm

Materials
Yarn #4 worsted-weight cotton or cotton blend
Color A Black, approx. 120 yd
Color B Red, orange, or another flame color, approx. 100 yd
Hook 4 mm (G/6)
Other Yarn needle, scissors, stitch marker

Gauge: approximately 16 sc × 17 rounds = 4 in / 10 cm.

Abbreviations: ch = chain, sc = single crochet, inc = 2 sc in same stitch, sl st = slip stitch, BLO = back loop only.

The hat is worked from the top down in joined rounds. Ch 1 at the beginning of a round does not count as a stitch.

Top of the Hat

With Color A, make a magic ring.

Round 1: Work 6 sc into the magic ring. Join. (6)
Round 2: Inc in every stitch around. (12)
Round 3: (1 sc, inc) around. (18)
Round 4: (2 sc, inc) around. (24)
Round 5: (3 sc, inc) around. (30)
Round 6: (4 sc, inc) around. (36)
Round 7: (5 sc, inc) around. (42)
Round 8: (6 sc, inc) around. (48)
Round 9: (7 sc, inc) around. (54)
Round 10: (8 sc, inc) around. (60)
Round 11: (9 sc, inc) around. (66)
Round 12: (10 sc, inc) around. (72)
Round 13: (11 sc, inc) around. (78)
Round 14: (12 sc, inc) around. (84)
Round 15: (13 sc, inc) around. (90)

At this point, the circle should measure approximately 7 inches across.

Shape the Sides

Round 16: Working in BLO, sc in each stitch around. (90)

This creates the small ridge that helps the flat crown turn downward into the sides of the bucket hat.

Rounds 17–18: Sc in each stitch around with Color A. (90)

Flame Section

Now begin the tapestry crochet section.

Each line below represents 18 stitches. Repeat each 18-stitch section 5 times around to make 90 stitches total.

. = Color A / black
X = Color B / flame color

Round 19 is closest to the top of the hat; Round 30 is closest to the brim.

R19   ........XX........
R20   .......XXXX.......
R21   ......XXXXX..X....
R22   .....XXXXXX.XX....
R23   ....XXXXXXXXXX....
R24   ...XXXXX.XXXXXX...
R25   ..XXXX...XXXXXXX..
R26   .XXXXX..XXXXXXXXX.
R27   XXXXXX.XXXXXXXXXXX
R28   XXXXXXXXXXXXXXXXXX
R29   XXXXXXXXXXXXXXXXXX
R30   XXXXXXXXXXXXXXXXXX

Repeat each line 5 times before joining the round.

When changing colors, begin the final sc before the color change normally, but complete the final yarn-over with the new color. Carry the unused yarn inside the stitches so you do not have to cut the yarn at every flame.

That gives us actual flames rising upward into the black portion instead of just random color blocks.

Crochet the Brim

Continue with Color B.

Round 31: (5 sc, inc) around. (105)

Rounds 32–33: Sc in each stitch around. (105)

Round 34: (6 sc, inc) around. (120)

Rounds 35–36: Sc in each stitch around. (120)

Round 37: (7 sc, inc) around. (135)

Rounds 38–39: Sc in each stitch around. (135)

For a slightly shorter brim, simply stop after Round 38.

Finishing Edge

Round 40: Work reverse single crochet (crab stitch) evenly around the entire brim.

Fasten off and weave in all ends.

Gently shape the hat with your hands. If using cotton yarn, light blocking can help the brim lie flatter.

VIDEO TUTORIAL

We hope you enjoy making this colorful Crochet Flame Bucket Hat Pattern and experimenting with your own flame combinations. It is one of those projects that looks impressive when finished but is built from simple techniques worked one step at a time.

Thank you so much for visiting Grandma’s Crafts! We are always sharing new crochet patterns, handmade projects, and creative ideas, so come back often for more inspiration.

You Are Here: