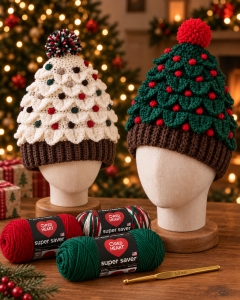
Welcome to Grandma’s Crafts! I’m so happy to have you here today. If you enjoy cozy crochet projects with a little bit of personality, especially the fun ones we get to bring out around the holidays, I think you are going to love this Christmas Tree Hat.
The first thing that caught my attention was the shape. It really does look like a little Christmas tree, with a brown ribbed band at the bottom, textured green layers, colorful ornaments, and a cute topper right at the top. It is playful, festive, and definitely one of those projects people will notice as soon as you put it on.
And you know how Christmas crochet goes. We always think we already have enough holiday projects, and then another cute pattern appears and somehow ends up on the list. I can already imagine this one being worn on Christmas morning, during a family gathering, for holiday photos, or even just around the house while everyone is getting ready for the celebrations.
One of the details that makes this hat so special is the texture. The tree is built with crocodile stitches, which create those overlapping layers that look surprisingly similar to little branches. As the hat gets closer to the top, the pattern also introduces a modified crocodile stitch using half double crochet, helping the shape become smaller and more tapered.
Then come the little puff stitch ornaments, and honestly, this is probably where you can have the most fun with the colors. You can keep everything traditional with red, gold, white, and green, or use whatever scraps you already have in your yarn basket. The pattern allows one or more colors for these ornament details, so every hat can easily look a little different.
The pattern is written for an adult size and uses size 4 worsted weight yarn with a 5.0 mm crochet hook. There is also a simple option for making a larger adult size by switching to a 5.5 mm hook. The stitch count is based on multiples of six, which is also helpful if you ever want to experiment with the sizing later.
I would say this is a project to enjoy slowly rather than rush through. The crocodile stitches, puff stitches, color changes, and shaping give you a little more to pay attention to than a basic hat, but once the rhythm starts repeating, everything begins to make much more sense. Keeping an eye on the stitch counts after each shaping round will make the process much easier too.
Another thing I like is that the top does not have to look exactly the same every time you make it. You can finish your tree with a pom-pom, a crocheted star, a snowflake, or another small holiday motif you already love. I think a little star would be adorable for a classic Christmas tree look, but a fluffy pom-pom would make it feel extra cozy.
This would also be such a fun handmade gift for someone who really gets into Christmas. You could make one for a friend, a family member, or even a few matching ones if your family enjoys taking those slightly silly holiday photos every year. And because the ornament colors are so easy to personalize, you can make each hat suit the person who will be wearing it.
This festive Christmas Tree Hat is worked from the bottom up, beginning with a ribbed brown band that resembles the trunk of a Christmas tree. Layers of crocodile stitches create the textured branches, while colorful puff stitches look like tiny ornaments scattered throughout the tree.
The pattern is written for an adult size and can be adjusted by changing the hook size, yarn weight, or stitch count while keeping the stitch count in multiples of 6.
Skill Level
Intermediate to Advanced
Finished Size
Adult
For a slightly larger adult size, use a 5.5 mm crochet hook instead of a 5.0 mm hook.
Materials
Size 4 worsted weight yarn
Brown yarn for the ribbed hat band
Green yarn for the tree
One or more colors for the ornaments
5.0 mm crochet hook
5.5 mm crochet hook for Adult Large
Yarn needle
Scissors
Stitch markers
Abbreviations
ch = chain sc = single crochet sc2tog = single crochet 2 together hdc = half double crochet hdc2tog = half double crochet 2 together dc = double crochet sl st = slip stitch st(s) = stitch(es) BLO = back loop only sk = skip rnd = round RS = right side WS = wrong side PS = puff stitch CS = crocodile stitch MCS = modified crocodile stitch
Special Stitches
Puff Stitch
Yarn over, insert hook into the indicated stitch and pull up a loop. Repeat this process 5 times.
Yarn over and pull through all loops on the hook.
Close the puff with a slip stitch.
When working the ornament rounds, close the puff with the main tree color.
V-Stitch
Work 2 dc into the same stitch.
Crocodile Stitch
Work 5 dc down the first post of the V-stitch, ch 2, then work 5 dc up the second post of the same V-stitch.
Modified Crocodile Stitch
Work 5 hdc down the first post of the V-stitch, ch 2, then work 5 hdc up the second post of the same V-stitch.
Pattern Notes
Do not turn your work unless the pattern specifically instructs you to do so.
Most rounds are worked with the RS facing.
The hdc and puff stitch rounds are worked with the WS facing.
During the ornament rounds, carry the ornament color underneath the stitches.
When looking at the top of a puff stitch, it may appear that there are two stitches. Only the loop directly on top of the puff is considered the actual stitch.
Always close each puff stitch using the main tree color.
The decreases are worked during the V-stitch rounds. Some of these V-stitches may appear wider while you are working them, but the following sc rounds help bring the shaping together evenly.
PATTERN
Ribbed Hat Band
Using brown yarn:
Foundation
Ch 11.
Row 1
Sk first ch.
Sc in 2nd ch from hook and in each ch across.
10 sc
Ch 1, turn.
Row 2
Sc in BLO of each stitch across.
10 sc
Ch 1, turn.
Rows 3–66
Repeat Row 2.
Bring the short ends of the ribbing together, making sure the band is not twisted.
Sl st Row 66 to the beginning foundation edge.
Turn the band RS out.
Working along the upper edge of the ribbing:
Ch 1.
Work 1 sc into the end of each row around.
Join with sl st to first sc.
66 sc
Fasten off.
Hat Body
Join green yarn to any sc along the upper edge of the ribbing with RS facing.
Round 1
Sc in each sc around.
Join with sl st to first sc.
66 sc
Round 2
Ch 3, dc in same st.
First V-stitch made.
Ch 2, sk next 2 sc.
V-stitch in next sc, ch 2, sk next 2 sc.
Repeat from * to * around.
Join with sl st to top of beginning ch-3.
22 V-stitches and 22 ch-2 spaces
Round 3
Ch 1.
Work CS around first V-stitch.
Ch 1.
Sk next V-stitch, work CS around next V-stitch, ch 1.
Repeat from * to * around.
Sk final V-stitch.
Join with sl st to first dc of first CS.
11 CS and 11 ch-1 spaces
Round 4
Ch 1.
Repeat the following sequence around:
Work 2 sc into the ch-2 space two rounds below, behind the first side of the CS.
Sc in the eye of the CS.
Work 2 sc into the next ch-2 space two rounds below, behind the second side of the CS.
Sc in the center of the next V-stitch two rounds below, working around the ch-1 from the previous round to anchor it.
Join with sl st to first sc.
66 sc
Ch 1, turn.
Round 5
With WS facing:
Hdc in same st as join.
Hdc in next 3 sc, changing to ornament color at the end of the third hdc.
PS in next sc, closing the puff with green.
Hdc in next 5 sc, changing to ornament color at the end of the fifth hdc. PS in next sc, closing the puff with green.
Repeat around until 1 sc remains.
Hdc in final sc.
Join with sl st to first hdc.
Fasten off ornament color.
55 hdc and 11 PS
Ch 1, turn.
Round 6
With RS facing, sl st across to first PS.
Ch 3, dc in same PS.
First V-stitch made.
Ch 2, sk next 2 hdc.
V-stitch in next hdc.
Ch 2, sk next 2 hdc.
Repeat the following sequence 3 times:
V-stitch in next PS, ch 2, sk next 2 hdc, V-stitch in next hdc, ch 2, sk next 2 hdc.
V-stitch in next PS.
Ch 2.
Decrease
Sk next 2 hdc.
Dc in next hdc.
Sk next 2 hdc.
Dc in next PS.
Ch 2.
Sk next 2 hdc.
Dc in next hdc.
Sk next 2 hdc.
Dc in next PS.
Decrease completed.
Ch 2, sk next 2 hdc.
V-stitch in next hdc.
Ch 2, sk next 2 hdc.
Repeat the following sequence 4 times:
V-stitch in next PS, ch 2, sk next 2 hdc, V-stitch in next hdc, ch 2.
Join with sl st to top of beginning ch-3.
20 V-stitches and 20 ch-2 spaces
Round 7
Sl st into next dc of first V-stitch.
Ch 1.
Work CS around next V-stitch, ch 1, sk next V-stitch.
Repeat around.
Join with sl st to first dc of first CS.
10 CS and 10 ch-1 spaces
Round 8
Repeat Round 4.
60 sc
Round 9
With WS facing, repeat Round 5.
50 hdc and 10 PS
Round 10
With RS facing, sl st across to first PS.
Ch 3, dc in same PS.
First V-stitch made.
Ch 2, sk next 2 hdc.
V-stitch in next hdc.
Ch 2, sk next 2 hdc.
Repeat the following sequence 6 times:
V-stitch in next PS, ch 2, sk next 2 hdc, V-stitch in next hdc, ch 2, sk next 2 hdc.
V-stitch in next PS.
Ch 2.
Decrease
Sk next 2 hdc.
Dc in next hdc.
Sk next 2 hdc.
Dc in next PS.
Ch 2.
Sk next 2 hdc.
Dc in next hdc.
Sk next 2 hdc.
Dc in next PS.
Decrease completed.
Ch 2, sk next 2 hdc.
V-stitch in next hdc.
Ch 2, sk next 2 hdc.
Join with sl st to top of beginning ch-3.
18 V-stitches and 18 ch-2 spaces
Round 11
Repeat Round 7.
9 CS and 9 ch-1 spaces
Round 12
Repeat Round 4.
54 sc
Round 13
With WS facing, repeat Round 5.
45 hdc and 9 PS
Round 14
With RS facing, sl st across to first PS.
Ch 3, dc in same PS.
First V-stitch made.
Ch 2, sk next 2 hdc.
V-stitch in next hdc.
Ch 2, sk next 2 hdc.
V-stitch in next PS.
Ch 2.
Decrease
Sk next 2 hdc.
Dc in next hdc.
Sk next 2 hdc.
Dc in next PS.
Ch 2.
Sk next 2 hdc.
Dc in next hdc.
Sk next 2 hdc.
Dc in next PS.
Decrease completed.
Ch 2, sk next 2 hdc.
V-stitch in next hdc.
Ch 2, sk next 2 hdc.
Repeat the following sequence 5 times:
V-stitch in next PS, ch 2, sk next 2 hdc, V-stitch in next hdc, ch 2.
Join with sl st to top of beginning ch-3.
16 V-stitches and 16 ch-2 spaces
Round 15
Repeat Round 7.
8 CS and 8 ch-1 spaces
Round 16
Repeat Round 4.
48 sc
Round 17
With WS facing:
Hdc in next sc.
Hdc2tog over next 2 sc, changing to ornament color.
PS in next sc, closing the puff with green.
Repeat the following around:
Hdc2tog over next 2 sc, hdc in next sc, hdc2tog over next 2 sc while changing to ornament color, PS in next sc, closing the puff with green.
When 2 sc remain, hdc2tog over final 2 sc.
Join with sl st to first hdc.
Fasten off ornament color.
24 hdc and 8 PS
Ch 1, turn.
Round 18
With RS facing, sl st across to first PS.
Ch 3, dc in same PS.
First V-stitch made.
Repeat the following sequence 3 times:
Ch 1, sk next hdc, V-stitch in next hdc, ch 1, sk next hdc, V-stitch in next PS.
Decrease
Ch 1.
Sk next hdc.
Dc in center hdc.
Sk next hdc.
Dc in next PS.
Ch 1.
Sk next hdc.
Dc in center hdc.
Sk next hdc.
Dc in next PS.
Decrease completed.
Repeat the following sequence 2 times:
Ch 1, sk next hdc, V-stitch in next hdc, ch 1, sk next hdc, V-stitch in next PS.
Ch 1.
Sk next hdc.
V-stitch in next hdc.
Ch 1.
Sk final hdc.
Join with sl st to top of beginning ch-3.
14 V-stitches and 14 ch-1 spaces
Round 19
Sl st into next dc.
Ch 1.
Work MCS around next V-stitch, ch 1, sk next V-stitch.
Repeat around.
Join with sl st to first MCS.
7 MCS and 7 ch-1 spaces
Round 20
Ch 1.
Repeat the following sequence around:
Sc in ch-1 space two rounds below, behind the first side of the MCS.
Sc in the eye of the MCS.
Sc in next ch-1 space two rounds below, behind the second side of the MCS.
Sc in the center of the next V-stitch two rounds below, working around the previous ch-1 to anchor it.
Join with sl st to first sc.
28 sc
Ch 1, turn.
Round 21
With WS facing:
Hdc in same sc as join.
Hdc in next 2 sc, changing to ornament color at the end of the third hdc.
PS in next sc, closing the puff with green.
Repeat around:
Hdc in next 3 sc, changing to ornament color at the end of the third hdc. PS in next sc, closing the puff with green.
Join with sl st to first hdc.
Fasten off ornament color.
21 hdc and 7 PS
Ch 1, turn.
Crown Shaping
From this point on, work in continuous rounds.
Do not join the rounds with a slip stitch.
Place a stitch marker in the first stitch of each round and move it up as you work.
Round 22
With RS facing, sc in each stitch around.
28 sc
Round 23
Sc in first 2 sc.
Sc2tog.
Sc in next 2 sc, sc2tog.
Repeat around.
21 sc
Round 24
Sc in each sc around.
21 sc
Round 25
Sc in next sc, sc2tog.
Repeat around.
14 sc
Round 26
Sc in each sc around.
14 sc
Round 27
Sc2tog around.
7 sc
Round 28
Sc in each sc around.
7 sc
Fasten off, leaving a long tail.
Finishing
Thread the remaining yarn tail through the stitches of the final round.
Pull firmly to close the top of the hat.
Secure the yarn and weave in the end.
Turn the hat inside out and weave in all remaining loose ends.
Finish the top with your favorite Christmas tree topper. A pom-pom, crocheted star, snowflake, or another small holiday motif works beautifully.
VIDEO TUTORIAL
ANOTHER OPTION
So grab your green yarn, choose a few cheerful colors for the ornaments, and enjoy watching your little Christmas tree grow as you crochet. This is exactly the kind of project that adds a bit of fun to the season, and I think it would be difficult to make just one.
I hope you enjoy making this Crochet Christmas Tree Hat and adding your own little touches along the way. And as always, I’m so glad you stopped by Grandma’s Crafts today. Save the pattern for your Christmas crochet list, and come back soon because there is always another cozy project waiting for us here.