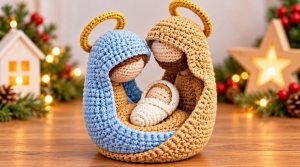
Welcome, dear friends of Grandma’s Crafts! There’s something special about settling down with a crochet hook, a few favorite yarns, and a Christmas project made with love. Today, we’re sharing a crochet Holy Family nativity scene featuring Mary, Joseph, and Baby Jesus. It’s a lovely way to bring the meaning of Christmas into your home. Whether you’re making it for your own holiday table or as a heartfelt gift, we hope you enjoy creating a keepsake that your family will look forward to bringing out each year. Gather your supplies, make yourself comfortable, and let’s enjoy a little crochet time together!
A crochet Holy Family nativity scene is a meaningful way to bring handmade charm into your Christmas decorations. Featuring Mary, Joseph, and Baby Jesus, this project combines the softness of yarn with a familiar scene of love, faith, and family.
Each handmade detail gives the arrangement its own character. A softly draped veil, a neatly embroidered beard, and a tiny blanket can turn simple crocheted shapes into a Christmas keepsake.
Whether you are making a decoration for your home or a gift for someone you love, take your time with the individual pieces and enjoy watching the scene come together.
Materials to Prepare Before You Begin
Gather your supplies before starting the video tutorial. Smooth yarn makes stitches easier to see, which is especially helpful when working on small amigurumi pieces.
Choose yarns of similar weight to keep the figures and clothing in proportion. Blue, cream, beige, and brown create a traditional palette, while muted shades give the arrangement a softer appearance.
You will generally need:
Yarn for the skin tones, clothing, head coverings, and blanket.
A crochet hook appropriate for your chosen yarn.
Polyester stuffing.
A tapestry needle.
Scissors.
Stitch markers.
Pins to hold the pieces in place during assembly.
Follow the video’s material recommendations when recreating its specific design. Yarn thickness, hook size, and your personal tension will affect the finished dimensions.
Crochet Techniques Used in Nativity Figures
Small crochet figures commonly use single crochet stitches, increases, and decreases to create rounded heads and shaped bodies. Many components are worked in continuous rounds.
Mark the beginning of each round and count your stitches regularly. This helps you notice mistakes before they change the shape of a piece.
Add stuffing gradually, distributing it evenly. Too much stuffing can stretch the fabric and expose gaps, while too little may leave the figures without enough support.
Sewing is another important part of the project. Before attaching a head, veil, or blanket permanently, pin it in place and examine the figure from several angles.
Watch the Crochet Holy Family Video Tutorial
Use the video below to follow the construction and assembly at your own pace. Pause whenever you need more time to complete a round, check a stitch count, or position a piece.
For readers who prefer english, turn on english subtitles in the YouTube player when available.
Follow the instructions below the video to select the language or use automatic translation.
You can switch the video’s audio to English dubbing, if available, by opening Settings in the bottom-right corner of the video and selecting Audio track → English.
How to Enable English Subtitles on YouTube
On a computer:
Start the video and click CC to turn on captions.
Click the Settings gear icon.
Select Subtitles/CC.
Choose English if it appears in the list.
If English is not listed, select Auto-translate, then choose English.
On a phone or tablet:
Open the video in the YouTube app.
Tap the video to display the controls, then tap CC to enable captions.
Open Settings and select Captions.
Choose English, or use Auto-translate → English if that option is available.
The available options depend on the video and your device. If you cannot find the language controls in the embedded player, open the video directly on YouTube. Videos without captions may not offer subtitle translation.
Automatically translated captions can occasionally misinterpret crochet terms. Watch the instructor’s hands and check the demonstrated stitch counts alongside the subtitles.
Crochet Holy Family Nativity Scene: Written Tutorial
Dear friends of Grandma’s Crafts, let’s bring this little Christmas scene to life, one stitch at a time. Keep your yarn and stitch marker nearby, make yourself comfortable, and enjoy creating Mary, Joseph, and Baby Jesus with the help of the video demonstrations.
This design begins with circular foundations that extend upward to support the adult figures. The heads and mantles are crocheted separately, and the foundations overlap to create a resting place for Baby Jesus.
Use these written instructions alongside the original creator’s videos, especially when shaping the upright sections and attaching the finished pieces.
US Crochet Abbreviations
MR: magic ring.
ch: chain.
sc: single crochet.
hdc: half double crochet.
inc: work 2 single crochet stitches in the same stitch.
dec: decrease 2 stitches into 1.
FLO: front loop only.
BLO: back loop only.
st/sts: stitch or stitches.
Numbers in parentheses indicate the completed stitch count.
Instructions in brackets are repeated as stated. For example, [2 sc, inc] x 6 means single crochet in each of the next 2 stitches, then increase in the next stitch. Repeat this sequence six times.
If you are following the Spanish captions, pb means single crochet, aum means increase, dism means decrease, cad means chain, and giro means turn.
1. Joseph’s Foundation
Use your chosen neutral yarn.
Round 1: Work 6 sc in a MR. (6)
Round 2: Inc in every stitch around. (12)
Round 3: [1 sc, inc] x 6. (18)
Round 4: [2 sc, inc] x 6. (24)
Round 5: [3 sc, inc] x 6. (30)
Round 6: [4 sc, inc] x 6. (36)
Round 7: [5 sc, inc] x 6. (42)
Round 8: [6 sc, inc] x 6. (48)
Round 9: [7 sc, inc] x 6. (54)
Round 10: [8 sc, inc] x 6. (60)
Round 11: Sc in FLO around. (60)
Joseph’s Upright Section
Begin working back and forth over part of the foundation.
Row 12: Work 30 sc in BLO. (30)
Rows 13 to 17: Ch 1, turn, and work 30 sc. (30 per row)
The upright section now narrows by leaving stitches unworked at the edges. On each shaping row, turn, begin in the second stitch, work the stated number of single crochet stitches, and leave the final stitch unworked.
Use the following shaping counts alongside the video:
Shaping row
Completed stitch count
18
28
20
26
22
24
24
22
26
20
28
18
30
16
32
14
33
12
34
10
35
8
36
6
Follow the video for the intervening plain rows and turning chains. The visible instructions show 26 sc for Row 21, 22 sc for Row 25, 20 sc for Row 27, and 18 sc for Row 29.
Rows 37 to 39: Work 6 sc per row. (6)
Finish this section as demonstrated in the video.
Leaving the edge stitches unworked creates the tapered shape. These shaping steps are different from working two stitches together.
2. Mary’s Foundation
Use light blue yarn.
Round 1: Work 6 sc in a MR. (6)
Round 2: Inc in every stitch around. (12)
Round 3: [1 sc, inc] x 6. (18)
Round 4: [2 sc, inc] x 6. (24)
Round 5: [3 sc, inc] x 6. (30)
Round 6: [4 sc, inc] x 6. (36)
Round 7: [5 sc, inc] x 6. (42)
Round 8: [6 sc, inc] x 6. (48)
Round 9: [7 sc, inc] x 6. (54)
Round 10: [8 sc, inc] x 6. (60)
Round 11: Sc in BLO around. (60)
Rounds 12 to 15: Sc in every stitch around. (60 per round)
Mary’s Upright Section
Row 16: Ch 1, turn, and work 20 sc. (20)
Row 17: Shape the row to 18 sc, following the starting and ending placement demonstrated in the video. (18)
For Rows 18 to 23, turn, begin in the second stitch, work the stated number of single crochet stitches, and leave the final stitch unworked.
Row 18: Work 16 sc. (16)
Row 19: Work 14 sc. (14)
Row 20: Work 12 sc. (12)
Row 21: Work 10 sc. (10)
Row 22: Work 8 sc. (8)
Row 23: Work 6 sc. (6)
Rows 24 to 26: Work 6 sc per row. (6)
Follow the video for the turning method and final fastening off.
3. Heads for Mary and Joseph
Make two heads using your chosen skin-tone yarn.
Round 1: Work 6 sc in a MR. (6)
Round 2: Inc around. (12)
Round 3: [1 sc, inc] x 6. (18)
Round 4: [2 sc, inc] x 6. (24)
Round 5: [3 sc, inc] x 6. (30)
Round 6: [4 sc, inc] x 6. (36)
Rounds 7 to 11: Sc around. (36 per round)
Round 12: [4 sc, dec] x 6. (30)
Round 13: [3 sc, dec] x 6. (24)
Round 14: [2 sc, dec] x 6. (18)
Round 15: [1 sc, dec] x 6. (12)
Round 16: Dec x 6. (6)
Add stuffing before the opening becomes too small, distributing it evenly to keep the head rounded. Avoid overstuffing, which can stretch the fabric and expose gaps.
Close the remaining opening with a yarn needle and secure the yarn end.
The reference figures have simple faces without embroidered features, allowing their gentle poses and clothing to define the scene.
4. Joseph’s Mantle
Use the neutral yarn chosen for Joseph’s head covering.
Rounded Hood
Round 1: Work 6 sc in a MR. (6)
Round 2: Inc around. (12)
Round 3: [1 sc, inc] x 6. (18)
Round 4: [2 sc, inc] x 6. (24)
Round 5: [3 sc, inc] x 6. (30)
Round 6: [4 sc, inc] x 6. (36)
Round 7: [5 sc, inc] x 6. (42)
Rounds 8 to 10: Sc around. (42 per round)
Flat Extension
Row 11: Ch 1, turn, and work 20 sc. (20)
Rows 12 to 17: Ch 1, turn, and work 20 sc. (20 per row)
Complete the finishing shown in the video.
Fit the rounded section over Joseph’s head, allowing the flat extension to hang behind it. Check the placement before attaching the pieces permanently.
5. Mary’s Mantle
Use light blue yarn.
Rounded Hood
Round 1: Work 6 sc in a MR. (6)
Round 2: Inc around. (12)
Round 3: [1 sc, inc] x 6. (18)
Round 4: [2 sc, inc] x 6. (24)
Round 5: [3 sc, inc] x 6. (30)
Round 6: [4 sc, inc] x 6. (36)
Round 7: [5 sc, inc] x 6. (42)
Continue the rounded hood through Round 10 as demonstrated in the video, then begin the flat extension below.
Widening Flat Extension
Row 11: Turn, ch 1, and work 16 sc. (16)
Row 12: Turn, ch 1, inc, 14 sc, inc. (18)
Row 13: Ch 1, turn, and sc across. (18)
Row 14: Turn, ch 1, inc, 16 sc, inc. (20)
Row 15: Turn, ch 1, and sc across. (20)
Row 16: Turn, ch 1, inc, 18 sc, inc. (22)
Row 17: Turn, ch 1, and sc across. (22)
Row 18: Turn, ch 1, inc, 20 sc, inc. (24)
Row 19: Turn, ch 1, and sc across. (24)
Row 20: Turn, ch 1, inc, 22 sc, inc. (26)
Row 21: Turn, ch 1, and sc across. (26)
Row 22: Turn, ch 1, inc, 24 sc, inc. (28)
Row 23: Turn, ch 1, and sc across. (28)
Row 24: Turn, ch 1, inc, 26 sc, inc. (30)
Row 25: Turn, ch 1, and sc across. (30)
Complete the edging and fastening off as shown in the video.
The increases gradually widen the mantle beneath the hood. When positioned on the figure, this section drapes down behind Mary’s head and around the upright support.
6. Baby Jesus: Head
Use skin-tone yarn.
Round 1: Work 7 sc in a MR. (7)
Round 2: Inc x 7. (14)
Rounds 3 to 6: Sc around. (14 per round)
Follow the video demonstration for the final decrease round, stuffing, and closure. Watch the instructor’s stitches closely during this small finishing section.
Shape the head gently with your fingers so it sits comfortably inside the hood.
7. Baby Jesus: Body
Use white or cream yarn.
Round 1: Work 6 sc in a MR. (6)
Round 2: Inc x 6. (12)
Round 3: [5 sc, inc] x 2. (14)
Rounds 4 to 7: Sc around. (14 per round)
Step 8: Ch 1 and work 8 hdc in FLO.
This step works over only part of the opening. Follow the video for handling the remaining stitches and completing the upper edge.
Add fiberfill as demonstrated, keeping the body softly shaped. Complete the remaining finishing before joining it to the head and hood.
8. Baby Jesus: Hood
Use white or cream yarn.
Round 1: Work 6 sc in a MR. (6)
Round 2: Inc x 6. (12)
Round 3: [1 sc, inc] x 6. (18)
Rounds 4 to 6: Sc around. (18 per round)
Row 7: Ch 1, turn, and work 10 sc. (10)
Follow the video for the remaining hood finishing and the order of joining the baby’s pieces.
Position the hood so it frames the face without covering it. The finished baby should have a compact shape that rests comfortably between Mary and Joseph.
9. Assembling the Holy Family
Arrange the completed pieces together before attaching them. This gives you time to adjust the spacing and angles.
Fit Mary’s head beneath the blue mantle and Joseph’s head beneath the neutral mantle. Compare their positions with the video, keeping the faces visible beneath the front edges of the coverings.
Position the heads on the narrow upright sections and follow the demonstrated attachment method. The reference uses adhesive during assembly, so watch the video for the exact contact points and order of fixing the pieces.
Overlap the circular foundations to form the shared arrangement. Place Baby Jesus on the upper foundation between the adult figures.
Check the scene from the front and both sides. The heads lean toward the center, directing attention toward the baby. Adjust the mantles so they fall naturally without hiding the faces.
Once the placement matches the demonstration, secure the pieces using the method shown. Allow any adhesive to set according to its product instructions before moving the arrangement.
10. Golden Halos: Two Finishing Options
Option One: Ready-Made Gold Rings
The main tutorial uses gold-colored rings as halos.
Choose rings that suit the proportions of your finished figures. Test their position above or behind the head coverings before attaching them.
Follow the video for placement and attachment. The demonstration shows hot glue being applied to a ring before it is fixed in position.
Keep the attachment discreet so the circular shape remains clearly visible.
Option Two: A Ring Covered with Gold Thread
For a textured finish, use a ring covered with gold thread, following the additional demonstration.
The ring shown in that reference measures 3 cm. Check this size against your completed figure before choosing it, since the example comes from a separate project.
Attach the gold thread and work the covering stitches around the ring itself, following the stitch demonstrated in the video. Continue until the surface is concealed.
Keep the stitches close together and distribute them evenly. The number needed depends on the thread thickness, ring size, and your tension.
The demonstration introduces a wire attachment near the finishing point and twists the ends together. Follow the video closely for this step and for fixing the halo to the figure. Keep the wire ends contained within the finished decoration.
11. Optional Decorative Stand
The finished reference shows the Holy Family on a separate stand with a gold-colored arch and star.
You can use a similar display accessory if it fits your arrangement. Check that the stand supports the foundations without squeezing or distorting them.
Position the figures so the arch frames the scene and all three faces remain visible.
Finishing Your Handmade Nativity
Give the completed scene a final check from every side. Tuck away loose yarn ends, adjust the mantles gently, and make sure the attached pieces are secure.
Mary’s blue covering should frame her face, Joseph’s mantle should rest comfortably over his head, and Baby Jesus should remain visible between them.
Take a moment to enjoy seeing your little Christmas scene complete. We hope the time spent making it brings you as much happiness as displaying it in your home each year.
Personalizing Your Handmade Christmas Decoration
Color is an easy way to make the project your own. Choose shades that suit your Christmas decorations or the preferences of the person receiving the gift.
You can also vary the amount of detail. Simple faces create a quiet, understated appearance, while embroidered features give each figure a more individual expression.
If you decide to expand the scene later, use similar yarn weights and proportions for additional characters. This helps the growing collection feel connected.
Displaying and Storing Your Finished Nativity
Display your crochet Holy Family on a shelf, mantel, or small table where the details can be appreciated. A wooden tray or simple fabric backdrop can help frame the arrangement.
Keep the yarn away from candles and direct heat. When cleaning is necessary, follow the yarn manufacturer’s care instructions and take any internal supports or embellishments into account.
After Christmas, store the pieces in a clean, dry container without heavy decorations pressing against them. Allow enough room to protect the shape of the heads, clothing, and accessories.
Your finished nativity carries the time and care you put into every stitch. Displayed each December, it can become a familiar and treasured part of your family’s Christmas traditions.