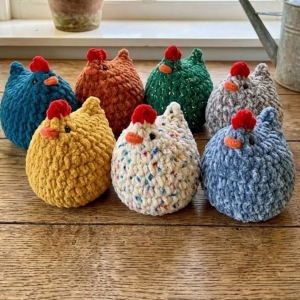
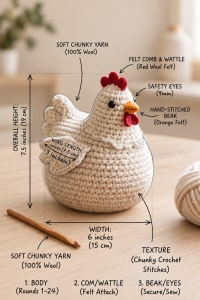
There’s something especially charming about handmade farm animals, and this Crochet Chicken Pattern has exactly that cozy, playful feel. With its rounded body, little wings, bright comb, tiny beak, and soft sculpted shape, it makes a lovely project for anyone who enjoys character-filled crochet.
One of the most interesting things about this design is the construction. Instead of crocheting the body, neck, and head as completely separate pieces, the main shape is worked almost continuously. The project begins with an oval base, gradually builds upward, and then narrows until part of the opening is closed to form the back while the remaining stitches continue into the neck and head.
That construction gives the finished chicken a very natural silhouette and also reduces the amount of sewing required later. Once the main body is complete, the separate wings and small facial details bring the character to life.
The wings are a particularly cute feature. They begin as simple crochet circles, are folded in half, and then finished with a scalloped edge. Leaving that decorative edge slightly free instead of sewing it completely flat gives the chicken a softer, more dimensional appearance.
The little details make a big difference too. A raised comb along the top of the head, a tiny pointed beak, and small wattles underneath help turn a simple crocheted shape into a recognizable little hen. Changing these colors is an easy way to give every finished version its own personality.
Color choice can completely transform the project. Traditional white, cream, brown, rust, and red create a classic farmhouse look, while pastel shades can turn the same pattern into a sweet Easter decoration. You could even make several chickens in different colors and create a small handmade flock.
This Crochet Chicken Pattern can work beautifully as seasonal décor, a shelf decoration, a handmade gift, or part of a larger farm-themed crochet collection. A few finished chickens arranged together would also make an adorable centerpiece for spring or Easter.
The project is also a nice opportunity to practice several useful amigurumi techniques, including crocheting around both sides of a foundation chain, working in continuous rounds, shaping with increases and decreases, joining two layers together, stuffing, and sewing dimensional pieces in place.
Taking your time with the shaping stage is especially worthwhile. Before closing the upper body, check that the back is aligned correctly and that the remaining neck opening sits where you want the head to rise. Small adjustments at this point can make the finished chicken look much more balanced.
When positioning the wings, pinning them temporarily before sewing can also help. Looking at the chicken from the front and both sides makes it easier to keep the wings at the same height and avoid an uneven final pose.
This adorable Crochet Chicken Pattern is worked almost entirely as one piece. The body begins with an oval base, gradually narrows toward the top, and is then partially closed to form the chicken’s back. The remaining stitches become the neck and head.
The wings are crocheted separately and sewn onto the body, while the comb, beak, and wattles are added directly to the finished head.
Materials
Medium / worsted weight yarn for the body
Small amounts of contrasting yarn for:
wings, if desired
comb
beak
wattles
3.75 mm crochet hook
Fiberfill stuffing
Safety eyes
Stitch marker
Yarn needle
Scissors
The reference pattern uses a 3.75 mm hook and places the safety eyes between Rounds 23 and 24.
Abbreviations
MR – magic ring
ch – chain
sc – single crochet
hdc – half double crochet
dc – double crochet
sl st – slip stitch
inc – 2 sc in the same stitch
dec – invisible single crochet decrease
st / sts – stitch / stitches
Rnd – round
FO – fasten off
Important Notes
The body is worked in continuous spiral rounds.
Do not join the rounds unless specifically instructed.
Place a stitch marker in the first stitch of every round and move it upward as you work.
The first five rounds are worked around both sides of the foundation chain to create an oval.
Stuff gradually. The chicken should feel firm enough to hold its shape, but not so tightly stuffed that the stitches stretch apart.
Body
Using the main body color:
Round 1
Ch 15.
Beginning in the second chain from the hook:
inc in first ch
sc in next 12 ch
work 4 sc in final ch
Now rotate the foundation chain so you can crochet along the unused loops on the opposite side.
sc in next 12 ch
inc in the final foundation chain
32 sts
What just happened?
You have crocheted completely around the foundation chain.
The groups of increases at both ends create the rounded ends of the oval.
Do not turn.
Round 2
Work:
inc in each of next 2 sts
sc in next 12 sts
inc in each of next 4 sts
sc in next 12 sts
inc in each of final 2 sts
40 sts
Round 3
Repeat the following shaping:
(sc, inc) ×2
sc in next 12 sts
(sc, inc) ×4
sc in next 12 sts
(sc, inc) ×2
48 sts
Round 4
Work:
(2 sc, inc) ×2
sc in next 12 sts
(2 sc, inc) ×4
sc in next 12 sts
(2 sc, inc) ×2
56 sts
Round 5
Work:
(3 sc, inc) ×2
sc in next 12 sts
(3 sc, inc) ×4
sc in next 12 sts
(3 sc, inc) ×2
64 sts
Your base should now look like a large oval.
Building the Body
Rounds 6–13
Sc in every stitch around.
64 sts for each round
Work a total of 8 even rounds.
At this point the flat oval will begin forming the walls of the chicken’s body.
Shaping the Upper Body
Round 14
Work:
dec
sc in next 28 sts
dec ×2
sc in next 28 sts
dec
60 sts
The decreases are positioned around both ends of the oval so the body begins narrowing symmetrically.
Round 15
Sc around.
60 sts
Round 16
Repeat:
8 sc, dec
around.
54 sts
Round 17
Repeat:
7 sc, dec
around.
48 sts
Round 18
Sc around.
48 sts
Round 19
Repeat:
6 sc, dec
around.
42 sts
Round 20
Sc around.
42 sts
Begin Stuffing
Start adding fiberfill now.
Stuff mainly into the lower and middle body.
Do not completely fill the upper opening yet because you still need to manipulate the stitches when forming the back.
Round 21
Repeat:
5 sc, dec
around.
36 sts
The reference construction follows the progression 64 → 60 → 54 → 48 → 42 → 36 before the top is folded and partially joined.
Forming the Back and Neck
This is the part that was much too vague in the other version.
You currently have 36 stitches around the opening.
Flatten the upper opening so that you have:
18 stitches along the front layer and 18 stitches along the back layer.
Make sure the sides of the chicken are aligned.
You are going to close only half of this flattened opening.
Back Seam
Starting at one outer edge, insert the hook through:
1 stitch from the front layer
and the corresponding stitch directly behind it.
Work 1 sc through both layers together.
Repeat across 9 pairs of stitches.
You will make:
9 sc through both layers
This uses 18 of the original 36 stitches.
Important
Do not continue closing the rest.
The other 18 stitches must remain open.
Those stitches form the neck opening.
Round 22 — Neck
Place the stitch marker in the first unjoined stitch.
Work 1 sc in each of the 18 remaining stitches around the opening.
18 sts
This is the missing Round 22 that explains why the next published instructions suddenly begin at Rounds 23–24. The fuller source explicitly identifies these remaining 18 stitches as the beginning of the head.
The piece should now have:
a closed section forming the back;
a smaller circular opening rising from the opposite side.
That opening becomes the neck/head.
Add a little more stuffing to the body before continuing if necessary.
Head
Round 23
Sc around.
18 sts
Round 24
Sc around.
18 sts
Do not close the head yet.
Adding the Eyes
Insert the safety eyes between Rounds 23 and 24.
Leave approximately 3 stitches between the eyes.
Before locking the backs permanently, look at the chicken from the front and make sure:
both eyes are level;
the back seam is behind the head;
the face is centered.
The reference specifies this same eye placement.
Now add stuffing to the neck and head.
Do not overstuff the head or the eye area may distort.
Closing the Head
Round 25
Repeat:
sc, dec
around.
12 sts
Add the final amount of stuffing.
Shape the head with your fingers.
Round 26
Dec ×6.
6 sts
FO, leaving a short tail.
Thread the yarn tail through the front loops of the final 6 stitches.
Pull firmly to close.
Secure and weave the yarn tail into the head.
Wings
Make 2.
The wings begin as flat circles and are then folded in half.
Using the wing color:
Round 1
6 sc in MR.
6 sts
Round 2
Inc in every stitch.
12 sts
Round 3
Repeat:
sc, inc
around.
18 sts
Round 4
Repeat:
2 sc, inc
around.
24 sts
Do not fasten off.
Folding the Wing
Fold the circle exactly in half.
You should now have 12 stitches along each layer.
Insert the hook through one stitch from the front layer and the corresponding stitch from the back layer.
Work sc through both layers.
Continue across.
12 sc
The piece should now resemble a semicircle.
Do not cut the yarn.
Scalloped Wing Border
Ch 2.
Across the 12 joined stitches, repeat:
3 hdc in next st, sl st in next st
a total of 6 times.
This uses all 12 stitches and creates six small scallops along the curved edge.
FO, leaving a long tail for sewing.
Repeat for the second wing.
The original construction uses the same folded circular wing with a six-repeat hdc scalloped edge.
Positioning the Wings
Place one wing on each side of the chicken.
The straight folded edge sits against the body.
The scalloped edge should face outward/downward.
Position the top of each wing approximately 2–3 rounds below the upper back/head area.
Before sewing, pin both wings in place and check the chicken from the front.
They should sit at approximately the same height.
Using the long yarn tail, sew along the straight upper edge of each wing.
Do not sew the scallops flat.
Leaving them loose gives the wings more dimension.
Comb
Use red, burgundy, pink, or your chosen comb color.
The comb is worked directly onto the top of the head.
Locate the center line of the head.
Attach the yarn approximately one round behind the eye line, at the top center.
First Comb Bump
Ch 3.
Work 1 dc into the first chain made, creating a small rounded loop/bump.
Anchor it to the head with a sl st slightly farther toward the back.
Second and Third Bumps
Repeat the same sequence twice more:
Ch 3, dc into first ch, sl st to the head
You should have 3 raised comb sections running from the front toward the back of the head.
FO securely.
Placement Tip
The comb should follow the center ridge of the head rather than sitting horizontally from side to side.
Beak
Use yellow, orange, or mustard yarn.
Locate the midpoint between and slightly below the eyes.
Attach the yarn.
Ch 2.
Work 1 sc into the first chain made — the chain closest to the head.
This creates a tiny pointed beak.
Sl st back into the attachment point if needed to secure it.
FO and weave the ends inside the head.
Beginner Tip
Do not make the beak too tight.
Allow the little chain-and-sc section to sit slightly away from the face so it forms a visible point.
Wattles
Using red or the same color as the comb:
Attach yarn directly below the beak.
First Wattle
Ch 2.
Sl st into the first chain.
Second Wattle
Ch 2 again.
Sl st into the same attachment point on the head.
FO securely.
You should have two tiny loops hanging beneath the beak.
Final Stuffing and Shaping
Gently massage the stuffing through the body.
The finished chicken should have:
a broad oval lower body;
a gently narrowed upper body;
a defined back seam;
a raised neck/head;
two dimensional wings.
If the chicken leans slightly, redistribute the stuffing with your fingers rather than adding significantly more.
Final Assembly Check
Before weaving in the final ends, check:
Body
Oval base lies evenly.
Back seam is secure.
Neck rises from the opposite side of the seam.
Face
Eyes are level.
Beak is centered.
Wattles sit directly underneath.
Comb follows the top-center line.
Wings
Both are positioned at similar heights.
Scalloped edges remain loose.
Optional Customizations
You can easily change the personality of the chicken by using:
cream or beige for a farmhouse-style hen;
white with a bright red comb;
brown or rust tones;
pastel colors for Easter;
black or charcoal for a dramatic version;
multicolored wings made from leftover yarn.
You can also embroider tiny eyelashes or eyebrows instead of using only safety eyes.
Safety Note
If the chicken is intended for a baby or very young child, avoid plastic safety eyes.
Use black yarn to embroider the eyes instead.
Secure every sewn piece carefully and check that no yarn tails remain loose.
Beginner Troubleshooting
The oval base is twisting: Make sure you worked along both sides of the foundation chain and placed the increases at the curved ends.
The stitch marker keeps moving: That is normal when working in a spiral. Keep moving it into the first stitch of each new round.
I have the wrong number before forming the back: Stop before folding. Round 21 must finish with 36 stitches.
I don’t understand why only 9 sc close the back: Each of those 9 sc goes through two stitches at once — one from each layer. Therefore 9 joined stitches consume 18 of the 36 stitches, leaving exactly 18 for the neck.
The head is off-center: The folded opening probably was not aligned before making the 9-stitch back seam. Undo that seam and flatten the body again before continuing.
My wings curl: A slight curve is fine. If they curl severely, your tension may be too tight.
VIDEO TUTORIAL
For a softer handmade look, the wings can be made in a contrasting shade or even with leftover yarn from another project. The scalloped edging adds enough detail that even a simple two-color combination can look very polished.
We hope you enjoy making this Crochet Chicken Pattern and experimenting with your own colors and finishing details. It’s one of those projects that starts with very simple crochet shapes and gradually turns into a surprisingly expressive little character.
Thank you for visiting Grandma’s Crafts! Be sure to explore the other crochet patterns and handmade ideas available on the blog for more seasonal projects, cute characters, and creative inspiration.