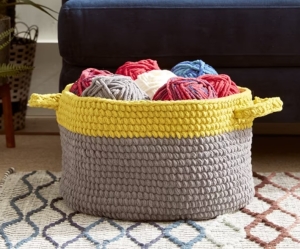
Don’t worry if you’re still learning, this is a wonderfully forgiving and beginner-friendly project 💛
Materials
You will need:
Super bulky yarn (such as blanket yarn)
Two colors: one main color and one contrast color
Crochet hook US M/13 (9 mm)
1 stitch marker
Yarn needle
Finished size:
Approximately 14″ in diameter and 9½” tall (as shown on page 1 of the PDF)
Gauge
7 sc × 7 rows = 4″ (10 cm)
Worked with 2 strands of yarn held together
Using two strands helps the basket hold its shape nicely.
Stitches (US Terms)
ch = chain
sc = single crochet
sl st = slip stitch
You will be working in rounds, joining each round with a slip stitch.
BASE OF THE BASKET
Hold two strands of your main color together.
Ch 2
Round 1: Work 8 sc into the 2nd ch from hook. Join
Round 2: Ch 1, 2 sc in each stitch around (16 sts)
Round 3: 2 sc in next st, 1 sc in next st repeat
Round 4: 2 sc in next st, 1 sc in next 2 sts repeat
Continue increasing in this gentle pattern.
Each round adds more stitches evenly, helping your circle stay flat.
Continue until your base reaches the desired size (as described on page 1).
BUILDING THE SIDES
Now we begin to shape the basket walls.
Work one round in back loops only
This creates a natural fold, helping the basket stand upright.
After that:
Continue working sc in both loops around
HEIGHT
Keep working in rounds until your basket measures about 8 inches tall.
Use your stitch marker to keep track of where each round begins.
CONTRAST EDGE
Now join your contrast color (still holding two strands together).
Work a few rounds of sc
This creates that lovely “dip edge” look you can see in the photos on page 2.
HANDLE OPENINGS
Now we create spaces for the handles:
Work sc as usual
In a few places, ch 1 and skip 1 stitch
Repeat this evenly around the basket.
These small gaps will become the handle openings.
FINISHING THE BODY
Work another round or two of sc, placing stitches into both stitches and chain spaces
Fasten off
Your basket body is now complete, my dear.
HANDLES
Using the contrast color:
Chain a length for your handle
Thread the chain through one handle opening and out the other side
Join into a loop (be careful not to twist it)
Work sc all around the chain to strengthen it
Repeat for the second handle.
FINAL TOUCHES
Weave in all loose ends
Gently shape your basket with your hands
And just like that… your basket is ready
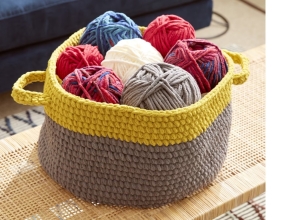
As you bring everything together, weaving in the ends and shaping the basket gently with your hands, you’ll begin to see how each step contributes to a piece that is both useful and made with care. Projects like this remind us that crochet is not only about creating items, but also about enjoying the peaceful moments we spend making them.
As we come to the end of this little journey, I hope this basket inspires you to keep exploring, creating, and filling your home with handmade warmth. Thank you for spending this time with me here at Grandma’s Craft, and I warmly invite you to explore our other articles, where many more cozy patterns and gentle inspirations are waiting just for you.
CROCHET BASKET PDF PATTERN
This little basket is more than just a project, it’s something made with patience, care, and love. It will hold not only your yarn, but also the quiet joy of the time you spent creating it.
Take your time.
Enjoy each stitch.
And always be proud of your work.